Working with Macros
|
| < Day Day Up > |
|
The most obvious benefit to creating macros in Excel is that you can automate repetitive tasks. While there’s a lot more to macros and Visual Basic for Applications than repeating a series of actions without the need for human intervention, it’s a great place to start. This section shows you how to record macros, run them using the method you find easiest, and use the built-in macro security capabilities to guard against viruses.
Recording and Viewing Macros
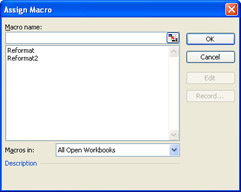
Recording a macro in Excel 2003 is a straightforward process: you click Tools, Macro, Record New Macro to display the Record Macro dialog box (depicted in Figure 3-1).
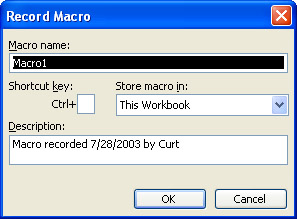
Figure 3-1: The Record Macro dialog box provides an interface for managing the macros in your workbook.
Type the name of the macro you want to create into the Macro Name box, and click OK. The Record Macro dialog box will go away, to be replaced by the Stop Recording toolbar.
![]()
You’re recording! Perform the actions you want to be included in your macro, click the Stop Recording button on the Stop Recording toolbar, and your macro is ready for use. As with any programming effort, you should plan what you want to do so you can do it as quickly and efficiently as possible. You should also practice the macro a few times so you are sure your actions generate the desired result.
When you’re done recording a macro, you can view the VBA code Excel created by clicking Tools, Macro, Macros, <macro_name>, Edit. Your macro will appear in the Visual Basic Editor, as shown in Figure 3-2.
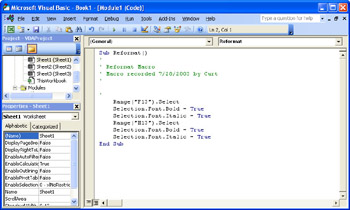
Figure 3-2: You can view the code behind a macro in the Visual Basic Editor.
| Note | You’ll see a lot more of the Visual Basic Editor in Chapter 4, “VBA Programming Starter Kit." |
This macro applies bold and italic formatting to the contents of the selected cell and to the contents of cell H13. Another aspect of this particular macro is that it was supposed to work for the active cell and the cell two columns to its right, but instead affects the active cell and cell H13. The reason that happened for this macro is that the macro recorder was using absolute references, which reflect the names of the cells selected during macro recording, instead of relative references, which reflect the positions of the selected cells in relation to the active cell when you start recording the macro. You can change your macro from absolute references to relative references by clicking the Relative References button on the Stop Recording toolbar. Figure 3-3 shows the same macro recorded using relative references.
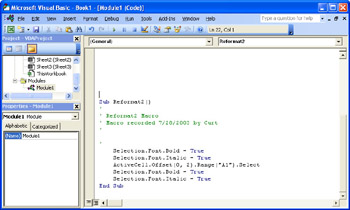
Figure 3-3: A more flexible macro that works on any set of cells, not just the cells selected when the macro was recorded.
For more information on creating relative references using the Offset property, see “Referring to Ranges” in Chapter 8: “Ranges and Cells".
Running a Macro
Once you’ve created a macro, you can run it at any time by clicking Tools, Macro, Macros, <macro_name>, Run. Also, in the Macro dialog box, you can display the macros available in other workbooks by clicking the arrow next to the Macros In box and selecting a workbook by name or by selecting All Open Workbooks, which will display every macro in any open workbook. If you select either of those choices, the macro names displayed will include the name of the workbook in which the macro is stored.
| Tip | Running Macros Automatically |
There are several other ways you can run a macro in Excel, though they require you to assign the macro to an action a user can take. Those actions are:
-
Pressing a key sequence.
-
Linking a macro to a toolbar button.
-
Linking a macro to a menu item.
Assigning a Macro to a Key Sequence
For readers who prefer to use keyboard shortcuts such as Ctrl+C (for copying) when you use Excel, you can assign macros to key sequences. It’s important to remember that if you assign a macro to a key sequence that’s already taken (for example, Ctrl+S, which saves a workbook), the new assignment will take precedence over the default behavior in the workbook where the assignment was made.
To assign a key sequence to a macro, follow these steps:
-
Click Tools, Macro, Macros.
-
In the Macro name box, select the name of the macro to which you want to assign to a keyboard shortcut key.
-
Click Options.
-
Type a letter in the Shortcut key box. Typing a lowercase letter lets you use Ctrl+letter, while typing an uppercase letter lets you use Ctrl+Shift+letter as the shortcut.
Note The shortcut key must be a letter; you can’t pick a number or special character such as the dollar sign ($) or ampersand (&).
-
Type a description for your macro in the Description box.
-
Click OK.
-
Click Cancel.
Assigning a Macro to a Toolbar Button
Running a macro from inside the Macros dialog box is the easy “built-in” way to do it, but when you’re moving quickly through a worksheet, the last thing you want to do is dig through the menu system to open a dialog box, remember the name of the macro you want to run, and run it. It’s much simpler to assign the macro to a toolbar button so you can run the macro with a single click of the mouse. You can add a new toolbar button to an existing toolbar, but it usually makes more sense to create a new toolbar to hold the buttons for your macros. If you have your monitor set at a relatively low screen resolution to avoid eyestrain, for example, there won’t be much room on any of the standard toolbars for another button. Also, if you have toolbar buttons for more than one macro, it might be difficult to pick the button out of a crowd on a densely populated toolbar. If you put your macro toolbar buttons on a toolbar clearly labeled as your custom macro toolbar, you’ll have a much easier time finding your macros and remembering which button is which.
To create a new toolbar, add a button to it, and assign a macro to the button, follow these steps:
-
Click Tools, Customize. Then, if necessary, click the Toolbars tab to display the Toolbars tab page of the Customize dialog box.
-
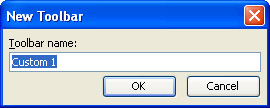
Click New. Then, in the Toolbar Name box, type the name of the new toolbar and then click OK to create the toolbar.
-
In the Customize dialog box, click the Commands tab.
-
In the Categories list, click Macros.
-
Drag the Custom Button command to your new toolbar.
-
On the new toolbar, right-click the button you just added, click Name, type a name for the button, and press Enter.
-
On the Custom Macros toolbar, right-click the new button and click Assign Macro.
-
Select the macro you want to assign to the toolbar button and click OK.
-
In the Customize dialog box, click Close.
Assigning a Macro to a Menu Item
Just as you can create toolbars to hold toolbar buttons that run your macros, you can create custom menus to serve the same purpose. While toolbars and menus are functionally equivalent, there are two possible arguments in favor of adding a macro to a menu instead of a toolbar. The first argument is that there is usually room to add a new menu to the main menu bar. Also, because menus don’t display their full contents until you open them, menu items don’t take up valuable real estate on a toolbar in the Excel window. The second argument in favor of using menus over toolbars comes down to personal preference. If you like using the menu system, assign your macros to menu items; if you prefer to use toolbar buttons, create a new toolbar.
To assign a macro to a menu item, follow these steps:
-
Click Tools, Customize. If necessary, click the Commands tab.
-
In the Categories list, click New Menu and drag the new menu to the right end of the main menu bar.
-
Right-click the new menu, and click Name. Type your new menu name, and press Enter.
-
In the Categories pane of the Customize dialog box, click Macros.
-
In the Command list, drag the Custom Menu Item command to the head of your new menu. When a box appears under the new menu head, drag Custom Menu Item onto it.
-
On the new menu, right-click Custom Menu Item and then click Name.
-
Type a new name for the menu, and press Enter.
-
On the new menu, right-click the menu item you just renamed and click Assign Macro. Then, in the Assign Macro dialog box, click the name of the macro you want to assign to the menu item and click OK.
-
Click Close.
Debugging a Macro
Part of the art of writing and recording macros is debugging, or the process of discovering why your VBA code isn’t working the way it should. The Visual Basic Editor provides quite a few tools for you to use in testing a macro you’ve recorded or written. One interesting technique you can use to debug your code is to step through the code one instruction at a time.
-
To start the process, click Tools, Macro, Macros, <macro_name>, Step Into to display the macro in the Visual Basic Editor.
-
From within the editor, press F8 to execute the next macro instruction. As shown in Figure 3-4, an arrow will appear beside the next instruction to be executed, and the instruction itself will be highlighted.
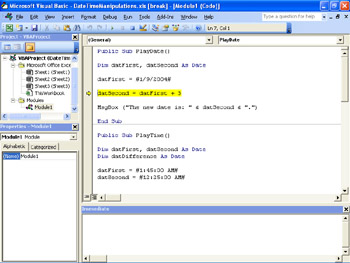
Figure 3-4: The Visual Basic Editor shows you which line of code will be executed next.
Subsequent presses of F8 will execute the highlighted step in the macro and highlight the next step, if any. There are a number of other ways you can control how your macro executes. Table 3-1 lists those keyboard shortcuts and offers a brief description of what each shortcut does.
| Sequence | Result |
|---|---|
| F5 | Runs the macro code. |
| F8 | Executes the highlighted step in the macro code and moves the highlight to the next step in the code. |
| Shift+F8 | Skips the highlighted step and moves the highlight to the next step in the code. |
| Ctrl+Shift+F8 | Stops executing the macro code. |
| Ctrl+F8 | Positions the cursor in the macro code; pressing Ctrl+F8 causes the editor to run the code until it reaches the cursor. |
| Shift+F9 | Sets a quick watch to follow the value of a selected variable in the code. |
| F9 | Inserts a breakpoint at the cursor, which will allow the code to execute to that point but then stop. |
| Ctrl+Shift+F9 | Clears all breakpoints. |
| Ctrl+F9 | Identifies the selected statement as the next statement to execute. |
When your macro runs but doesn’t produce the result you’re expecting, it makes the most sense to have your macro code in one window and your worksheet in another, and to step through the macro one line at a time using F8. Skipping steps with Shift+F8 lets you bypass any instructions that you know aren’t operating correctly, and if things aren’t going right at all and you want to stop before anyone gets hurt, Ctrl+Shift+F8 lets you stop the whole process. You don’t undo any of the steps that occurred before you pressed Ctrl+Shift+F8, but you do prevent any additional code from running.
| Caution | When you’re running and re-running a macro, don’t forget to undo the changes the macro made to your worksheet. If you don’t, you won’t see any changes the next time you run it. |
A breakpoint, by contrast, is a set stopping point that lets you run the code up to the breakpoint. You can continue past the breakpoint by pressing F5. As shown in Figure 3-5, the Visual Basic Editor indicates the presence of a breakpoint by putting a dot in the vertical bar at the left edge of the code window, and displaying the code in reverse video.
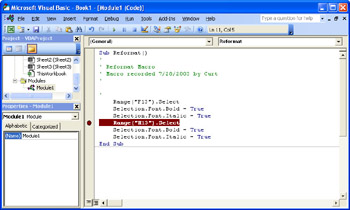
Figure 3-5: Breakpoints let you run your code to a specific point before you step through it line by line.
Implementing Macro Security and Digital Signatures
Viruses and other forms of harmful software (sometimes called malware) are a fact of life you have to deal with when you work with a powerful and flexible programming language such as VBA. You should already have a virus checking program or two installed on each of your computers to act as the first line of defense against macro viruses (viruses written using a macro programming language), but new viruses pop up all the time and it’s possible that your detection programs won’t recognize newer threats. After your second line of defense, which is you casting a critical eye on every file you receive, expected or not, you have the Excel macro security settings.
| Tip | Avoid Running Auto Macros |
The Excel macro security settings determine how permissive Excel should be about allowing macros to be run on your computer. There are three macro security settings: High, Medium, and Low, which you can control by clicking Tools, Options, Security, Macro Security to display the Security dialog box.
You should cross the Low option off your list of acceptable macro security settings; even if you have an all-but-foolproof virus scanner, allowing even one virus to get through is one too many. No software can know what files you are or aren’t expecting, so you need to make sure there’s an active human in the security loop. That human is you.

The next-higher security level is Medium, which means Excel will display a dialog box asking if you want to enable macros whenever you try to open a workbook that contains macros. Clicking Enable Macros will open the workbook and allow you to run the macros in the workbook, clicking Disable Macros will open the workbook but prevent the macros from being run, and clicking Cancel will prevent the workbook from being opened. If you work with a lot of macros, are the only person who uses your computer, and you are confident you will remember not to click Enable Macros if an unexpected file, or a file you didn’t expect to contain macros, appears in your e-mail In box or a shared folder, you can use the Medium setting. If you share your computer with other users, or if you go away on vacation and want to be a bit cautious about what can and can’t be done on your computer, you should strongly consider changing the macro security level to High. You can always switch back to Medium when you return.
Introducing Digital Signatures
The mechanics of the High security setting relies in part on the use of digital signatures to verify the source of the VBA code in a workbook. A digital signature is the result of an operation using the principles of public-key encryption techniques to create a unique combination of the signed material and a file that is known only to you, but the result of which can be verified as having been signed by you. The mathematics are quite complex, relying on group theory and other disciplines only a handful of researchers really understand, but here’s a synopsis of how it works.
The first step is for you to generate a key that will be used to encrypt your data by adding the values in the key to the values in the text. A simple example would be if your key were a and the word to be encrypted were kazoo. If you “add” a, the first letter in the alphabet, to each letter in kazoo, you will increment the letter by one place, resulting in the encrypted word lbapp. The key you’ll actually generate is much, much longer, and it’s split into two pieces: a public half and a private half. The private half, called your private key, is to be kept secret; you don’t need to share it with anyone else, and anyone who asks you to do so does not have your best interests at heart. You can and should distribute the public half, called the public key, to anyone with whom you will exchange digitally signed files. The trick behind public- key encryption is that anyone who has a copy of your public key can verify that a document you signed using your private key is from you and is unchanged since you signed it. It’s important to note that anyone who attempts to sign a file using your public key will not appear to be you.
Depending on the encryption software package you use, you might be able to use your public-key and private-key pair to digitally sign workbooks and macro code that you distribute over your internal network. The problem with using keys that aren’t distributed outside your organization is that no one outside your network will have any idea whether your signature is valid or not. If you need to work with individuals outside your corporate network, you can obtain a digital certificate from a trusted third-party vendor. A digital certificate is an electronic file that identifies you, and contains information such as your organization name, the certificate’s issuing authority, your e-mail address and country, and the certificate’s expiration date, and it has a copy of your public key. After you sign a document using a digital certificate, anyone who wants to verify that the certificate used to sign the document belongs to you can go to the key server maintained by the issuing authority and match the signature to your public key.
Digital Certificates: You Can Even Create Your Own
There was a lot of competition in the digital certificate market in the latter half of the 1990s, as various companies vied for a share of the trusted authority pie. At the end of the decade, two companies stood out: VeriSign, and Thawte Consulting. In December 1999, VeriSign ended the competition by buying Thawte, consolidating the two largest digital certificate providers under a single corporate umbrella. You can visit the companies at http://www.verisign.com/ or http://www.thawte.com/ to get a feel for the products and services they offer.
While Thawte and VeriSign are the leaders in the digital certificate market, you should pay close attention to the disclaimers they have in their standard contract. While they make their best effort to verify the identity of the individuals and organizations that purchase digital certificates, they do not warrant that their methods are infallible and, in fact, require you to hold them harmless should someone evade their verification procedures and assume a false digital identity.
Digitally Signing Workbooks and Macros
After you have acquired a digital certificate, you can sign a workbook by clicking Tools, Options, Security, Digital Signatures, Add, <certificate_name>, OK. After you click Add, the Select Certificate dialog box (shown in Figure 3-6) appears with a list of unexpired certificates available on your computer. You can then click the name of the certificate with which you want to sign your workbook (or click View Certificate if you want to view the details of the certificate in case some of your certificates have similar names) and click OK to sign your workbook.
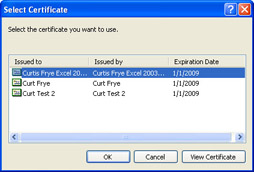
Figure 3-6: The Select Certificate dialog box lists the certificates available for digitally signing a workbook.
The process for signing code in the Visual Basic Editor is similar to signing a workbook. To sign the VBA code associated with a workbook, you click Tools, Macro, Visual Basic Editor. In the Visual Basic Editor, click Tools, Digital Signature, Choose, select a <certificate_name>, and click OK. Unlike the Select Certificate dialog box that appears when you sign a workbook, the Select Certificate dialog box that appears when you sign your VBA code lets you use a certificate that has expired. Listing expired certificates is an odd choice because, as you’ll see in the next section, signing a macro with an expired certificate is equivalent to not signing it at all.
| Note | After the author of this chapter (Curt Frye) signed a macro using an expired certificate, a warning box appeared about two minutes later indicating there was a problem with the digital certificate and that the signature would be discarded. It would be better not to list expired certificates at all, but detecting the problem before the code could be sent out is an acceptable workaround. |
Using Digital Signatures with the High Macro Security Setting
The preceding discussion of digital signatures sets the stage for discussing the High macro security level. When you have your macro security level set to High, Excel is extremely cautious about allowing any macros to run. If Excel doesn’t recognize the source that signed the macros in the workbook you’re trying to open, the security routine will either require your permission to trust the source that signed the macro or will disable macros entirely.
You can add a trusted source to Excel by opening the file that contains the digitally signed macros from the developer that you want to add to the list. A Security Warning box will appear, indicating the publisher is not on the trusted list. To add the publisher to the list of trusted sources, select the Always Trust Macros from this Publisher check box and click Enable Macros.
| Note | Your network administrator can prevent users from adding sources to the list of trusted sources, so you might need to ask your administrator to add new developers to the list. |
There are a number of scenarios under which digital signatures and macros can interact with Excel when the macro security level is set to High; Table 3-2 summarizes those situations and the effect of the High security setting.
| Circumstance | Reaction |
|---|---|
| The macro does not have a digital signature. | Excel disables macros and opens the workbook. |
| The macro has a valid signature from a trusted source. | Excel enables macros and opens the workbook. |
| The macro has a valid signature from an unknown source. | Excel displays information about the certificate used to sign the macro and, if not disabled by a network administrator, asks if you want to trust the source and the certification authority. |
| The macro has an invalid signature, indicating the file might have been corrupted by a virus. | Excel disables macros and warns you there might be a virus. |
| The signature can’t be verified because the public key is missing or can’t be found on a key server. | Excel disables macros and indicates it was unable to verify the signature. |
| The macro was signed with a certificate that has either expired or has been revoked. | Excel disables macros and indicates the certificate is invalid. |
|
| < Day Day Up > |
|
EAN: 2147483647
Pages: 161