13.2 System V Printing
| The System V printing system is used on a wide range of Unix systems, from microcomputers with a single printer to high-end mainframes with many printers. Among the operating systems we are considering, the System V printing facility is used by HP-UX and Solaris.
13.2.1 User CommandsThe System V spooling subsystem provides several user commands for submitting and managing print jobs:
All of these commands are supported by AIX as an alternate interface to its own queuing system. 13.2.1.1 The system default printerThe lp command includes a -d option for specifying the desired destination:printer or printer class (see below). If it is omitted, the destination designated in the LPDEST environment variable is used. If this variable is not set and -d is not included on a command, the system default printer is used. This is set by the system administrator using the lpadmin command, as in this example which makes PS2 the default destination: # lpadmin -dPS2 The lpstat command's -d option may be used to list the system default destination: $ lpstat -d system default destination: PS2 13.2.1.2 Device classesWhen initiated by the lp command, print requests are sent to the queue for a destination. Destinations may be either a specific printer (or other device) or a deviceclass, which provides a mechanism to group similar devices and declares them to be equivalent to and substitutable for one another.[5] For example, all of the laser printers can be grouped into a class laser, users may then spool a print request to destination laser, and it will be printed on the first available device in that class. All devices within a device class share a single queue.
The lp command places a print request into a queue, either for a specific device or a class containing several devices. Sometime later, the print service daemon, lpsched, actually sends the job to the printing device. We'll discuss how to place specific printers into device classes later in this section. 13.2.1.3 Getting status informationThe lpstat command can provide status information about current printing queues and devices. Table 13-4 lists lpstat's most useful options.
All lists are comma-separated; enclose them in quotes if they contain special characters that have meaning to the shell. For all options, if the list is omitted, all entities of the specified type are assumed. For example, the command # lpstat -uchavez,jones lists all jobs belonging to users chavez and jones, while lpstat -u lists all jobs belonging to all users. Similarly, lpstat -c may be used to list the members of all defined classes. Without any options, lpstat displays all requests that were submitted by the user executing the lpstat command (it is thus equivalent to lpstat -u$USER). For example, the following command lists all jobs in the queue for printer PS: $ lpstat -oPS PS-1139 chavez 89427 May 25 07:19 on PS PS-1140 harvey 302052 May 25 07:21 PS-1141 stein 58357 May 25 07:26 PS-1142 stein 9846 May 25 07:26 The following command displays the current status of destinations PS and PS2: $ lpstat -pPS,LP2 printer PS now printing PS-1139. enabled since May 13 22:12 printer LP2 is idle. enabled since May 13 22:12 The following command indicates whether the queue for device class laser is accepting new jobs or not: $ lpstat -alaser laser accepting requests since Jan 23 17:52 The following command displays the special file used as an interface for PS: $ lpstat -vPS device for PS: /dev/tty0 13.2.2 Manipulating Individual Print RequestsUnder System V, the system administrator may cancel any pending job using the cancel command, which takes either the request IDs of the jobs to be cancelled or a list of one or more printers as its argument. In the first case, the specified requests are cancelled, even if they are currently printing; in the second case, whatever request is currently printing on each indicated printer is terminated. Other useful options to cancel in conjunction with a printer list allow you to remove multiple requests via a single operation: -a removes all requests belonging to the user who executes the command for the listed printer, and -e (for everything) removes every job in the queue. The -i option limits the operation to local print jobs, and the -u option limits the operation to requests belonging to the user specified as its argument. The -u option may be specified multiple times to select more than one user. For example, the following command cancels all jobs belonging to users chavez and harvey on printers PS2 and PS3: # cancel PS2 PS3 -uchavez -uharvey Pending print jobs may also be moved between printqueues with the lpmove command, which has the following syntax: # lpmove request-IDs new_dest # lpmove old_dest new_dest The first form moves the specified jobs to the new destination designated as the command's final argument; the second form moves all jobs currently queued for old_dest to new_dest (useful when a printer has gone down and an alternate is available). Note that if old_dest and new_dest are printers in the same class, then an lpmove is not necessary: since the same queue feeds both devices, jobs will automatically be routed to the second printer if the first one goes down. On the other hand, if old_dest is currently up and running, the lpmove command has the side effect of disabling that queue as well as moving all jobs within it. In many implementations (including HP-UX but not Solaris), lpmove can only be used when the printing service is shut down (how to do so is discussed later in this section). 13.2.3 Managing QueuesIn the System V printing subsystem, queues are controlled via two pairs of commands: accept and reject, and enable and disable. The accept and reject commands may be used to permit and inhibit spooling to a print queue; both take a list of destinations as their argument. With its -r option, reject may also specify a reason for denying requests, which will be displayed to users attempting to send jobs to that queue. For example, the following commands close and then reopen the queue associated with the printer PS: # reject PS # accept PS The following command closes the queue for the destination class laser: # reject -r"There is no paper in the entire building..." laser accept and reject don't affect whether pending jobs continue to print or not. The enable and disable commands are used to control the status of a particular printing device. They both take a list of printers as their arguments; in this case, since actual devices are being controlled, destination classes are not valid arguments. disable also has a -r option to allow an administrator to specify a reason that a printer is going down. It also has a -c option, which automatically cancels any jobs that are currently printing on the specified device(s). By default, jobs printing when the disable command is executed will be reprinted on another printer in the same class (if any) or when the device comes back up. For example, the following commandsdisable and then reenable the device PS: # disable -r"Changing toner cartridge; back by 11" PS # lpstat -pPS Printer PS disabled since May 24 10:53 - Changing toner cartridge; back by 11 # enable PS 13.2.4 Starting and Stopping the Print ServicePrint requests are actually handled by the lpsched daemon, which is started automatically at system boot time. The commands look something like these: if [ "$LP" -eq 1 -a -s /var/spool/lp/pstatus ]; then ps -ef | grep lpsched | grep -iv grep > /dev/null 2>&1 if [ $? = 0 ]; then /usr/sbin/lpshut > /dev/null 2>&1 fi rm -f /var/spool/lp/SCHEDLOCK /usr/sbin/lpsched && echo line printer scheduler started fi These commands first verify that the printing subsystem is enabled in the startup configuration files (LP is set to 1 for this HP-UX system) and that the subsystem's status file exists and is not empty. Then the process list is examined to determine whether lpsched is already running; if it is, the lpshut command is used to terminate it gracefully. Check to make sure the server startup and shutdown programs are available. Next, lpsched's lock file is deleted (this file ensures that only one instance of lpsched is running at a time), and then the new daemon is started (which will create its own lock file). If lpsched starts successfully, a message is printed to standard output. The -r option to lpstat may be used to determine if the print scheduling daemon is running: $ lpstat -r scheduler is running As we've seen, the printing service may be shut down with the lpshut command. This command disables all devices but does not prevent requests from being added to queues. The print service may be restarted by rerunning the appropriate boot script, as in this HP-UX example: # lpshut # /sbin/init.d/lp start If you kill lpsched using any other method, or if it crashes, you may need to remove its lock file manually (/var/spool/lp/SCHEDLOCK) if the boot script does not do this for you. As we've seen, the administrative commands for the System V spooling system generally reside in /usr/sbin. 13.2.5 Managing Printers and Destination ClassesThe lpadmin command is used to define and modify the characteristics of printer devices and classes. It should only be used for such purposes when lpsched has been stopped with lpshut. The -p option is used to specify the printer to be affected by the lpadmin command. -p may be used on every lpadmin command. lpadmin also has many other options designed to perform various administrative functions within the spooling system. 13.2.5.1 Defining or modifying a printerIn its most basic form, the lpadmin command defines a printer by specifying its device file and model definition: lpadmin -pprinter -vspecial-file interface-option where printer is the name for the printer and special-file is the pathname to the special file through which the system communicates with the printer. If the specified printer already exists, its definition is modified; otherwise, a new printer is created. The interface option has one of the following forms:
The purpose of these options is to specify which printerinterface program is to be used with the new printer. A printer interface is a shell script that performs the various tasks necessary to prepare the printer for printing and then spools the desired files to the device. When a printer is defined, its interface program is copied to the directory /var/spool/lp/interface into a file having the same name as the printer. The easiest option to use is -e, which says to use the same interface as an existing printer. For example, the following command defines a new printer PS4, attached via /dev/ttd2; it is the same model as the existing printer PS3: $ lpadmin -pPS4 -ePS3 -v/dev/ttd2 For a new printer type, you may find an appropriate interface program already on the system since modern operating systems usually provide many of them (stored in /var/spool/lp/model). Interface programs are also often available from the manufacturer of the printer. The -m option specifies the filename of an interface program stored in /var/spool/lp/model. For example, the following command defines a new printer named Workhorse, which will use the interface program named laserjet4 and is attached to the computer via /dev/ttd5: $ lpadmin -pWorkhorse -v/dev/ttd5 -mlaserjet4 This command will create a copy of /var/spool/lp/model/laserjet4 as /var/spool/lp/interface/Workhorse. Finally, the -i option may be used to specify the path to the desired interface program explicitly. 13.2.5.2 Deleting printersThe -x option to lpadmin removes the definition of a printer from the system. For example, this command removes the printer Slow from the system: # lpadmin -xSlow 13.2.5.3 Managing device classesThe -c option to lpadmin is used to place a printer into a class. For example, the command: # lpadmin -pPS2 -claser will add the printer PS2 to the class laser, creating the class if it does not already exist. Similarly, the -r option may be used to remove a printer from a class. For example, the following command removes the printer PS1 from the class laser: # lpadmin -pPS1 -rlaser You can also place the printer into a destination class as you create it: # lpadmin -pPS7 -v/dev/ttd2 -mpostscript -claser Even when a printer has been placed into a class, users can still spool print jobs to its individual queue. This command creates a printer PS7, a PostScript printer accessed via /dev/ttd2, and adds it to the class laser. When removing a printer from a class or from the system with -r or -x, if the specified printer is the only member of its class, that class is also removed as a side effect. NOTE
It is important to ensure that all of the printers within a class are functionally equivalent to one another. If they're not the same make and model, they should at least have identical capabilities and produce identical output for a given print job. 13.2.5.4 In-queue prioritiesPrint requests in destinationqueues are assigned priority numbers that determine the order in which requests get printed (the default is their order of submission). The standard System V scheme is to use priority numbers ranging from 0 to 39, with lower numbers designating higher priorities (meaning printed sooner). Solaris uses this system, but HP-UX uses a different system with priorities running from 0 to 7, with 7 being the highest priority level. The two operating systems also differ in the commands they provide for setting and modifying job priorities. 13.2.5.4.1 Priorities under HP-UXHP-UX provides the -g option to lpadmin to define a default priority level for each printer. For example, this command sets the default priority level for printer PS0 to 2: # lpadmin -pPS0 -g2 The default priority level is 0 (the lowest level). In the case of a printer class, the default priority for jobs placed in the queue is the highest default priority among printers in the class. Priority levels for pending jobs can be modified with the lpalt command (which can also alter some other job characteristics such as the title and number of copies). For example, this command changes the priority level for the specified job to 7: # lpalt -p7 PS0-21 We'll look at other options to lpalt later in this section. The lpfence command provides the final mechanism for managing printing via priorities. It sets a minimum priority level called the fence for a job to be allowed to print. This characteristic is specified for an individual print queue (printer or class). For example, the following commands modify the queue PS1, setting its default priority to 1 and its fence to 4: # lpadmin -pPS1 -g1 # lpfence PS1 4 In this configuration, new jobs without explicit priorities will be assigned priority 1, but only jobs with a priority of 4 or more will be printed. As with lpadmin, lpfence can only be executed when lpsched is not running. When a user initiates a print request with the lp command, he can specify a priority level using the -p option. At the moment, there is no way to limit the priority level that an individual user can specify, so any priority system you implement can be circumvented by a knowledgeable user. 13.2.5.4.2 Priorities under SolarisSolaris provides the lpusers command to set the system-wide default printing priority level and to specify priority limits on a user-by-user basis. The -d option is used to set the system default priority: the priority level a request will be assigned when no explicit priority is set on the lp command. For example, the following command sets the system default priority to 15: # lpusers -d15 The priority of an individual print request may be specified with the -q option to lp: $ lp -dlaser -q25 long_file This user has lowered the priority of this print request by setting the priority level to 25. Similarly, the following command queues a print request at higher than normal priority (by specifying a lower priority level): $ lp -dlaser -q10 imp_file The system administrator can set limits on how much a user can lower the priority level for his requests. These limits, in combination with the system default printing priority, can effectively set different printing priorities for different classes of users. The -q option to the lpusers command specifies priority level limits. The -u option specifies one or more users to whom the specified limit applies. If no users are specified, -q sets the default priority limit; this limit is for users who do not have a specific value assigned. If -u is used without -q (i.e., no priority is specified), the limits for the specified users are reset to the system default priority limit. Here are some examples: # lpusers -d15 System default priority level. # lpusers -q10 System default priority limit. # lpusers -q5 -uchavez,wang Users chavez and wang' limit is 5. # lpusers -q0 -uharvey User harvey's limit is 0. # lpusers -ustein User stein's limit is 10. First, the system default priority level and limit are set to 15 and 10, respectively. For this system, unprioritized jobs are given a priority level of 15, and in general, users may increase their priority by specifying a priority level as low as 10. However, the users chavez and wang may specify a level as low as 5, and user harvey may specify one as low as 0, effectively granting him almost immediate access to a printer if desired. Finally, the priority limit for user stein is set to the system default of 10 . The system administrator may change the priority of a pending print request using lp -q in conjunction with the -i option, which specifies a request ID. For example, the following command lowers the priority setting to 2 for print job PS-313: # lp -iPS-313 -q2 This option may be used to rearrange jobs within a print queue. The -H option to lp allows a fast method to move a job to the head of a queue. By specifying the immediate keyword as its argument, the specified job advances at once to the top of the queue: # lp -iPS-314 -Himmediate Two successive jobs sent to the top of the queue in this manner will print in reverse chronological order: the job sent most recently will print first. If you want a job to start printing immediately, without even waiting for the current job to finish, the current job may be suspended with the hold keyword. For example, the following commands start up request PS-314 as soon as possible: # lp -iPS-314 -Himmediate # lp -iPS-209 -Hhold Many printers, especially PostScript printers, can sometimes retain a printing state across jobs. How killing a job in this way will affect them is indeterminate. It's usually better to let the printing job finish. If you do suspend a printing job, you can restart it later by specifying the resume keyword to lp -H: # lp -iPS-209 -Hresume 13.2.5.5 Printer interface programsWe conclude this subsection with a brief look atprinter interface programs. These programs may range from very simple to quite complex. By convention, an interface script takes the following arguments: program-name request-ID username job-title #copies printer-options file(s) $0 $1 $2 $3 $4 $5 $6 Here is a simple interface program:[7]
#!/bin/sh job=$1; user=$2; title=$3; copies=$4; do_banner=$5 printer=`basename $0` star="******************************************************" # Construct the banner page unless suppressed if [ "$do_banner" != "no" ]; then echo "\004\c" echo "\n\n\n$star" banner $title echo "\n\n\nUser: $user" echo "Job: $job" echo "Printer: $printer" echo "Date: `date`" echo "\004\c" fi # Print the files shift;shift;shift;shift;shift Discard all arguments except the file list. files="$*" while [ $copies -gt 0 ]; do for file in $files do cat "$file" 2>&1 echo "\004\c" done copies=`expr $copies - 1` done When this program is invoked, standard output from the script will go to the printer. This script first prints a banner page (unless the user didn't want one), using the print job's title and including other data including the username, printer name, and date. It then sends the appropriate number of copies of each file to the printer, placing a form feed after each one. If there is no interface program for your printer, you can try writing one yourself. The simplest way to do so is to use one of the existing programs as a starting point. 13.2.6 Remote PrintingRemote printing is far less standard under the System V spooling system than for the LPD spooling system. Thus, we will consider each system separately. 13.2.6.1 HP-UX remote printingHP-UX supports outgoing printing to other HP-UX systems and to remote LPD-based systems by providing the rmodel printer model, which can be specified in a normal lpadmin command to create a print queue. Here is a sample command, which creates a local queue named hamlas (-p) for printing on the printer named laser (-orp) located on host hamlet (-orm): # lpadmin -phamlas -v/dev/null -mrmodel -ob3 -ormhamlet -orplaser The -ob3 option enables support for BSD-style print request numbering. Note also that the printer device is specified as /dev/null (-v). HP-UX will also accept incoming print jobs from other HP-UX systems and LPD-based systems. It provides the rlpdaemon server for this purpose, generally controlled by inetd (see Section 7.6) via a configuration entry like this one: printer stream tcp nowait root /usr/sbin/rlpdaemon rlpdaemon -i The -i option tells rlpdaemon to exit after processing the request that invoked it, and it should only be used when the server is controlled by inetd. Don't forget to tell inetd to reread its configuration file after activating this line. In addition, the corresponding service must be defined in /etc/services: printer 515/tcp spooler # remote print spooling If a system will be receiving more than an occasional remote print job, rlpdaemon should be started at boot time instead (you can modify the lp boot script to accomplish this), and the /etc/inetd.conf entry should be commented out. You can also use SAM to set up remote printing.
13.2.6.2 Solaris remote printingThe Solaris version of lpadmin includes a -s option, which can be used to define a remote LPD-based printer. Its argument is the remote host and queue in the format: host!queue. Here is an example: # lpadmin -pColor -shamlet\!dj200 This command adds a queue named Color, which sends jobs to the queue dj200 on host hamlet. No model or device specification options are required in this case. Note that the exclamation mark must be escaped to protect it from the shell. If the name of the remote queue is the same as the one you are specifying for the local queue, only the hostname need be given to -s: # lpadmin -pdj200 -shamlet The Solaris version of lpadmin can also send print jobs directly to a remote printer device (i.e., network attached) in raw mode (in which job data is not interpreted) by using the netstandard model, as in this example: # lpadmin -php4k -v/dev/null -mnetstandard -o protocol=tcp \ -o dest=engprt A port number can be added to the remote hostname using a colon as the separator character. Solaris provides the in.lpd daemon for servicing incoming print requests from LPD-based systems. It is controlled by inetd via the following configuration file entry: printer stream tcp6 nowait root /usr/lib/print/in.lpd in.lpd You can comment/uncomment this entry to enable/disable this facility. The daemon interfaces to the rest of the Solaris printing system as needed in order to fulfill incoming print requests. 13.2.7 Adding a New PrinterNow that we've looked at all of the pieces, we're ready to add a new printer to the system. To add a new local printer to a System V system, you must:
13.2.8 System V Spooling System VariationsAs we've noted before, System V spooling system implementations vary quite a bit. In this section, we will look at some additional operating system-specific characteristics on our two operating systems. 13.2.8.1 Solaris: Additional configuration filesOn Solaris systems, the lpadmin command maintains a printer configuration file, /etc/printers.conf . This is an ordinary text file, but it is better not to edit it manually as it is only a summary of printer configuration. Printer configurations may also be stored in one of the available directory services (e.g., NIS, NIS+, LDAP, and so on). There is also a user-specific configuration file feature. A user can create a file named .printers in her home directory containing her desired default printer, desired options for various printers, aliases for print commands, and the like. See the printers manual page for details. The lpset and lpget commands are also provided for maintaining both of these printer configuration databases. 13.2.8.2 Solaris: Controlling printer accessSolaris provides the -u option to lpadmin for managing useraccess to printers and classes. By default, all users are allowed to use any destination. With the -u option, the system administrator can specify who can use each destination by defining an allow list or a deny list. For any destination, if the allow list exists, only users whose usernames appear in it will be allowed access to it. If there is a deny list, those users appearing on the list will be denied access to the printer. An allow list precludes the existence of a deny list. Allow and deny lists do not affect root or the special user lp. Usernames are specified in the form:
where host is a hostname and username indicates a user on that host. Either part is optional. Either part may also be replaced by the keyword all, which acts as a wildcard for that component. A missing host corresponds to the local system. Here are some examples: !chavez User chavez on the local system. hamlet!chavez User chavez on hamlet. chavez User chavez on any system. hamlet!all All users from hamlet. !all All local users. For example, the following command allows only users on hamlet and duncan to use destination PS1: # lpadmin -pPS1 -uallow:duncan\!all,hamlet\!all The following command prevents user harvey on the local system and user wang on any system from using destination laser: # lpadmin -plaser -udeny:\!harvey,wang You can remove a user from an allow list by using a deny list and vice versa. For example, this command removes user wang from the list of denied users for laser: # lpadmin -plaser -uallow:wang Now suppose we want to remove user duncan!idaho from the allow list on PS1 that we set up earlier. If we execute this command: # lpadmin -pPS1 -udeny:duncan\!idaho the result will be removing the duncan!all entry from the allow list (this makes sense if you think about it). Finally, be aware that consecutive additions to the allow list or deny list are additive: the lists keep getting bigger rather than being replaced. If you need to start over in constructing either list, use the -uallow:all option to clear all current entries. 13.2.8.3 Solaris: Forms and filtersSolaris extends the lpadmin command in many ways. Here are some of the most useful additional options:
The first option is self-explanatory, and it is extremely useful at sites where there are a lot of printers. The remaining options serve to define the variations that are possible for a single printer (or destination class). For example, the -f option is used to specify forms that are allowed or not allowed on a destination device. Forms are alternate print media supported by the same device, for example, different sizes of paper, labels, or printed forms such as invoices or checks. Forms are defined via the lpforms command and are stored in /etc/lp/forms. The -I option is used to define the types of files that can be printed at the destination. -I is designed to enable fully automated printing. Ideally, once all destinations are configured with -I, the print service will have the ability to figure out where to print a request based upon the file's characteristics known as its content type without the user having to specify a destination at all (the user can specify the file's content type with the -T option to lp). Programs known as filters are provided to convert different content types; the lpfilter command installs and manages these filter programs (which are stored in /etc/lp/fd). See the lp, lpfilter, and lpadmin manual pages for details on content types and filters in the Solaris spooling system. Here is an example illustrating some of these options: # lpadmin -p exp2 -v /dev/term/b -c exper \ -I "simple,fortran,pcl,postscript" \ -f "allow:plain,invoice,labels,secret" -o width=14i \ -D "WhizBang Model 2883/XX2 Printer" This command defines a printer, attached via /dev/term/b, named exp2, and described as a "WhizBang Model 2883/XX2 Printer". It is part of the class exper. The printer can handle plain ASCII files, text files with Fortran carriage control information, and PCL and PostScript output. The allowed forms on this device are invoice, plain, labels, and secret. The -o option specifies that the printer has a width of 14 inches. Note that we've added a space between options and their argument for readability (since Solaris allows it). 13.2.8.4 HP-UX: Altering pending print jobsWe introduced the lpalt command earlier in this section in the context of changing the priority of a pending job (via its -p option). The command can also be used to change other aspects of pending jobs. These are its most useful options:
The following command illustrates some of these options: # lpalt -n1 -p7 -dPS6 laser-23 request id is PS6-78 (1 file) This command moves the specified job to the queue PS6, setting the number of copies to 1 and its in-queue priority to 7. The job is assigned a new request ID when it enters the new queue. 13.2.8.5 HP-UX: Analyzing printer usageHP-UX also provides a utility for analyzing spooling subsystem usage data: lpana . In order for data to be collected, lpsched must be run with the -a option. You will need to modify /sbin/init.d/lp if you want this to be the default mode. The lpana command supports a -d option to specify the printer or class in which you are interested (otherwise, all destinations are included). Here is an example of the report produced by this utility: # lpana performance analysis is done from Aug.18 '01 10:00 through Aug.18 '01 11:03 ---printers ----wait---- ---print--- ---bytes--- -sum- num_of /classes-- AV SD AV SD AV SD KB requests PS1 2'11 111 0'19 13 9029 4387 150 17 test 0'13 1 0'44 22 41462 154801 2875 71 This report provides data for two printers, PS1 and test, for a one-hour period on August 18, 2001. The data about total printer traffic is at the extreme right of the report, in the last two columns. The final column lists the number of jobs handled during the report period, and the penultimate column gives their collective size in kilobytes. Columns two through four list the average wait time, print time, and size in bytes for each printer, as well as the standard deviation of each figure. Times are given in the format: minutes'seconds. From this report, we can see that the printer test not only printed far more jobs than PS1, and although the jobs were larger on average (almost five times as large), they printed much more quickly (in about 44 seconds, on average). Jobs queued to test also waited much less time before printing than did ones to PS1. 13.2.8.6 Graphical administration toolsBoth HP-UX and Solaris provide graphical tools for administering the printing subsystem. In both cases, the tools can be used both to manipulate print jobs and queues and to configure printers. We will focus on the latter. Under HP-UX, the SAM facility's printing area is reached via Printers and Plotters Figure 13-3. Configuring printers with SAM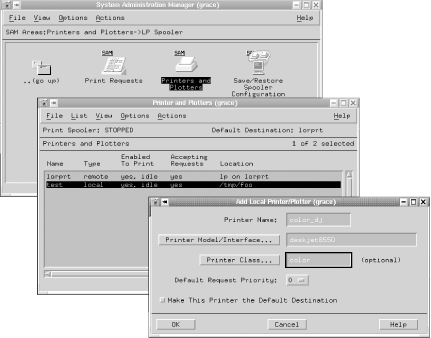 Selecting Printers and Plotters brings up a list of configured print destinations (shown in the middle window). The bottom window illustrates part of the process of adding a new printer. Here we are adding a printer named color_dj. We have selected the model from a pop-up list (by clicking on the Printer Model/Interface button), in this case deskjet8550. We are also placing the printer into the class color. On Solaris systems, the Print Manager module of the admintool facility can be similarly used to configure a new print destination. It is illustrated in Figure 13-4. Figure 13-4. Configuring a printer with the Solaris Print Manager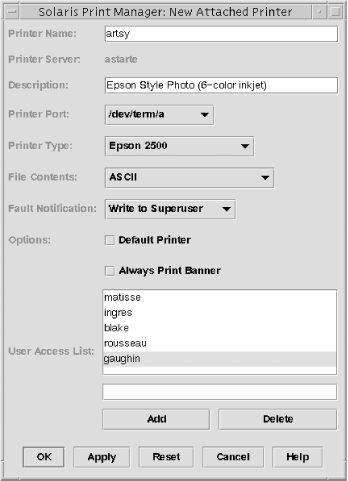 The figure shows the main dialog used to configure a local printer. We have specified a name and description for this printer and selected its special file, model, supported content, and the desired error notification method via pop-up menus. Finally, we have used the unlabeled field and the Add button at the bottom of the form to construct the list of users who are allowed to use this printer. Thus, while this form does not present every option which can be configured via lpadmin, it does make basic configuration tasks quick and straightforward. |


EAN: 2147483647
Pages: 162