13.1 The BSD Spooling Facility
| The BSD printing subsystem is often referred to by the name of the spooling daemon, lpd. We will so designate it from now on. It can maintain multiple printers, printers at local and remote sites, and multiple print queues. This system can be adapted to support laser printers, raster printers, and other types of devices. As shipped, the spooling system is usually configured to support only a standard line printer. 13.1.1 User CommandsThe LPD spooling system provides several commands allowing users to submit and manage their print jobs:
Each of these commands includes a -P option for specifying the desired printer. If it is omitted, the default printer is used, which is specified by setting the PRINTER environment variable to the name of the printer to be used by default. If this variable is not set and -P is not included on a command, the first printer defined in the /etc/printcap configuration file (discussed below) is used (although some older LPD subsystem implementations default to the printer named lp).
13.1.2 Manipulating Print JobsThe system administrator is often called upon to manage and manipulate individual print jobs. We will consider the basic techniques for doing so in this section. Use the lpq command to list the contents of a print queue. For example, the following command lists the jobs in the queue for printer ps: $ lpq -P ps Rank Owner Job Files Total Size 1st chavez 15 l1726.f 74578 bytes 2nd harvey 16 fpppp.F 12394 bytes lprm can be used to remove individual print jobs. Its syntax is: # lprm -P printer jobs-to-remove The jobs to be removed may be specified in various ways: as a list of job IDs and/or usernames (in the latter case, all jobs belonging to the specified users will be removed), or with a single hyphen, in which case all jobs will be removed when the command is run by root. So, to remove job 15 from the queue ps, use the command: # lprm -P ps 15 Similarly, to remove all jobs from the plot queue, use this command: # lprm -P plot - Finally, you can use the lpc administrative utility (which we'll discuss in more detail very shortly) to reorder jobs within a queue. For example, to move a job within its print queue, use lpc's topq subcommand. This command moves job 12 to the top of the ps queue: # lpc topq ps 12 The final parameter is the list of jobs to move. It may be specified as a list of job IDs and/or usernames (the latter select all jobs belonging to those users). topq will move the specified jobs to the top of the queue for the specified printer. If more than one job is specified, the jobs take on the order in which they are listed on the command line: at the end, the job listed first will be at the top of the queue. 13.1.3 Managing QueuesThe lpc utility is used to perform most administrative tasks connected with the spooling system under BSD, including shutting down a printer for maintenance, displaying a printer's status, and manipulating jobs in print queues (as we've just seen). The command to invoke the line printer control utility is simply lpc: # lpc lpc> lpc is now running and issues its own prompt. lpc has several internal subcommands:
For all of the lpc subcommands, the keyword all can be substituted for the printer name to act on every printer on the system. lpc also provides a help subcommand that can be used to obtain the list of available subcommands or a description of any individual subcommand. Here are some examples using lpc : # lpc lpc> status ps ps: queuing is enabled Info about the ps queue and device. printing enabled 5 entries in spool area daemon started The lpd daemon is running. lpc> disable ps Block new job submissions to ps. ps: queuing disabled lpc> stop ps Stop printing on device ps. ps: printing disabled lpc> quit Single lpc internal commands can also be executed from the command line by specifying it as lpc's arguments: # lpc up ps 13.1.4 The Spooling DaemonThe BSD spooling daemon is usually located at /usr/sbin/lpd. It is started by a system initialization script at boot time (see Table 13-1), using commands like the following: if [ -f /usr/sbin/lpd ]; then rm -f /dev/printer /var/spool/lpd.lock /usr/sbin/lpd; echo -n 'lpd' >/dev/console fi If the server program is readable, the boot script removes the old socket and old lock file (the latter is designed to ensure that only one instance of the daemon is running at any time), and then the script starts the daemon. The new daemon will automatically recreate its lock file and communications interface as part of its initialization tasks. Occasionally, the spooling daemon gets hung. The main symptom of this is a queue with jobs in it but nothing printing. In this case, you should kill the old daemon and start a new one manually: # ps aux | grep lpd root 5990 2.2 0.8 1408 352 p0 S 0:00 grep lpd root 208 0.0 0.2 1536 32 ? I 0:00 lpd # kill -9 208 # rm -f /dev/printer /var/spool/lpd.lock # /usr/lib/lpd Note that you also need to remember to remove the old socket and lock files. The same actions can be accomplished by invoking the lpd boot script (when available). For example: # /etc/init.d/lpd restart 13.1.5 Configuring Queues: The printcap FileThe file /etc/printcap lists all output devices supported by the spooling system.[4] In other words, the entries in the printcap file define the available printers on the system.
Here is a sample printcap entry for a simple line-oriented printer (a rather rare item these days): # line printer--system default printer lp|lpt1|Machine Room Line Printer:\ :sd=/var/spool/lpd/lpt1:\ Spool directory :lp=/dev/lp0:\ Printer's physical device :lf=/var/adm/lpd-errs:\ Path to printer's error log file :pl#66:pw#132: Set page length and width The first line is a comment (indicated by the number sign). The second line provides names for this entry and its associated queue and printer, separated by vertical bar characters. Specifying several names, as we've done here, is typical: a short name for common use and additional names indicating the printer type and/or location. Fields within a printcap entry are separated by and surrounded by colons, and entries may extend beyond one line by escaping the newline character with a backslash and including a tab at the beginning of each continuation line. Setting names are typically two characters and are usually followed by an assignment character and the desired value. We've annotated the remaining lines in the preceding printcap entry. These settings are fairly self-explanatory. The only tricky part is the two settings on the final line. These are numeric settings specifying the page length and width (in lines and characters, respectively) for this printer, and the assignment character is a number sign instead of an equal sign. Here is a more complex printcap entry for a laser printer: # laser printer ps|ps3a|hp4000|3rd Floor Laser Printer:\ :sd=/var/spool/lpd/ps3a:\ Spool directory :lp=/dev/lp0:\ Printer's physical device :lf=/var/adm/lperr/ps-errs:\ Error log file :pl#66:pw#0:\ Page length/width :mx#500:hl:\ Max. file size=500 blocks; print burst page last :if=/usr/lbin/pcfof +Chp4000tn.pcf:\ Filter specifications :vf=/usr/lbin/psrast:\ :af=/var/adm/lpacct: Accounting file The entry begins as before with a comment and a line specifying several names for this printer. The next four lines define the same settings as in our first example, and the following line defines the maximum number of pages that a job may send to this printer (here set to 1000 blocks) and also specifies that the banner/burst page be printed after each job rather than before. This setting, hl, is a Boolean setting; specifying its name turns it on, and appending an at sign to the name turns it off: hl@. The next two fields specify filters to be used with this printer: if specifies a program that prepares the input for printing, and vf specifies a program that processes input consisting of raster images. The many filter settings that can be specified are listed in Table 13-3. Multiple filters are piped together as specified in the printcap manual page; see the same source for the calling arguments that are used with filter programs. General filter programs are often provided by the operating system vendor, and manufacturers also can supply ones customized for their printer devices. The final line in the laser printer entry specifies the accounting file to be used with this printer. This file will eventually be processed by the pac utility, described in Chapter 17. Accounting records are not generated automatically by the LPR subsystem but must be explicitly created by one of the filter programs. Traditionally, this is handled by the if filter. We'll look at a sample filter program later in this section. Table 13-3 lists the most important printcap entry fields.
See the manual page for full details on all printcap entry fields. 13.1.5.1 Spooling directoriesAs we've noted, a spooling directory holds files destined for a particular printer until the daemon, lpd, can print them. Spooling directories are conventionally located under /var/spool/lpd. Each printer generally has its own spooling directory. All spooling directories must be owned by the special user daemon and the group daemon and have access mode 755 (read and execute access for everyone; read, execute, and write access for user). This protection scheme gives the spooling system sole write access to files that have been spooled, forcing users to use the spooling system and preventing anyone from deleting someone else's pending files or otherwise misbehaving. To create a new spooling directory called /var/spool/lpd/newps, execute the following commands: # cd /var/spool/lpd # mkdir newps # chown daemon.daemon newps # chmod 755 newps # ls -ld newps drwxr-xr-x 2 daemon daemon 2048 Apr 8 09:44 newps You will have to create new spooling directories when you add additional printers. 13.1.5.2 Restricting printer accessThe printcap variable rg can be used to restrict a print queue to the members of a specified group. For example, rg=chem will restrict the printer to members of the chem group. Not all implementations of the LPD spooling service support this feature (for example, Tru64 does not). We'll look at the access restriction scheme for remote printing later in this section. 13.1.5.3 A filter programHere is a simple printer filtering program that illustrates the general techniques used in such programs, including accounting record creation (we have removed all of the code testing for invalid input, missing/empty files, and the like to make the basic structure clear): #!/bin/sh # Filter for PostScript files to an HP DeskJet # Obtain and process program options. while getopts a:c:h:m:n:p:q:r option; do ... done acct_file="$1" # Real filter tests for not null # Set parameter defaults. MODEL="" RESOLUTION="600" QUALITY="normal" # Let user override defaults if desired. . $HOME/config.hp # Real filter checks if file exists # Create option for model if defined if [ '' != "$MODEL" ]; then MODEL="-sModel=$MODEL" fi # Reset printer, prevent stair step and print printf '\033E\033&k2G\033&s0C' gs -q -sDEVICE=hpdj $MODEL -r"$RESOLUTION" \ -sPrintQuality="$QUALITY" \ -sPagecountFile="./_pages_$randstring" \ -sOutputFile=- $PSCONFIGFILE - printf '\033E' # Printer reset/final page eject # Write accounting record pages=`cat ./_pages_$randstring` printf '%7.2f\t%s:%s\n' "$pages" "$host" "$user" >> "$acct_file" rm -f ./_pages_$randstring The program first parses its options (not shown) and then stores the name of the printing accounting file given as its final argument. It then sets the default values for some printer specification parameters printer model, print resolution, and print quality and then reads in a user-specific configuration file that can change some of these values. Next, the script defines the MODEL variable as the option that will be used on the subsequent print command if the user has specified a specific printer model (by default, no model is specified). The final two sections of the script perform the real work. First, the printer is sent an appropriate reset string (this script is designed for Hewlett-Packard DeskJet series printers) via the printf command. Then the gs command invokes the Ghostscript facility to process the files to be printed (they are assumed to be PostScript files). Finally, the printer is sent a simple reset code to restore its default settings and eject the final page (if necessary). The last action of the script is creating and writing the accounting record. It relies on the page count provided by the Ghostscript facility via an external file, specified on the gs command line and here (we won't worry about how the randstring variable is created). Once the page count is read, the script writes a properly formatted record to the accounting file and removes the scratch file. 13.1.6 Remote PrintingThe BSD printing facility can also send files to printers on remote hosts or directly attached to the network, provided that the remote printers also support the LPD spooling protocol. Here is a sample printcap entry for a remote printer: # Remote printer entry remlp|hamlq|hamlet's letter quality printer|:\ :lp=:\ :rm=hamlet:rp=lp2:\ :lf=/var/adm/lpd_rem_errs:\ Include a log file if you need debugging info. :sd=/var/spool/lpd/remlp: This entry specifies the properties of a printer named remlp. The empty lp field shows that this entry describes a remote printer, and the rm field indicates the destination system for remote printing (in this case, the host hamlet). The rp field holds the name of the target printer on the destination host. Thus, in this example, sending a file to the printer remlp will result in its being printed by printer lp2 on system hamlet. Although this entry does not contain any specific details about the remote printer, the printcap entry can include filter, accounting file, and other settings as well. Alternatively, these items can be defined in the remote system's own printcap file. Of course, the local printcap entry will need to define all appropriate printer settings for network-attached printers that support LPD. Accepting incoming remote print jobs also requires minimal additional configuration. In order for a system to allow a remote system to send jobs to it, the remote system's hostname must be listed in the file /etc/hosts.lpd or /etc/hosts.equiv. If the first file exists, the hostname must appear in it, or remote printing requests will be refused. If /etc/hosts.lpd does not exist, the /etc/hosts.equiv file is checked (see Section 7.6 for more on the /etc/hosts.equiv file). Finally, if a printer's printcap entry contains the rs characteristic, only remote users with accounts on the local system (defined as an account having the same UID on the local and remote systems) will be allowed to send remote jobs to that printer. 13.1.7 Adding a New PrinterTo add a newprinter to a system using the BSD spooling facility, you must:
Troubleshooting hints are discussed in the final section of this chapter. 13.1.8 LPD VariationsWe close this section by looking briefly at some of the features of the LPD spooling system in the various operating system environments. 13.1.8.1 FreeBSDIn addition to the commands we've considered so far,FreeBSD also provides the chkprintcap command, which performs some primitive verification of printcap entries. Its most useful form is with its -d option. In this mode, it will ensure that no two printers are sharing a spool directory and will also create any missing spool directories referenced in the printcap file. FreeBSD's lptcontrol command is also occasionally useful. It can be used to change the state of a parallel port among the following: standard, extended, polled, and interrupt-driven (see the manual page for details). Note that lptcontrol will need to be run at boot time in order to retain the desired setting. 13.1.8.2 Tru64Tru64 provides an excellent printer configuration utility named printconfig , illustrated in Figure 13-1. Figure 13-1. The Tru64 printconfig utility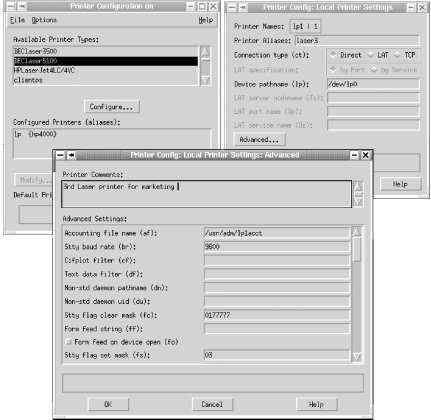 Its main window is in the upper left in the illustration. Here, you can add a new printer, choosing from a large list of predefined types in the upper scroll box, or you can modify one of the existing printers listed in the lower box. You can also designate any printer to be the system default printer (the tool automatically assigns lp as one of its names and reorders printcap entries appropriately). The windows in the upper right and bottom center of the illustration show the process of adding a new printer (here named laser3). The most important printcap entry fields are included on the former, while all of the remaining possible settings are accessible via the scrolling list in the latter. The utility fills in default values for many fields based on the printer type you initially selected, including the paths to many filter programs (provided with the operating system). Tru64 also provides an older text-based, menu driven utility named lprsetup . This brief session will give you a sample of its general flavor: # /usr/sbin/lprsetup Tru64 UNIX Printer Setup Program Command < add modify delete exit view quit help >: view lp|lp0|0|hp4000:\ :af=/usr/adm/lpacct:\ :if=/usr/lbin/pcfof +Chp4000tn.pcf:\ :lf=/usr/adm/lperr:\ :lp=/dev/lp:\ ... Command < add modify delete exit view quit help >: quit 13.1.8.3 Linux Linux systems also provide GUI interfaces for creating printcap entries. For example, the linuxconf tool can be used to configure printers. Similarly, SuSE's yast2 tool can do the same job; the appropriate module is reached by selecting Hardware Figure 13-2. SuSE Linux yast2 printer configuration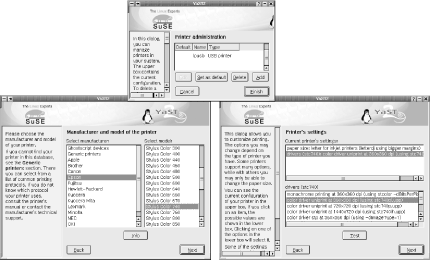 The main window for this module (at the top in the figure) lists configured printers and also allows you to add a new one. The two other windows in the illustration are from the series of dialogs that follow during the add printer process. The one on the left specifies the specific printer model you are adding, and the one on the right allows you to specify characteristics of that particular printer. In this case, we specify letter-size paper and color printing at a resolution of 360 x 360 dpi. Later dialogs request other general information required by the printcap entry, and the tool creates the entry automatically once the process completes.
| |||||||||||||||||||||||||||||||||||||||||||||||||||||||||||||||||||||||||||||||||||||||||||||

EAN: 2147483647
Pages: 162
- Step 1.1 Install OpenSSH to Replace the Remote Access Protocols with Encrypted Versions
- Step 1.2 Install SSH Windows Clients to Access Remote Machines Securely
- Step 3.3 Use WinSCP as a Graphical Replacement for FTP and RCP
- Step 4.3 How to Generate a Key Pair Using OpenSSH
- Step 4.7 Using Public Key Authentication for Automated File Transfers
- Structures, Processes and Relational Mechanisms for IT Governance
- Integration Strategies and Tactics for Information Technology Governance
- An Emerging Strategy for E-Business IT Governance
- Assessing Business-IT Alignment Maturity
- Linking the IT Balanced Scorecard to the Business Objectives at a Major Canadian Financial Group