1.4 About Menus and GUIs
| For several years now, vendors and independent programmers have been developing elaborate system administration applications. The first of these were menu-driven, containing many levels of nested menus organized by subsystem or administrative task. Now, the trend is toward independent GUI-based tools, each designed to manage some particular system area and perform the associated tasks. Whatever their design, all of them are designed to allow even relative novices to perform routine administrative tasks. The scope and aesthetic complexity of these tools vary considerably, ranging from shell scripts employing simple selections lists and prompts to form-based utilities running under X. A few even offer a mouse-based interface with which you perform operations by dragging icons around (e.g., dropping a user icon on top of a group icon adds that user to that group, dragging a disk icon into the trash unmounts a filesystem, and the like). In this section, we'll take a look at such tools, beginning with general concepts and then going on to a few practical notes about the tools available on the systems we are considering (usually things I wish I had known about earlier). The tools are very easy to use, so I won't be including detailed instructions for using them (consult the appropriate documentation for that). 1.4.1 Ups and DownsGraphical and menu-based system administration tools have some definite good points:
On the other hand, they have their down side as well:
In my view, an ideal administrative tool has all of these characteristics:
In addition, these features make using an administrative tool much more efficient, but they are not absolutely essential:
If one uses these criteria, AIX's SMIT comes closest to an ideal administrative tool, a finding that many have found ironic. As usual, using menu interfaces in moderation is probably the best approach. These applications are great when they save you time and effort, but relying on them to lead you through every situation will inevitably lead to frustration and disappointment somewhere down the line. The Unix versions we are considering offer various system administration facilities. They are summarized and compared in Table 1-2. The table columns hold the Unix version, tool command or name, tool type, whether or not the command to be run can be previewed before execution, whether or not the facility can log its actions and whether or not the tool can be used to administer remote systems.
There are also some other tools on some of these systems that will be mentioned in this book when appropriate, but they are ignored here.
1.4.2 AIX: SMIT and WSMAIX offers two main system admini stration facilities: the System Management Interface Tool (SMIT) and the Workspace System Manager (WSM) facility. Both of them run in both graphical and text mode. SMIT consists of a many-leveled series of nested menus. Its main menu is illustrated in Figure 1-2. Figure 1-2. The AIX SMIT facility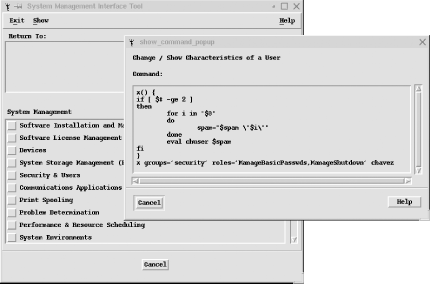 One of SMIT's most helpful features is command preview: if you click on the Command button or press F6, SMIT displays the command to be executed by the current dialog. This feature is illustrated in the window on the right in Figure 1-2. You can also go directly to any screen by including the corresponding fast path keyword on the smit command line. Many SMIT fast paths are the same as the command executed from a particular screen. Many other fast paths fall into a predictable pattern, beginning with one of the prefixes mk (make or start), ch (change or reconfigure), ls (list), or rm (remove or stop), to which an object code is appended: mkuser, chuser, lsuser, rmuser for working with user accounts; mkprt, chprt, lsprt, rmprt for working with printers, and so on. Thus, it's often easy to guess the fast path you want. You can display the fast path for any SMIT screen by pressing F8 in the ASCII version of the tool: Current fast path: "mkuser" If the screen doesn't have a fast path, the second line will be blank. Other useful fast paths that are harder to guess include the following:
Here are a few additional SMIT notes:
The WSM facility contains a variety of GUI-based tools for managing various aspects of the system. Its functionality is a superset of SMIT's, and it has the advantage of being able to administer remote systems (it requires that remote systems be running a web server). You can access WSM via the Common Desktop Environment's Applications area: click on the file cabinet icon (the one with the calculator peeking out of it); the system administration tools are then accessible under the System_Admin icon. You can also run a command-line version of WSM via the wsm command. The WSM tools are run on a remote system via a Java-enabled web browser. You can connect to the tools by pointing the browser at http://hostname/wsm.html, where hostname corresponds to the desiredremote system. Of course, you can also run the text version by entering the wsm command into a remote terminal session. 1.4.3 HP-UX: SAMHP-UX provides the System Administration Manager, also known as SAM. SAM is easy to use and can perform a variety of system management tasks. SAM operates in both menu-based and GUI mode, although the latter requires support for Motif. The items on SAM's menus invoke a combination of regular HP-UX commands and special scripts and programs, so it's not always obvious what they do. One way to find out more is to use SAM's built-in logging feature. SAM allows you to specify the level of detail in log file displays, and you can optionally keep the log open as you are working in order to monitor what is actually happening. The SAM main window and log display are illustrated in Figure 1-3. Figure 1-3. The HP-UX SAM facility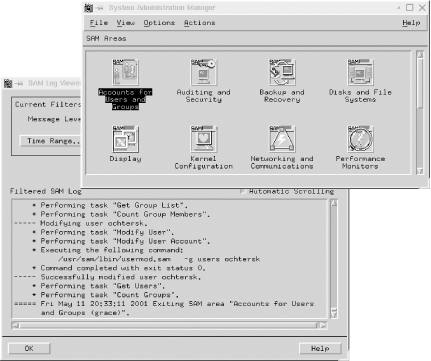 If you really want to know what SAM is doing, you'll need to consult its configuration files, stored in the subdirectories of /usr/sam/lib. Most subdirectories have two-character names, closely related to a top-level icon or menu item. For example, the ug subdirectory contains files for the Users and Groups module, and the pm subdirectory contains those for Process Management. If you examine the .tm file there, you can figure out what some of the menu items do. This example illustrates the kinds of items to look for in these files: #egrep '^task [a-z]|^ *execute' pm.tm task pm_get_ps { execute "/usr/sam/lbin/pm_parse_ps" task pm_add_cron { execute "/usr/sam/lbin/cron_change ADD /var/sam/pm_tmpfile" task pm_add_cron_check { execute "/usr/sam/lbin/cron_change CHECK /var/sam/pm_tmpfile" task pm_mod_nice { execute "unset UNIX95;/usr/sbin/renice -n %$INT_ID% %$STRING_ID%" task pm_rm_cron { execute "/usr/sam/lbin/cron_change REMOVE /var/sam/pm_tmpfile" The items come in pairs, relating a menu item or icon and an actual HP-UX command. For example, the fourth pair in the previous output allows you to figure out what the Modify Nice Priority menu item does (runs the renice command). The second pair indicates that the item related to adding cron entries executes the listed shell script; you can examine that file directly to get further details. There is another configuration file for each main menu item in the /usr/sam/lib/C subdirectory, named pm.ui in this case. Examining the lines containing "action" and "do" provides similar information. Note that "do" entries that end with parentheses (e.g., do pm_forcekill_xmit( )) indicate a call to a routine in one of SAM's component shared libraries, which will mean the end of the trail for your detective work. SAM allows you to selectively grant access to its functional areas on a per-user basis. Invoke it via sam -r to set up user privileges and restrictions. In this mode, you select the user or group for which you want to define allowed access, and then you navigate through the various icons and menus, enabling or disabling items as appropriate. When you are finished, you can save these settings and also save groups of settings as named permission templates that can subsequently be applied to other users and groups. In this mode, the SAM display changes, and the icons are colored indicating the allowed access: red for prohibited, green for allowed, and yellow when some features are allowed and others are prohibited. You can use SAM for remote administration by selecting the Run SAM on Remote System icon from the main window. The first time you connect to a specific remote system, SAM automatically sets up the environment. 1.4.4 Solaris: admintool and Sun Management ConsoleFrom a certain point of view, current versions of Solaris actually offer three distinct tool options:
Figure 1-4. Solaris system administration tools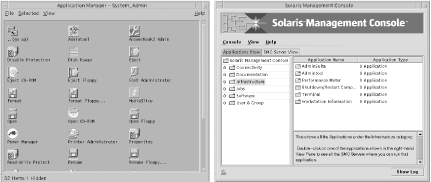 1.4.5 Linux: LinuxconfMany Linux systems, including some Red Hat versions, offer theLinuxconf graphical administrative tool written by Jacques Gélinas. This tool can also be used with other Linux distributions (see http://www.solucorp.qc.ca/linuxconf/). It is illustrated in Figure 1-5. Figure 1-5. The Linuxconf facility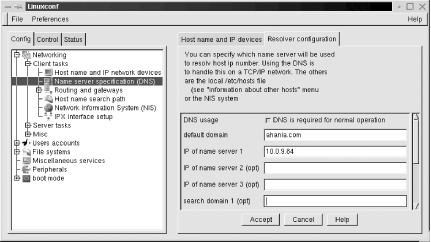 The tool's menu system is located in the area on the left, and forms related to the current selection are displayed on the right. Several of the program's subsections can be accessed directly via separate commands (which are in fact just links to the main linuxconf executable): fsconf, mailconf, modemconf, netconf, userconf, and uucpconf, which administer filesystems, electronic mail, modems, networking parameters, users and groups and UUCP, respectively. Early versions of Linuxconf were dreadful: bug-rich and unbelievably slow. However, more recent versions have improved quite a bit, and the current version is pretty good. Linuxconf leans toward supporting all available options at the expense of novice's ease-of-use at times (a choice with which I won't quarrel). As a result, it is a tool that can make many kinds of configuration tasks easier for an experienced administrator; less expert users may find the number of settings in some dialogs to be somewhat daunting. You can also specify access to Linuxconf and its various subsections on a per-user basis (this is configured via the user account settings). 1.4.6 Red Hat Linux: redhat-config-*Red Hat Linux provides several GUI-based administration tools, including these:
There are often links to some of these utilities with different (shorter) names. They can also be accessed via icons from the System Settings icon under Start Here. Figure 1-6 illustrates the dialogs for creating a new user account (left) and specifying the local system's DNS server (right). Figure 1-6. Red Hat Linux system configuration tools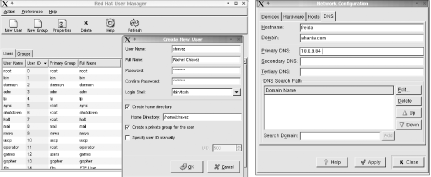 1.4.7 SuSE Linux: YaST2The "YaST" in YaST2 stands for "yet another setup tool." It is a follow-on to the original YaST, and like the previous program (which is also available), it is a somewhat prettied up menu-based administration facility. The program's main window is illustrated in Figure 1-7. Figure 1-7. The SuSE Linux YaST2 facility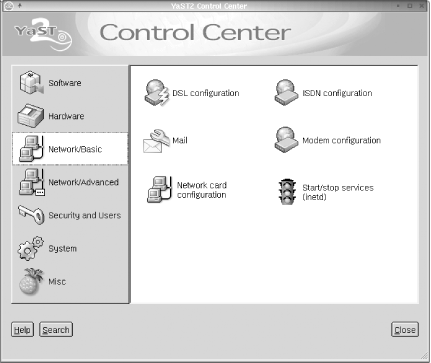 The yast2 command is used to start the tool. Generally, the tool is easy to use and does its job pretty well. It does have one disadvantage, however. Whenever you add a new package or make other kinds of changes to the system configuration, the SuSEconfig script runs (actually, a series of scripts in /sbin/conf.d). Before SuSE Version 8, this process was fiendishly slow. SuSEconfig 's actions are controlled by the settings in the /etc/rc.config configuration file, as well as those in /etc/rc.config.d (SuSE Version 7) or /etc/sysconfig (SuSE Version 8). Its slowness stems from the fact that every action is performed every time anything changes on the system; in other words, it has no intelligence whatsoever that would allow it to operate only on items and areas that were modified. Even worse, on SuSE 7 systems, SuSEconfig's actions are occasionally just plain wrong. A particularly egregious example occurs with the Postfix electronic mail package. By default, the primary Postfix configuration file, main.cf, is overwritten every time the Postfix SuSEconfig subscript is executed.[8] The latter happens every time SuSEconfig runs, which is practically every time you change anything on the system with YaST or YaST2 (regardless of its lack of relevance to Postfix). The net result is that any local customizations to main.cf get lost. Clearly, adding a new game package, for example, shouldn't clobber a key electronic-mail configuration file.
Fortunately, these problems have been cleared up in SuSE Version 8. I do also use YaST2 on SuSE 7 systems, but I've examined all of the component subscripts thoroughly and made changes to configuration files to disable actions I didn't want. You should do the same. 1.4.8 FreeBSD: sysinstallFreeBSD offers only the sysinstall utility in terms of administrative tools, the same program that manages operating system installations and upgrades (its main menu is illustrated in Figure 1-8). Accordingly, the tasks that it can handle are limited to the ones that come up in the context of operating system installations: managing disks and partitions, basic networking configuration, and so on. Figure 1-8. The FreeBSD sysinstall facility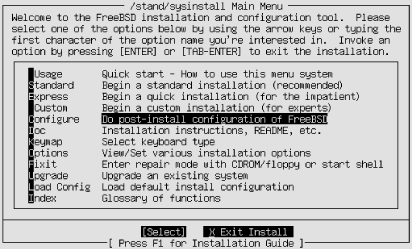 Both the Configure and Index menu items are of interest for general system administration tasks. The latter is especially useful in that it lists individually all the available operations the tool can perform. 1.4.9 Tru64: SysManThe Tru64 operating system offers the SysMan facility. This tool is essentially menu driven despite the fact that it can run in various graphical environments, including via a Java 1.1-enabled browser. SysMan can run in two different modes, as shown in Figure 1-9: as a system administration utility for the local system or as a monitoring and management station for the network. These two modes of operations are selected with the sysman command's -menu and -station options, respectively; -menu is the default. Figure 1-9. The SysMan facility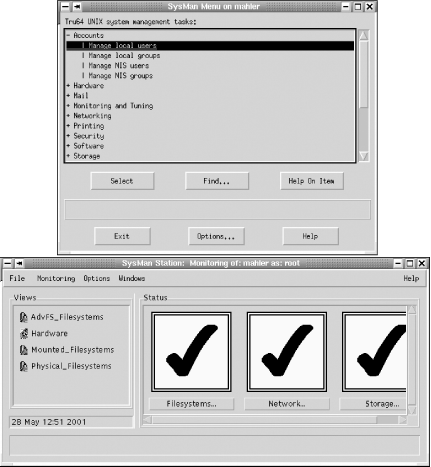 This utility does not have any command preview or logging features, but it does have a variety of "accelerators": keywords that can be used to initiate a session at a particular menu point. For example, sysman shutdown takes you directly to the system shutdown dialog. Use the command sysman -list to obtain a complete list of all defined accelerators. One final note: the insightd daemon must be running in order to be able to access the SysMan online help. 1.4.10 Other Freely Available Administration ToolsThe freely available operating systems often provide some additional administrative tools as part of the various window manager packages that they include. For example, both the Gnome and KDE desktop environments include several administrative applets and utilities. Those available under KDE on a SuSE Linux system are illustrated in Figure 1-10. Figure 1-10. KDE administrative tools on a SuSE Linux system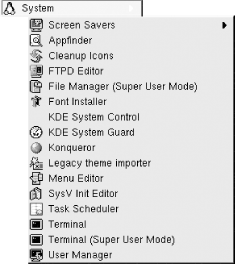 We will consider some of the best of these tools from time to time in this book. 1.4.10.1 The Ximian Setup ToolsThe Ximian project brings together the latest release of the Gnome desktop, the Red Carpet web-based system software update facility, and several other items into what is designed to be a commercial-quality desktop environment. As of this writing, it is available for several Linux distributions and for Solaris systems. Additional ports, including to BSD, are planned for the future. The Ximian Setup Tools are a series of applets designed to facilitate system administration, ultimately in a multiplatform environment. Current modules allow you to administer boot setup (i.e., kernel selection), disks, swap space, users, basic networking, shared filesystems, printing, and the system time. The applet for the latter is illustrated in Figure 1-11. Figure 1-11. The Ximian Setup Tools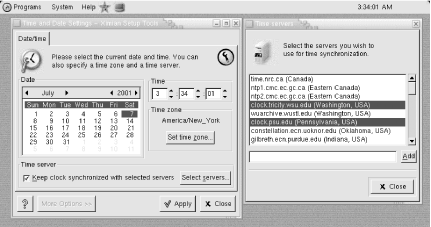 This applet, even in this early incarnation, goes well beyond a simple dialog allowing you to set the current date and time; it also allows you to specify time servers for Internet-based time synchronization. The other tools are of similar quality, and the package seems very promising for those who want GUI-based system administration tools. 1.4.11 VNCI'll close this section by briefly looking at one additional administrative tool that can be of great use for remote administration, especially in a heterogeneous environment. It is called VNC, which stands for "virtual network computing." The package is available for a wide variety of Unix systems[9] at http://www.uk.research.att.com/vnc/. It is shown in Figure 1-12.
Figure 1-12. Using VNC for remote system administration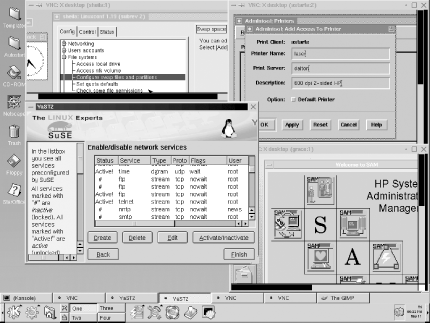 The illustration depicts the entire desktop on a SuSE Linux system. You can see several of its icons along the left edge, as well as the tool bar at the bottom of the screen (where you can determine that it is running the KDE window manager). The four open windows are three individual VNC sessions to different remote computers, each running a different operating system and a local YaST session. Beginning at the upper left and moving clockwise, the remote sessions are a Red Hat Linux system (Linuxconf is open), a Solaris system (we can see admintool), and an HP-UX system (running SAM). VNC has a couple of advantages over remote application sessions displayed via the X Windows system:
In order to use VNC, you must download the software and build or install the five executables that comprise it (conventionally, they are placed in /usr/local/bin). Then you must start a server process on systems that you want to administer remotely, using the vncserver command: garden-$ vncserver You will require a password to access your desktops. Password: Not echoed. Verify: New 'X' desktop is garden:1 Creating default startup script /home/chavez/.vnc/xstartup Starting applications specified in /home/chavez/.vnc/xstartup Log file is /home/chavez/.vnc/garden:1.log This example starts a server on host garden. The first time you run the vncserver command, you will be asked for a password. This password, which is independent of your normal Unix password, will be required in order to connect to the server. Once the server is running, you connect to it by running the vncviewer command. In this example, we connect to the vncserver on garden: desert-$ vncviewer garden:1 The parameter given is the same as was indicated when the server was started. VNC allows multiple servers to be running simultaneously. In order to shut down a VNC server, execute a command like this one on the remote system (i.e., the system where the server was started): garden-$ vncserver -kill :1
|
EAN: 2147483647
Pages: 162