Building a Database with Visual Studio .NET
Visual Studio .NET is well equipped when it comes to the design and development of Microsoft SQL Server databases. It provides the functionality to create databases, tables, views, stored procedures, and many other features.
The starting point of all database utilities is Server Explorer. Select Server Explorer from the View menu to open it (see Figure 12-1). You will find your database in one of two places. If the database is a Microsoft SQL Server 7.0 or higher database, it will be located in the SQL Servers database folder inside your Servers folder. Otherwise, it will be located in the Data Connections folder just above the Servers folder.
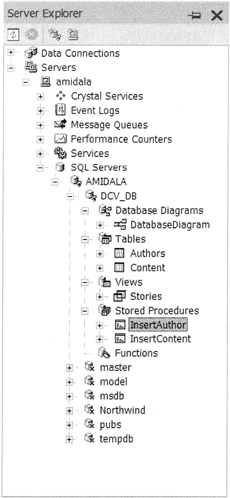
Figure 12-1: Server Explorer
Visual Studio .NET provides Microsoft SQL Server databases with much of the functionality that comes with SQL Enterprise Manager. On the other hand, all the other databases types are mostly restricted to viewing and editing records. This book focuses on Microsoft SQL Server and covers the functionality provided by Visual Studio .NET. If you are developing using any other database, much of the first part of this chapter will not help you because you will have to use the database maintenance tools provided by your database.
| Tip | If you don't currently have a database installed on your system, I recommend that you install the MSDE 2000 database server provided with the .NET Framework samples. This database is a stripped-down version of Microsoft SQL Server, and with it you'll get a good feel for the functionality provided by Visual Studio .NET. Plus, you can always uninstall it later and use the database of your choice. |
There is nothing stopping you from building your Microsoft SQL Server databases outside of Visual Studio .NET, using the SQL Enterprise Manager, for example, and then adding the database to Server Explorer. Doing this is beyond the scope of this book, however.
Now you'll build your own simple content management database so that you can explore ADO.NET with intimate knowledge of its architecture, instead of as a black box as you would if you were using one of the preinstalled databases provided with MSDE 2000 or Microsoft SQL Server.
Creating a New Database
The first step in database development isn't creating one. Obviously, creating the data model, designing the logical database, and designing the physical database should come first. But hey, I'm a programmer. I'll code first and then go ask questions. (I'm joking—really!)
Visual Studio .NET makes creating databases so easy that it's almost not worth explaining how to do it.
| Caution | Be sure you really want the database you're creating because it's tricky to delete it once it's created in Visual Studio .NET. I had to go to the Microsoft SQL Enterprise Manager to delete my test databases. It's also possible to execute the DROP DATABASE command to remove a database. |
The following steps create the database DCV_DB, which contains author information and their related stories. You will use this database throughout the chapter.
-
Select Server Explorer from the View menu.
-
Expand the SQL Servers database folder from within your Servers folder.
-
Right-click the database server folder that you want to create the database in.
-
Select the New Database menu item, which displays the Create Database dialog box shown in Figure 12-2.
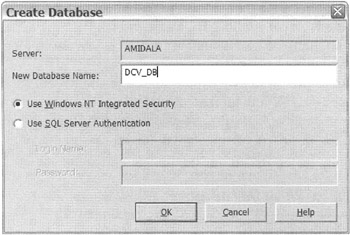
Figure 12-2: The Create Database dialog box -
Enter DCV_DB in the New Database Name field.
-
Select the Use SQL Server Authentication radio button.
-
Enter sa in the Login Name text box.
-
Click OK.
Microsoft SQL Server 2000 and MSDE 2000 support two types of security: Windows Integrated Security and SQL Server authentication (security). Covering these security systems is beyond the scope of this book. All you really need to know for now is that the connection strings will differ depending on which method you use. I cover these differences later in this chapter.
In the preceding database I use the most common (and probably least secure) security configuration. It uses the system administrator (sa) account with no password. You will find that many demonstration systems use this configuration.
| Note | If you selected Windows Integrated Security when you installed your Microsoft SQL Server 2000 or MSDE 2000 database, then you should select the Use Integrated NT Integrated Security radio button, because the security configuration described in this section causes a "Not associated with a trusted SQL Server connection" error. |
Now you should have a new database called DCV_DB in your database folder. You can expand it and see all the default folders built. If you click these folders, however, you will see that there is nothing in them. That's your next job.
Adding and Loading Tables and Views to a Database
An empty database is really quite useless, so now you'll add a couple of tables to the database to provide a place to store your content.
| Note | The tables and views you use in this chapter are purposely very simple (you might even call them minimal) and aren't the best schema around. I did this so that you don't get bogged down with the details of the database and so it doesn't take much effort or time for you to build these tables and views yourself. |
The first table is for storing authors and information about them, and the second table is for storing headlines and stories. The two databases are linked together by a common AuthorID key. Figure 12-3 shows a data diagram of the database.
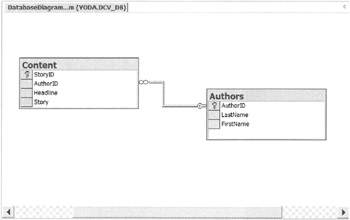
Figure 12-3: The DCV_DB data diagram
Having this separation means you have to store only one copy of the author information, even though the author may have written many stories. If you had created only one table to contain all the information, a lot of duplicated author information would have to be rekeyed each time a story is added to maintain the database. It also conveniently enables me to show you how to create a relationship between tables.
The process of building a new table is only slightly more difficult than creating a database. The hard part is figuring out what columns are needed and the format for each table in the database. It's nice to know you can spend most of your time designing the ultimate database schema instead of figuring out how to implement it.
Creating Tables
To create the first table, follow these steps:
-
Navigate down to the database server folder as you did in the "Creating a New Database" section.
-
Expand the database server folder.
-
Expand the DCV_DB folder.
-
Right-click the Tables folder.
-
Select the New Table menu item. You should now have an entry form in which to enter the database columns shown in Table 12-2.
Table 12-2: Authors Database Table Column Descriptions COLUMN NAME
DATA TYPE
LENGTH
DESCRIPTION
IDENTITY
ALLOW NULLS
AuthorID
int
4
Autogenerated ID number for the author
Yes
No
LastName
varchar
50
Last name of the author
No
No
FirstName
varchar
50
First name of the author
No
No
-
Right-click the AuthorID row and select Set Primary Key from the drop-down menu.
-
Select Save Table 1 from the File menu.
-
Enter Authors into the text field in the dialog box.
-
Click OK.
Go ahead and repeat these steps for the second table, but use the information in Table 12-3 and use StoryID as the primary key. Save the table as Content.
| COLUMN NAME | DATA TYPE | LENGTH | DESCRIPTION | IDENTITY | ALLOW NULLS |
|---|---|---|---|---|---|
| StoryID | int | 4 | Autogenerated ID number for the story | Yes | No |
| AuthorID | int | 4 | Foreign key to the Authors database | No | No |
| Headline | varchar | 80 | Headline for the content | No | No |
| Story | text | 16 | Story portion of the content | No | No |
In this book I don't go into what all the data types mean, but if you're interested, many good books on Microsoft SQL Server and SQL cover this topic in great detail.
The Identity field, when set to Yes, will turn on autonumber generation for the column. Why the field is called "Identity" (instead of "Autonumber") is a mystery to me. I'm an application programmer, though, and not a database person. It's probably some special database term.
Okay, you now have your tables. The next step is to build a relationship between them. In this database, it is fairly obvious: AuthorID is the column that should link these two tables.
Creating a Relationship
To create a relationship between your tables, follow these steps:
-
Right-click the Content table in Server Explorer.
-
Select Design Table from the menu.
-
Right-click anywhere on the Table Designer.
-
Select Relationships from the menu. This will bring up a Relationships property page similar to the one shown in Figure 12-4.
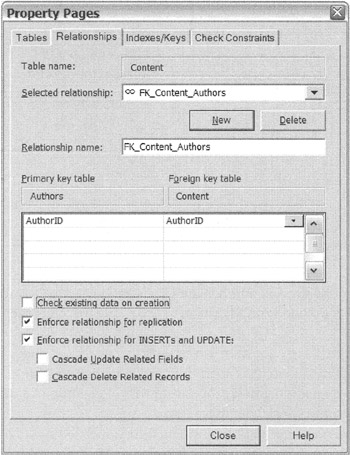
Figure 12-4: The Relationships property page -
Click the New button.
-
Select Authors as the primary key side of the relationship from the Primary key table drop-down list.
-
Select AuthorID as the primary key in the grid beneath the Primary key table drop-down list.
-
Select Content as the foreign key side of the relationship from the Foreign key table drop-down list.
-
Select AuthorID as the foreign key in the grid beneath the Foreign key table drop-down list.
-
Click Close.
Now you have two tables and a relationship between them. Quite often, when you want to get data from a database, you need information from multiple tables. For example, in this case, you might want to get all stories with each author's first and last name. As mentioned previously, you could have created the Content table that way, but then you would have a lot of duplicate data floating around. There is nothing stopping you from executing a SQL statement, also known as a query, that gets this information, as shown in Listing 12-1.
Listing 12-1: Getting Data from Two Tables
SELECT FirstName, LastName, Headline, Story FROM Authors, Content WHERE Authors.AuthorID = Content.AuthorID ORDER BY StoryID ASC
Personally, I prefer to be able to write a query something like this instead:
SELECT FirstName, LastName, Headline, Story FROM Stories
This is exactly what you can do with database views. Basically, you might think of a view as a virtual table without any data of its own, based on a predefined query. If you know you are going to use the same set of data based on a query, you might consider using the view instead of coding.
| Note | Those of you who are knowledgeable about SQL and views might have noticed the ORDER BY clause. Microsoft SQL Server supports the ORDER BY clause in its views, unlike some older database systems. |
Creating a View
Follow these steps to create a view:
-
Right-click the Views table from within the DCV_DB folder in Server Explorer.
-
Select New View from the menu. This will bring up an Add Table dialog box similar to the one shown in Figure 12-5.
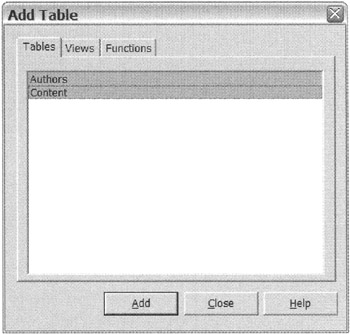
Figure 12-5: The Add Table dialog box -
Select both Authors and Content.
-
Click the Add button. This generates a window similar to the one shown in Figure 12-6.
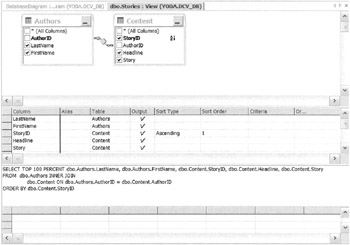
Figure 12-6: The View Design window -
Click the Close button.
-
Click the check boxes for FirstName and LastName in the Authors table.
-
Click the check boxes for StoryID, Headline, and Story in the Content table.
-
Right-click StoryID and select Sort Ascending from the menu.
-
Select Save View1 from the File menu.
-
Enter Stories into text field.
-
Click OK.
Pretty painless, don't you think? You have the option of testing your view right there, too. Click the Run Query button on the main toolbar. (It's the button with an exclamation point on it.) The View Design window is pretty powerful. If you play with it for a while, you'll see what I mean.
Did you click the Run Query button and get nothing? Oops... I forgot to tell you to load some data into the database. You can do this with Visual Studio .NET as well. Simply double-click either of the tables you created, and an editable table will appear.
First enter the data for the authors. If you don't, you won't have an author ID to enter into the AuthorID column in the Content view. Enter the data from Table 12-4. Notice that there are no author IDs to enter—this field is automatically created. In fact, Visual Studio .NET will yell at you if you try to enter something in the AuthorID column.
| LASTNAME | FIRSTNAME |
|---|---|
| Doors | Bill |
| Ellidaughter | Larry |
| Fraser | Stephen |
Now enter the data in Table 12-5. Notice that StoryID cannot be entered. It, too, is an autogenerated number. You do have to enter AuthorID, though, because it is not automatically generated in this table.
| AUTHORID | HEADLINE | STORY |
|---|---|---|
| 1 | .NET is the Best | According to my research. The .NET product has no competition, though I am a little biased. |
| 2 | Oracle is #1 | Research suggests that it is the best database on the market, not that I have any biases in that conclusion. |
| 3 | Content Management is Expensive | Not anymore. It now costs the price of a book and a little work. |
| 4 | SQL Server Will Be #1 | This database has no real competition. But then again, I am a little biased. |
Building Stored Procedures
You don't have to use stored procedures, because anything you can run using stored procedures you can run using standard SQL. So, why cover this utility at all?
There are two main reasons. First, stored procedures let a software developer call database code using function calls with arguments. Second, and more important, the utility is compiled before it gets loaded. This makes the calls to the database faster and more efficient because it has already been optimized.
Because you haven't covered ADO.NET code yet, you won't be able to do much with the stored procedure you'll create. Fortunately, Visual Studio .NET provides an option so that it can be tested.
Unlike the previous utilities, you have to actually code stored procedures. If you don't know SQL, don't worry because the coding is short and, I think, pretty self-explanatory. As always, there are many good books you can read to get a better understanding of it.
You will create a stored procedure to insert data into the Authors table. You already did this process manually, so you should have a good idea of what the stored procedure needs to do.
To create a stored procedure, follow these steps:
-
Right-click the Stored Procedures table from within the DCV_DB folder in Server Explorer.
-
Select New Stored Procedure from the menu. This will bring up an editing session with the default code shown in Listing 12-2.
Listing 12-2: Default Stored Procedure Code

CREATE PROCEDURE dbo.StoredProcedure1 /* ( @parameter1 datatype = default value, @parameter2 datatype OUTPUT ) */ AS /* SET NOCOUNT ON */ RETURN
First you have to set up the parameters that will be passed from the program. Obviously, you need to receive all the mandatory columns that make up the row. In the Authors table's case, that's the entire row except AuthorID, which is autogenerated. Listing 12-3 shows the changes that need to be made to the default code provided in order to add parameters. Note that the comments /*...*/ are removed.
Listing 12-3: Setting the Parameters
CREATE PROCEDURE dbo.StoredProcedure1 ( @LastName NVARCHAR(32) = NULL, @FirstName NVARCHAR(32) = NULL, ) AS
The SET NOCOUNT ON option prevents the number of rows affected by the stored procedure from being returned to the calling program every time it is called. If you need a count on the number of records affected, you can leave the SET NOCOUNT ON option commented out or you can delete the option altogether. Because I will use the count in a later example I left the option commented out.
Finally, you code the actual insert command. The key to this stored procedure is that instead of hard-coding the values to be inserted, you use the parameters you previously declared. Listing 12-4 is the final version of the stored procedure. Note that you rename the stored procedure to dbo.InsertAuthor.
Listing 12-4: InsertAuthor Stored Procedure
CREATE PROCEDURE dbo.InsertAuthor ( @LastName NVARCHAR(32) = NULL, @FirstName NVARCHAR(32) = NULL, ) AS /* SET NOCOUNT ON */ INSERT INTO Authors ( LastName, FirstName) VALUES (@LastName, (@FirstName) RETURN
All that's left is to save the stored procedure. Saving the file will create a stored procedure with the name on the CREATE PROCEDURE line. If you made a mistake while coding, the save will fail and an error message will tell you where the error is.
To run or debug the stored procedure, just right-click the newly created stored procedure and select Run Stored Procedure or Step Into Stored Procedure.
You now have a database to work with for the rest of the chapter. Let's continue on and start looking at ADO.NET and how to code it using Managed C++.
EAN: 2147483647
Pages: 169