Configuring Visual Studio .NET for ASP.NET
It is possible to code ASP.NET with Managed C++ codebehind, but I find it easier to develop using Visual Studio .NET. Even if you are not using Visual Studio .NET, this section should still give you insight into how to configure your favorite development environment.
The first step in configuring Managed C++ for ASP.NET development is to make sure that ASP.NET is set up properly on your computer. The common problem you may run into is installing IIS after installing .NET. Unfortunately, this does not work. If you did this by mistake, your ASP.NET pages will not be processed properly by IIS. You will know you have made this mistake because after running an ASP.NET Web page, you will find within the source code of the HTML generated the original ASP.NET Web controls and not HTML (as it should have). Basically IIS is not translating the .aspx file because ASP.NET is not registered correctly on your system. To fix the problem, try running aspnet_regiis.exe from the Visual Studio .NET command prompt:
aspnet_regiis.exe -lv
Once you have ASP.NET configured properly, the next step is to create a class library by selecting the Class Library (.NET) template in the Add New Project dialog box (see Figure 14-1). You create a library because, in actuality, a codebehind is just an assembly with a few specific coding requirements.
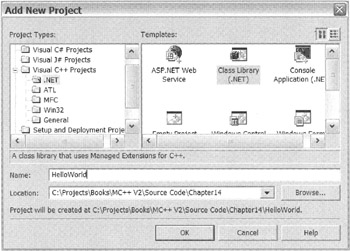
Figure 14-1: The Add New Project dialog box
In this chapter, I use a project called "HelloWorld". Use whatever name you want, just remember that it will be the name of the assembly that will be built, unless you change it in the configuration.
The next few configurations are optional. First, I rename (in Solution Explorer) the Header Files folder to Class Files. This is just my preference. I feel that because that is what I am going to place in this folder, it only makes sense to rename it. But for those of you who insist on the "same old, same old," these files do end in .h and are included so they are also header files.
Next, you can delete from the solution (and physically from the development directory) the generated .h file, in this case HelloWorld.h, as it is not needed. You can also delete the ReadMe.txt file and the Resource Files folder for the same reason.
I personally don't see the need for precompiled headers in the case of ASP.NET, so you can also delete stdafx.h and stdafx.cpp. If you do this, you need to change the properties of the project's configuration to not use precompiled headers (see Figure 14-2).

Figure 14-2: Precompiled headers Property Pages dialog box
The next step is optional, though I highly recommend it because it will keep your Solution Explorer much cleaner: Add a folder within Solution Explorer called Web Forms and provide it with a filter of aspx;asax;ascx;config. If you plan on making many Web Forms, you might consider changing the Web Forms folder into a complete hierarchy of folders but, because this is a simple example, this single folder will do.
The next two configuration steps are required. If you do not execute them, your Web Forms will not work. First, you need to make the directory where you created the project Web-shared and make it a virtual directory. You have several ways of doing this, but the easiest by far is using Windows Explorer (see Figure 14-3).
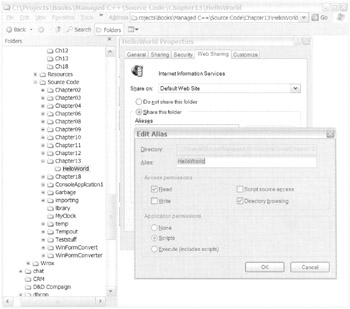
Figure 14-3: Creating a Web-shared folder
-
Navigate to the source code directory.
-
Right-click the directory folder to get the Properties dialog box.
-
Select the Web Sharing tab.
-
Select the Share this folder radio button to bring up the Edit Alias dialog box.
-
Enter the alias you want. I just take the default in this case.
-
Click the OK button twice to close both dialog boxes.
| Note | You need IIS to be installed for the Web Sharing tab to appear. This shouldn't be an issue because you need IIS installed for ASP.NET to work as well. |
Second, change the Output Directory of the assembly to the bin directory. You can optionally change the Intermediate Directory to build (see Figure 14-4). There's a workaround for this step. You can copy the compiled assembly every time to the bin directory—but why bother, as this is much easier? Plus you can't forget to copy it, which is a possibility if you do this manually every time.
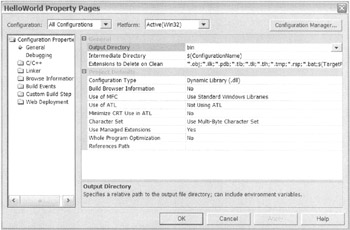
Figure 14-4: Changing the Output Directory in the Configuration Properties
At this point, you're ready to create ASP.NET Web Forms, but you'll first add three more files that might come in handy later.
The first file you should add is the Web.config file. This file defines configuration settings that are used at the time your Web application is first deployed. You can add or revise these configuration settings at any time with minimal impact to your Web application. If the file does not exist in the root directory of your application, then the system default is used.
Listing 14-1 is close to the same as that of either of the autogenerated Web.config files of C# or Visual Basic .NET, except that the defaultLanguage attribute of the compilation element has been removed, as well as comments. (I removed the comments to save space in the book.)
Listing 14-1: The Default Managed C++ Web.config File
<?xml version="1.0" encoding="utf-8" ?> <configuration> <system.web> <compilation debug="true" /> <customErrors mode="RemoteOnly" /> <authentication mode="Windows" /> <trace enabled="false" requestLimit="10" pageOutput="false" traceMode="SortByTime" localOnly="true" /> <sessionState mode="InProc" stateConnectionString="tcpip=127.0.0.1:42424" sqlConnectionString="data source=127.0.0.1;user id=sa;password=" cookieless="false" timeout="20" /> <globalization requestEncoding="utf-8" responseEncoding="utf-8" /> </system.web> </configuration>
The second and third files you should add are the Global.asax file (Listing 14-2) and its codebehind (Listing 14-3). The Global.asax file is an optional file that contains code for responding to application-level events raised by ASP.NET. The following two listings were created using my wfconvert.exe tool on a C# version of the Global.asax file. (I again removed the comments to save space.)
Listing 14-2: The Default Global.asax File
<%@ Assembly Name="HelloWorld" %> <%@ Application Inherits="HelloWorld.Global" %>
Listing 14-3: The Default Global.asax.h (Codebehind) File
using namespace System; using namespace System::Collections; using namespace System::ComponentModel; using namespace System::Web; using namespace System::Web::SessionState; namespace HelloWorld { public __gc class Global : public System::Web::HttpApplication { public: Global() { InitializeComponent(); } protected: void Application_Start(Object *sender, EventArgs *e) { } protected: void Session_Start(Object *sender, EventArgs *e) { } protected: void Application_BeginRequest(Object *sender, EventArgs *e) { } protected: void Application_EndRequest(Object *sender, EventArgs *e) { } protected: void Application_AuthenticateRequest(Object *sender, EventArgs *e) { } protected: void Application_Error(Object *sender, EventArgs *e) { } protected: void Session_End(Object *sender, EventArgs *e) { } protected: void Application_End(Object *sender, EventArgs *e) { } private: void InitializeComponent() { } }; } Now you are ready to create your first Managed C++ Web Form. Just to make sure you got everything, take a look at Figure 14-5, which shows what Solution Explorer should now look like.
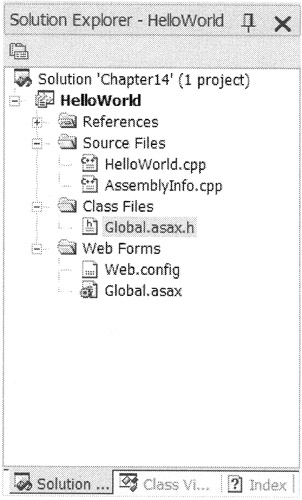
Figure 14-5: Solution Explorer is ready for ASP.NET.
EAN: 2147483647
Pages: 169