| Before you can connect Flash to a socket server, you must create a new XMLSocket object. You can then use the methods of that object to connect to a server and exchange information. In this section, we'll show you how to create and use an XMLSocket object while also using the XML object methods and properties introduced earlier in this lesson. To create a new XMLSocket object, you must use the constructor for XMLSocket. Here's an example: server = new XMLSocket(); The above line of ActionScript creates a new XMLSocket object named server . To connect the XMLSocket to a server, you simply employ the connect() method of the XMLSocket object using the following syntax: server.connect(hostName,port) The hostName parameter is the IP address on which the socket server resides usually a numeric sequence (for example, 65.134.12.2). Since you'll be connecting to your own machine in this exercise, you can use either the sequence "127.0.0.1" or "localhost". Both 127.0.0.1 and localhost are valid references to your own computer. If you were to type http://localhost into your Web browser's address bar, it would try to connect to your computer as if it were a Web site. The port parameter refers to the port on which the server is listening. Flash can only connect to ports higher than 1024. For example: server = new XMLSocket(); server.connect("localhost", 9999) You can close a connection with a socket by using the close() method which would look like the following: server.close(); To send information via the socket connection, simply use the send() method and pass in the object you wish to send. For instance: server.send("<Text>Hi</Text>"); The XMLSocket can respond to the following types of events: onConnect This event fires when the connection is accepted or when it fails. onXML This event fires when information arrives via the socket connection. This lets you know that new information has arrived so that you can use it. onClose This event fires when the connection with the socket is lost. As we did with the onLoad event in the XML object, we have to define these event handlers with the XMLSocket that we create. For example: function serverConnected (success) { trace(success); } server.onConnect = serverConnected; Here you see that the serverConnected() function is called when the onConnect event is fired. The success parameter, shown in the function definition, has a value of true if the connection was successful and false if the connection was not successful. The onXML event is used as follows: function xmlReceived (data) { trace(data); } server.onXML = xmlReceived; The xmlReceived() function is called each time information arrives via the socket. The data parameter contains the XML document pushed into Flash. The onClose event handle can be defined and used as follows: function socketClosed () { //notify the user } server.onClose = socketClosed; You would typically use this type of event to let the user know that a connection has been lost. In this exercise, you'll build a simple chat application that connects to AquaServer (the free server provided on the CD-ROM). When this server receives a message, it automatically broadcasts that message to all connected users. It's not suitable as a long-term chat solution but a perfect tool for learning purposes. More advanced servers let you connect to or create a "room" from there, you can then do fancier things (for example, sending a message to a specific user, to the entire room, or to everyone in the chat). -
Open chat1.fla in the Lesson12/Assets folder. The file contains four layers: The Actions layer where we'll keep the ActionScript; the Labels layer which contains all of the labels for the movie; the Assets layer containing the text fields and buttons; and the Background layer which contains the interface graphics. 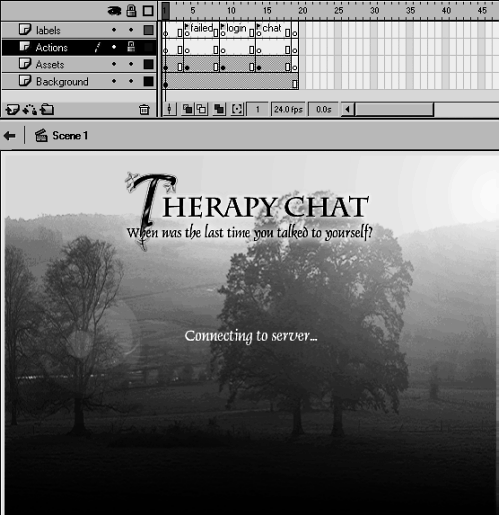 We'll begin by scripting the underlying functionality of our chat application. Later, we'll add appropriate actions to the various buttons it contains. -
With the Actions panel open, select Frame 1 and add this script: stop(); function setChatText (msg) { chatText += msg; chatBox.htmlText = chatText; scrollBar.setScrollPosition(chatBox.maxscroll); } The first line contains a stop() action to prevent the movie from playing past this frame until we instruct it to. The next line starts a function definition. This function is used to update the text displayed in the chat window (an HTML-enabled text field named chatBox). The chat window exists at the frame labeled chat. When called, this function receives a single parameter named msg , which is an HTML-formatted text string with appropriate break tags (<BR>) and other formatting. The first line of the function concatenates this string of text with the value of the variable chatText , which is used to store the entire chat transcript. (Think of this variable as containing a raw-HTML representation of the chat session.) The next line in the function definition uses the value of chatText to set what is displayed in the chat window (chatBox). Because the chat window is an HTML-enabled text field, it will interpret the raw HTML in chatText and display it properly. 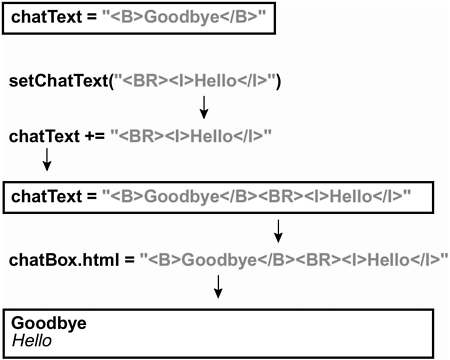 If you look on the frame labeled chat, you'll see that there is a Flash scroll-bar component attached to the chatBox text field. A method of this component setScrollPosition() is used to set the scrolling amount of the text field to which it's attached. Thus, the last line of script sets the scroll position of the chatBox to be as large as possible. Our application especially the onXML event (as you'll see in Step 4 below) makes extensive use of this function. -
Add this function definition to the same frame, just below the function defined in the previous step: function initializeChat (itWorked) { if(itWorked) { _root.gotoAndStop("login"); } else { _root.gotoAndStop("failed"); } } This function will be called using the onConnect event (as shown in Step 8). This event handler will automatically send a value of true or false to this function (the itWorked parameter), depending on whether a successful connection is made. An if statement is used to analyze this value and then to act accordingly. If the connection was successful (that is, itWorked has a value of true ), the timeline will be moved to the login frame label. If the connection is not successful, the timeline will be moved to the failed label. This function prevents the user from proceeding to the log-in screen unless he or she is connected to the server. -
Next, add the following function definition to the same frame, just below the function you defined in the previous step: function received (info) { var from = info.firstChild.firstChild.attributes.from; var message = info.firstChild.firstChild.firstChild.nodeValue; setChatText("<BR><B><FONT FACE=\"arial\" SIZE=\"15\" COLOR=\"#333333\">"+from +"</B></FONT>: <FONT FACE=\"arial\" SIZE=\"15\" COLOR=\"#999999\">"+message+"</FONT>"); } This function will be assigned as the onXML event handler (as shown in Step 8), which means it will be called whenever information has arrived from the server. The info parameter represents the actual XML data received. The data received (chat messages) is identical to the data that's sent to the server. It's formatted as follows: <doc> <message from="jobe">Hello world</message> </doc> The first two lines use properties of the XML object to set the values of two local variables, from and message . Based on the format of our XML document's structure (as shown above), the from variable will contain the user name of the person who sent the message, and the message variable will contain the actual message sent. Lastly, the from and message variables are used to format a line of HTML code, which is added to the chat window using the setChatText() function (defined in Step 2). NOTE For information on how to use HTML-formatted text in Flash, see Lesson 13, Validating and Formatting Data. -
To let a user know when the connection has closed, add this function definition to the frame: function connectionClosed () { setChatText("<BR><B><FONT FACE=\"arial\" SIZE=\"15\" COLOR=\"#666666\">The connection has been terminated.</B></FONT>"); } In a moment, we'll assign this function as the onClose event handler (shown in Step 8). When the socket connection is closed or lost, this function is called. It then makes a function call itself, to the setChatText() function, which you'll remember is used to update what's displayed in the chat window. Thus, when the connection is lost, the following message will appear in the chat window: "The connection has been terminated." -
To manually close the connection, add this function definition: function closeConnection () { server.close(); } By calling this function, you can force the socket connection to be closed. As soon as it is closed the onClose event will fire. In a moment we will set up a button to call to this function. -
Add this function definition to the same frame: function send (messageToSend) { server.send("<doc><message from=\""+screenName+"\">"+messageToSend+"</message></doc>"); } This function actually sends a message to the server using the send() method you simply pass in the message to send (massageToSend ) to the function, the value of which will be any text the user has entered to send. This text is then formatted into an XML document that looks like the following: <doc> <message from="jobe">Hello</message> </doc> That document is then sent to the server, and all open chat windows (other users) will receive this data, which calls the received() function defined in Step 4. 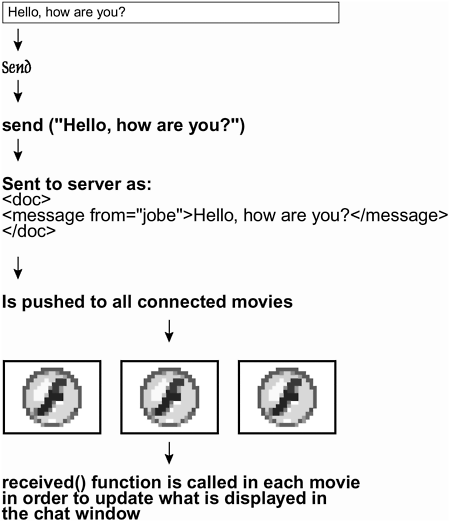 -
Add the following lines of script, just below the script you added in the previous step: XML.prototype.ignorewhite = true; server = new XMLSocket(); server.onConnect = initializeChat; server.onXML = received; server.onClose = connectionClosed; server.connect("localhost", 9999); The first line above sets the ignoreWhite property of all XML objects to true . When true , all white space (for example, tabs and carriage returns between nodes) are ignored a good practice, which also makes your parsing code shorter. Remember, Flash sees tabs and carriage returns as nodes, so if you don't set ignoreWhite to true, you will end up with extraneous nodes. Regular spaces and carriage returns contained within the nodes are untouched. Using ignoreWhite only affects what is between nodes. The rest of the ActionScript entered above creates a new XML socket object named server and then assigns functions to be called on each of the possible events. The last line of this code opens a connection with the server. Remember: Everything we've coded thus far is on Frame 1, which means that it will be executed (or defined, whichever the case may be) as soon as the movie begins to play. -
Move the playhead to the frame labeled failed. With the Actions panel open, select the Try Again button and attach this script: on (release) { _root.gotoAndStop(1); } If the connection attempt fails, then the playhead is moved to the frame labeled failed. By adding this button, you allow the user to try to reconnect by sending the timeline back to Frame 1, which contains the code that initiates connection with the server (the last line in the previous step). -
Move the playhead to the frame labeled login, where you'll find a text field (named nameField) and a button on the stage. With the Actions panel open, select the frame on the Actions layer at that label and add the following line of script: selection.setFocus("nameField"); When the movie is moved to this frame label so that the user may log in, this line of code sets the cursor into the nameField text field. This makes it possible for the user to immediately begin typing his or her screen name rather than have to click the text field first. It's a simple script we've added for the sake of convenience. -
With the playhead still at the login frame and the Actions panel open, select the Submit button and add this ActionScript: on (release, keyPress "<Enter>") { if (nameField.text != "") { screenName = nameField.text; _root.gotoAndStop("chat"); } } This script is used to set the user's screen name, which is used whenever messages are sent (as in Step 7). When the user presses the Submit button, an if statement is used to make sure that he or she has entered something in the nameField text field. The text entered is then used to set the value of screenName which is obviously the user's screen name. The last action is used to send the timeline to the frame labeled chat, where the user can begin to send and receive messages. -
Move the playhead to the frame labeled chat, where you will find two text fields (chatBox and chatMessage) and two buttons on the stage. With the Actions panel open, select the frame on the Actions layer at that label and add the following line of script: setChatText("<FONT FACE=\"arial\" SIZE=\"20\" COLOR=\"#666666\"><b>You have just joined the chat!</b></FACE>"); selection.setFocus("chatMessage"); Since these actions are placed on a frame, they're executed as soon as the timeline is moved to the frame labeled chat. The first line of ActionScript here calls the setChatText() function (defined in Step 2), which is used to display a simple message in the chat window indicating to the user that he or she has joined the chat.  The next line places the cursor into the chatMessage text field, which is where the user types the message he or she wishes to send. As with the script discussed in Step 10, this script is added for convenience. -
With the Actions panel open, select the Send button and add this script: on (release,keyPress "<enter>") { if (chatMessage.text != "") { send(chatMessage.text); chatMessage.text = ""; } } This script is used to send a message from the user when the button is pressed and released. An if statement is used to determine whether the user has entered something into the chatMessage text field. If text has been entered, it's used in a function call to the send() function defined in Step 7. The last action in the script will empty the chatMessage text field so that the user can begin typing a fresh message into it. -
With the Actions panel open, select the Close Connection button on the stage and add this script: on (release) { closeConnection(); } This action calls the closeConnection() function defined in Step 6. When the user clicks the button, the socket connection will be forced to end. -
Start AquaServer on port 9999. Refer to the previous section for instructions on how to do this. -
Choose Control > Test Movie to test what you have created: Log in and send some chat messages. The HTML-formatted messages should pop into your window. You can open up several instances of this SWF file and try chatting between them. If you click the Close Connection button, you should notice that you can no longer chat. -
Save your work as chat2.fla You're finally finished! As you can see, there are many steps involved in creating even the most basic chat application. However, now that you're comfortable with XML, you'll soon be building bigger, more complex applications. |