Working with the Registry
| The Windows Registry is a repository used to store application, user, and machine-specific information. It's the perfect place to store configuration data such as user preferences, database connection strings, file locations, and more. Before you start mucking with the Registry, however, you must first be aware that changes to the Registry can cripple an application or even cause Windows to crash! Be sure to know what you are changing and the ramifications of the change before modifying the Windows Registry. By the Way Don't pollute the Registry! I'm constantly amazed by the amount of junk that a program will store in the Registry. Keep in mind that the Registry is not your personal database. In fact, if your application uses a database, it's often a better idea to store information in the database itself. Understanding the Structure of the Windows RegistryThe Registry is organized in a hierarchical structurelike a tree. The top nodes in the tree (called hives) are predefinedyou can't add to, modify, or delete them. Table 20.1 lists the hives (top levels) of the Registry.
Under each hive listed in Table 20.1 are a number of keys. Figure 20.1 shows what the Registry looks like on my computer. Notice how Printers is a key that belongs to the HKEY_CURRENT_USER hive. Figure 20.1. The Registry is a hierarchical structure of hives, keys, and values.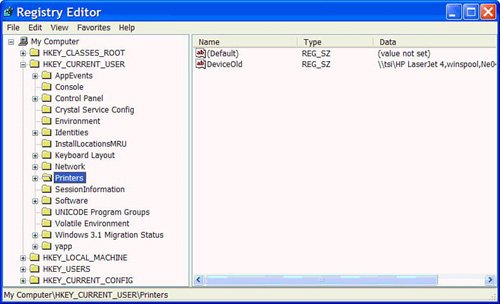 Keys can contain one or more values. In Figure 20.1, notice that the Printers key has two values (they appear in the list view on the right). Keys are used to provide a framework for storing data; values actually hold the data in question. Value items have specific data types, though they are different from the data types in Visual C#. Table 20.2 lists the possible data types for Registry values.
By far, the most commonly used data type is the REG_SZ string data type. You can store all sorts of things in a REG_SZ value, such as text (obviously), "True", "False", "0", "1", and more. In fact, this is usually the only data type I use for my applications. When saving Boolean values, I just format them as either "1" or "0". Accessing the Registry with Registry and RegistryKeyWorking with the Registry from within Visual C# is most easily performed using the Registry object. This object is part of the Microsoft.Win32 namespace. In order to use the objects, you have two options: Preface each object reference with Microsoft.Win32, as in: Microsoft.Win32.RegistryKey key = Microsoft.Win32.Registry.LocalMachine.OpenSubKey("Software", true);Or create a using statement in the top of the class accessing the Registry, so that you can use a short reference like this: RegistryKey key = Registry.LocalMachine.OpenSubKey("Software", true);You have created a using statement in the past. To do so, you find the existing using statements at the top of the class, and add the following using statement below them: using Microsoft.Win32; You will be doing this in the example that you build in this hour. Creating Registry KeysThe Registry object has a number of properties. Among these are object properties that relate to the hives of the Registry shown in Table 20.1. Table 20.3 lists the properties that reference the Registry's hives.
Creating Registry keys using Registry is a snap. First, you have to identify the hive under which you want to create the key. When you know the hive, you just call the CreateSubKey() method of the corresponding hive object property, passing it the name of the key to create. For example, consider this statement: Registry.CurrentUser.CreateSubKey("UserSettings");This statement would create the Key UserSettings under HKEY_CURRENT_USER. Now, you have to realize that an application rarely creates a key directly under a hive. There are many subkeys you can use for each hive, but perhaps the most common is the \Software key. Most applications create a corporate-named key under \Software and then create product keys below the corporate subkey. For example, suppose that your company name is CleverSoftware, you're going to ship the Picture Viewer program, and you want to store some application settings in the Registry (in fact, you will modify your Picture Viewer to do this later in this hour). You want to end up with a key structure that looks like this: HKEY_CURRENT_USER\Software\CleverSoftware\PictureViewer Fortunately, the CreateSubKey() method allows you to specify multiple levels of keys in one method call. To create this structure, you would use the following statement: Registry.CurrentUser.CreateSubKey(@"Software\CleverSoftware\PictureViewer"); By the Way Remember, Visual C# treats the slash character \ in a string as an escape character. By prefacing the string with the @ symbol, you tell Visual C# to use the string as a literal value. Visual C# would parse out this statement by first locating the hive HKEY_CURRENT_USER and then looking for a \Software key. It would find one, because all Windows machines have this key, but it would not overwrite this key. It would then look for CleverSoftware. Assuming that it did not find this key, it would create it and the subkey that you specified. Note that if Visual C# finds an existing subkey that you defined in your statement (all subkeys are separated by a slash \), it will not overwrite it. By the Way Why HKEY_CURRENT_USER instead of HKEY_LOCAL_MACHINE? In general, it's best to save application settings in HKEY_CURRENT_USER so that each user who uses of your application can have his or her own settings. If you store your settings in HKEY_LOCAL_MACHINE, the settings will be global to all users who run the application from the computer in question. Also, some administrators restrict access to HKEY_LOCAL_MACHINE, and your application will fail if it attempts to access restricted keys. Deleting Registry KeysYou can use two methods to delete a Registry key: DeleteSubKey() and DeleteSubKeyTree(). DeleteSubKey(), deletes a key and all its values as long as the key contains no subkeys. DeleteSubKeyTree(), deletes a key, its values, and all sub-keys and values found below it. Use this one with care! Here's a statement that could be used to delete the subkey created with the previous sample: Registry.CurrentUser.DeleteSubKey(@"Software\CleverSoftware\PictureViewer"); Did you Know? DeleteSubKey() throws an exception if the key you specify does not exist. Whenever writing code to work with the Registry, try to account for the unexpected. Getting and Setting Key ValuesCreating and deleting keys is useful, but only in the sense that keys provide the structure for the important items: the value items. You've already learned that keys can have one or more value items and that value items are defined as a specific data type. All that's left is to learn the code used to manipulate Registry values. Unfortunately, getting and setting key values isn't as easy as defining keys. When defining keys, the Registry object makes it easy to work with hives by giving you an object property for each hive. To create a new value item, or to set the value of an existing value item, you use Registry.SetValue(). The SetValue() method has the following basic syntax: SetValue(keypath, itemname, value)Unfortunately, you have to specify the hive name in keypath, as you will see. Notice that you do not specify the data type; Visual C# sets the data type according to the value that is passed to the method. For example, to create a RegistrationName value item for the Registry key discussed in the previous section, you would use a statement like this: Registry.SetValue(@"HKEY_CURRENT_USER\Software\CleverSoftware\PictureViewer\", "RegistrationName", "James"); This statement would produce a value item as shown in Figure 20.2. Figure 20.2. Values appear attached to keys.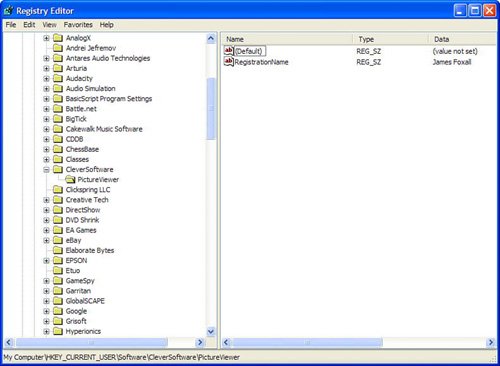 To change the value, you would call SetValue() again, passing it the same key and item name, but a different valuenice and easy! To retrieve a value from the Registry, you use the GetValue() method. This method also requires a full hive/key path. The basic format of GetValue() is this: GetValue(keypath, itemname, defaultvalue) The parameters keypath and itemname are the same as used with SetValue(). Sometimes, when you go to retrieve a value from the Registry, the value and perhaps even the key won't exist. There are a number of reasons for thisanother application might have deleted the value, the user might have manually deleted the value, or the user might have restored a backup of her Registry from before the value was created. The defaultvalue parameter is used to define what GetValue() returns if it is unable to find the value item. This eliminates the need to catch an exception in the event that the value item is missing. The following statements display the value in the RegistrationName as created in the previous example: string strRegName; strRegName = Convert.ToString( Registry.GetValue(@"HKEY_CURRENT_USER\Software\CleverSoftware\PictureViewer\", "RegistrationName", "")); MessageBox.Show(strRegName); Modifying Your Picture Viewer Project to Use the RegistryIn this section, you're going to modify your Picture Viewer project so that the user's settings on the Options dialog box are saved to the Registry. When the user first starts the Picture Viewer program, the settings are loaded from the Registry. Start by opening the Picture Viewer project you last worked on in Hour 19, "Performing File Operations," and then double-click frmOptions.cs in the Solution Explorer to display the Options form. Follow these steps to create the using statement so that you don't have to preface every Registry instance with Microsoft.Win32:
Displaying Options from the RegistryThe first thing you need to do is show the current user's settings when the Options form displays. Follow these steps to display the options stored in the Registry:
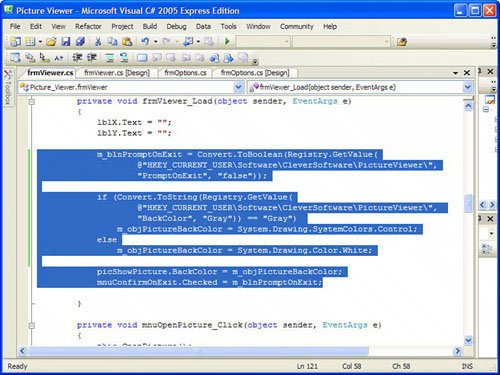
All this code should be familiar to you by now. The first statement is used to set the value of the txtUserName text box to the user name stored in the Registry. The first time the Options form loads, there is no entry in the Registry, so an empty string is used. Notice that we wrapped the Registry call in Convert.ToString(), so that whatever value we pull from the Registry will be converted to a string, which is what a text box accepts. The second statement sets the checked state of the Prompt on Exit check box to the value stored in the Registry. If no value is found, as is the case the first time the Options form is loaded, the Checked property is set to false. Once again, you had to wrap the result of GetValue() with a conversion functionin this case, Convert.ToBoolean()to convert the value to a boolean. The next statement starts an if...else construct that looks for a color name in the Registry and sets the appropriate option button's Checked property to TRue. Because we're comparing the Registry result to text, we wrap the result in Convert.ToString() to cast the result as a string. Saving Options to the RegistryNow that the Options form displays the current values stored in the Registry, you can add the code to save the changes the user makes to these values. Follow these steps:
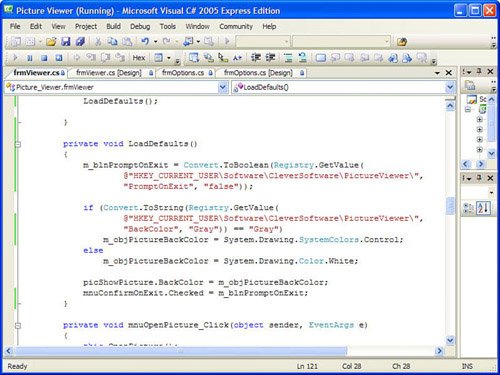
This code is essentially the opposite of the code you entered in the Load event; it stores the values from the controls into the Registry. You should be able to follow this code on your own. Using the Options Stored in the RegistryYou're now allowing the user to view and change the settings stored in the Registry, but you're not actually using the user's preferences. Follow these steps to use the values stored in the Registry:
Testing and Debugging Your Picture Viewer ProjectPress F5 to run the project. Next, click the Options button on the toolbar to display the Options form. Nothing looks different yet. Follow these steps to see the effect of your new code:
Notice that you weren't prompted to confirm exiting. This occurs because the main Picture Viewer form is not being updated to reflect the changes made to the Registry. You're now going to use the skills you learned for creating procedures to make your code work properly. Follow these steps:
The Registry is a powerful tool to have at your disposalif used properly! In this section, you learned all the necessary techniques to implement Registry functionality in your applications. |
EAN: 2147483647
Pages: 248