Setting Up Visual SourceSafe
[Previous] [Next]
To implement source code control, first create a Visual SourceSafe database. Once you've created a Visual SourceSafe database, you can add a Visual Basic project to it. This is most easily done with Visual SourceSafe Administrator, shown in Figure 15-1. To start Visual SourceSafe Administrator, choose Programs from the Start menu, and then choose Microsoft Visual SourceSafe and Visual SourceSafe 6.0 Admin from the submenus.
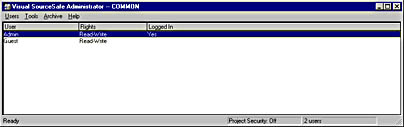
Figure 15-1. Use Visual SourceSafe Administrator to configure source code control.
Creating a Visual SourceSafe Database
Visual SourceSafe is installed with a default source code database titled Common. When placing projects under source code control, it's best to start by creating your own source code database. When you do this, you'll begin to notice that Visual SourceSafe isn't always the most intuitive program. Most Windows applications let you create documents (including databases) by using items on a File menu. However, in Visual SourceSafe, you create databases by using the Tools menu. (Note that there isn't a File menu available in Visual SourceSafe Administrator.)
To create a Visual SourceSafe database, follow these steps:
- Choose Create Database from the Tools menu.
- Enter the name of the folder in which you want to create the source code database. (See Figure 15-2.) This folder should be a new, empty folder placed on the network where all developers can access it. Make sure that all developers who'll use the project have full access to this folder and its subfolders .
- Click OK to commit your folder selection.
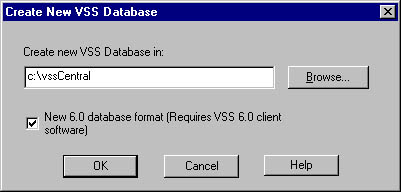
Figure 15-2. Create each new Visual SourceSafe database in its own folder.
NOTE
You don't actually specify a name for the new Visual SourceSafe database; you specify the folder in which it is created.
Opening a Visual SourceSafe Database
In applications such as Microsoft Word or Microsoft Access, when you create a new document or database, the new object is automatically opened and ready to use. This is not how it works with Visual SourceSafe. After you create a Visual SourceSafe database, you must explicitly open the database. To open the database, choose Open SourceSafe Database from the Users menu. (Remember: sometimes you'll have to explore the menus to find the function you need.)
After choosing Open SourceSafe Database, you're shown the Open SourceSafe Database dialog box, as shown in Figure 15-3. At first, your new database won't appear in the list. Although Visual SourceSafe created the database for you, it doesn't remember it. You'll have to click the Browse button to locate and select the Visual SourceSafe database file you've created. (See Figure 15-4.)
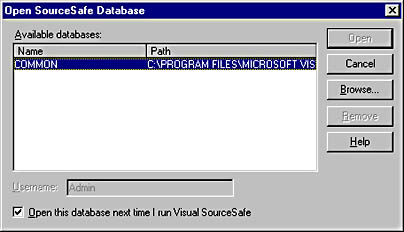
Figure 15-3. Visual SourceSafe doesn't remember the database it just created, you must locate the database manually.
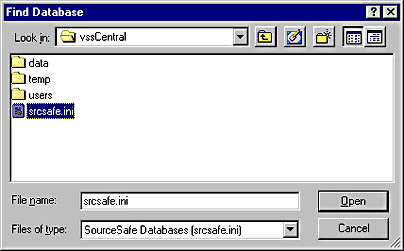
Figure 15-4. Visual SourceSafe saves its databases with the extension .ini, but not all .ini files are Visual SourceSafe databases.
NOTE
Although the extension .ini is commonly used for text files of a specific format throughout Windows, Visual SourceSafe actually uses the same extension for its databases! The interface and behavior of Visual SourceSafe deviates from accepted standards in many ways, and therefore it is not an exemplary model of standardization. However, if you can get past these shortcomings, you'll find a very useful tool that can help you deal with many administrative challenges.
Adding Users to a Visual SourceSafe Database
Each new Visual SourceSafe database is created with an Admin and a Guest user. You'll need to create a custom user account for each developer who will access the project while it's under source code control. When a project under Visual SourceSafe protection is opened in Visual Basic, the person opening the project has to log in as a valid user. If you create passwords for the users, each user will have to enter a password as well. By making each user log in to the Visual SourceSafe database, you'll have a level of security, you'll be able to determine which files each and every user presently has checked out, and you'll be able to review version history for each user .
To add a new user to a Visual SourceSafe database, follow these steps:
- Choose Add User from the Users menu to display the Add User dialog box shown in Figure 15-5.
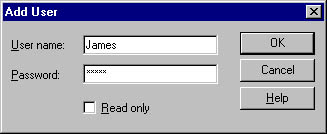
Figure 15-5. Each user who will have access to the protected project must have a valid user account.
- Enter the name of a user and the user's password. Leave the password field blank if you don't want to enforce passwords.
- To grant the user read-only access to files under source code control, select the Read Only check box. Don't select this check box if you want the user to be able to modify files.
- Click OK to save the new user's information. The new user then appears in the main Visual SourceSafe Administrator window. (See Figure 15-6.)
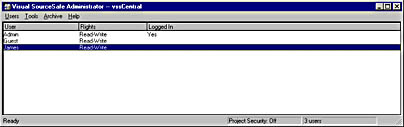
Figure 15-6. All users of a Visual SourceSafe database are shown in Visual SourceSafe Administrator, along with their rights and whether or not they are logged in to the database.
Although you can add users at any time, always start with at least one custom user. Also, even if you don't assign passwords to all the user accounts, consider adding a password to the Admin account to prevent other users from running Visual SourceSafe Administrator and modifying your configuration. To add a password to the Admin user, select the user in the list and choose Change Password from the Users menu.
Placing a Visual Basic Project Under SourceSafe Control
To place a Visual Basic project under source code control, you must add the project and all of its files to the SourceSafe database. This can be a tedious and error-prone process if done manually. However, there is an easy way to add an entire Visual Basic project to source code control, and that's through Visual Basic itself.
To add a Visual Basic project to Visual SourceSafe, follow these steps:
- Start Visual Basic, and open the project you want to add to Visual SourceSafe.
- Visual SourceSafe includes a Visual Basic add-in component. You access the features of the add-in component on the SourceSafe submenu that is automatically added to the Tools menu in Visual Basic. Choose Add Project To SourceSafe from the SourceSafe submenu, as shown in Figure 15-7.
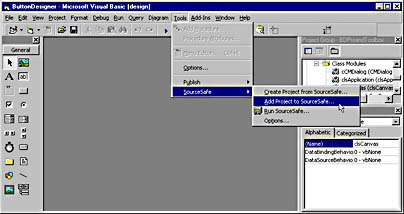
Figure 15-7. Add an entire Visual Basic project to source code control by using the SourceSafe add-in menu.
- After choosing to add the Visual Basic project to source code control, you're asked to log in to the Visual SourceSafe database, as shown in Figure 15-8. Enter your user name and password (if applicable ), and make sure that the proper Visual SourceSafe database is specified in the Database text box. If the database displayed isn't the correct one, click Browse to locate and select the proper database.
- Click OK to log in to Visual SourceSafe and add the project to source code control.
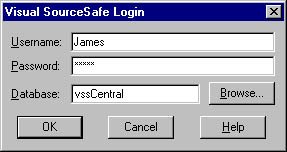
Figure 15-8. To perform any functions with Visual SourceSafe, you must log in as a valid user.
- After you log in to Visual SourceSafe, you're shown the Add To SourceSafe Project dialog box, as shown in Figure 15-9, which displays the current project tree of the active Visual SourceSafe database. You can have more than one project in a Visual SourceSafe database. If projects already exist in the active Visual SourceSafe database, they'll appear in this dialog box. Use this dialog box to specify the name of the project as well as its location in the database organizational tree. Usually, accepting the defaults is adequate.
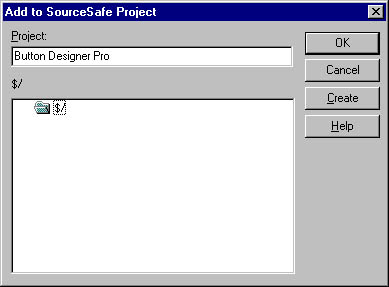
Figure 15-9. Use this dialog box to name a project and to specify its location in the Visual SourceSafe database organizational tree.
- Next, you are asked to specify which files to add to source code control. (See Figure 15-10.) Generally, you'll want to add all Visual Basic project files to source code control. All files are selected by default, so you can simply click OK to continue.

Figure 15-10. Although you can selectively add files to source code control, it's best to add all of your Visual Basic source files.
After you select the files to place under source code control, Visual SourceSafe will display a dialog box as it adds the files to the current Visual SourceSafe database. If the project is very small, the dialog box might appear and disappear so fast that you won't notice it. When Visual SourceSafe is finished, the Visual Basic Project Explorer window refreshes, and you'll see new icons for each file in the project, as shown in Figure 15-11.
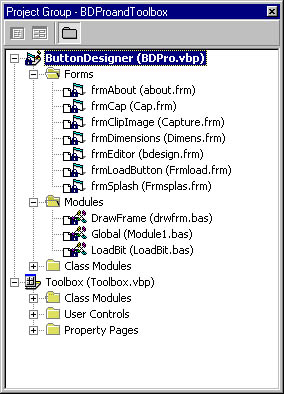
Figure 15-11. Files under source code control appear in the Project Explorer with icons indicating their Visual SourceSafe status, such as available, checked out by the current user, or checked out by another user.
The files under source code control appear with an icon of a document and a lock. When a file is checked out, a red check mark is placed on the icon's document.
EAN: 2147483647
Pages: 57