Visual Basic Projects and Visual SourceSafe
[Previous] [ Next ]
For the most part, development of a Visual Basic project under source code control is similar to your work on an ordinary project. The primary difference is that you must check out files to modify them. I've said that when you check out a source code file it's much like checking out a book at the library and taking it home. You can make changes to the book because you have it ”although you shouldn't do this to a library book! ”but no other person can make changes to it until you check it in and that person checks it out. However, unlike a small library that houses only one copy of each book, Visual SourceSafe provides as many read-only copies of every source code file as necessary for every developer to be able to view the file. This is necessary because you can't edit and debug a form, for example, without having the entire project in which the form resides.
NOTE
When you check out a file in the Visual Basic integrated development environment (IDE) that has a corresponding binary file (such as the .frx file that corresponds to a form's .frm file), the binary file is automatically checked out as well.
Designating a Working Folder
Before developers begin to work with a project under source code control, some setup must be performed on each development machine. Creating a working folder for each developer is the first step. A working folder is a folder containing a copy of the entire project. Each developer must have a unique working folder that is not shared by any other developer. No developer opens a "master" project. Instead, each developer opens the copy of the project that resides in that developer's working folder.
When you use the Add Project To SourceSafe menu item in Visual Basic to add the current project to Visual SourceSafe, the project is treated as the working project and the folder in which it resides is automatically designated as the current user 's working folder. Once the project is under source code control, there's no master project that can be opened in Visual Basic. Instead, the source files are stored in a complex structure in the folder in which the active Visual SourceSafe database resides. As users check files in and out, the master Visual SourceSafe project is updated. It's absolutely critical that you regularly back up the entire contents of the Visual SourceSafe database folder, including all subfolders .
Since the master Visual SourceSafe project is not stored in the same format as Visual Basic project files ”and therefore you cannot open the master project directly ”you need to have a working copy of the Visual Basic project to do any development using Visual Basic. The developer who adds the project to source code control by following the steps outlined previously already has a working copy. However, you must create a working folder and a working copy of the project for all other developers.
To create a custom working folder, use Visual SourceSafe Explorer, shown in Figure 15-12. To start Visual SourceSafe Explorer, choose Programs from the Start menu, and then choose Microsoft Visual SourceSafe and Microsoft Visual SourceSafe 6.0 from the submenus. The current working folder is shown in the right pane below the toolbar. Notice that the user logged in to Visual SourceSafe in Figure 15-12 has no working folder.
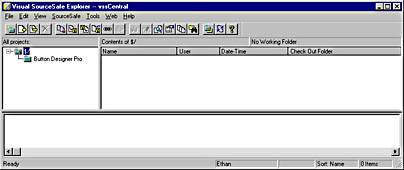
Figure 15-12. Each developer manages his or her project by using Visual SourceSafe Explorer.
To create or change the current working folder of a developer, follow these steps:
- Log in to Visual SourceSafe as the user whose working folder you want to create. This is best done from the machine that the developer will use, to prevent problems with relative paths and drive mappings.
- Choose Set Working Folder from the File menu to display the Set Working Folder dialog box shown in Figure 15-13.
- Enter the path and folder name of the developer's working folder. To create a new folder, enter the name and path in the text box first and then click Create Folder.
- Click OK to use the designated working folder.
NOTE
Each and every developer must have a unique working folder; do not attempt to create a shared working folder. Since each developer will have a distinct working folder, you don't have to create working folders on a shared drive. However, the master Visual SourceSafe database must reside on a shared drive.
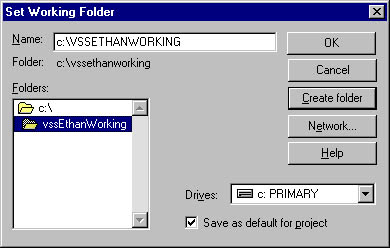
Figure 15-13. Create or change working folders by using the Set Working Folder dialog box.
Creating a Working Copy of the Project
Once you've designated a working folder, you have to create a working copy of the Visual Basic project with which the developer can work. To do this, select the project name in the left pane of Visual SourceSafe Explorer. When you select the project, the pane on the right fills with the list of all files under source code control for the selected project. (See Figure 15-14.)
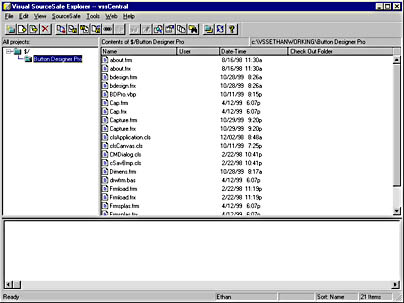
Figure 15-14. Selecting a Visual SourceSafe project displays all the files in the project.
With the project selected, choose Get Latest Version from the SourceSafe menu. Visual SourceSafe asks you to confirm the working folder, as shown in Figure 15-15. If the working folder is correct, click OK to accept the defaults and create a working project.
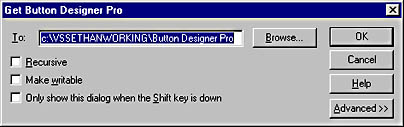
Figure 15-15. Whenever you retrieve the latest version of a project, validate that the files are being pulled to the correct working folder.
Checking Out Files by Using Visual SourceSafe Explorer
Most of the time, you'll check files in and out through the Visual Basic IDE. However, there will be times when you'll want to use Visual SourceSafe Explorer. For instance, although you can tell that a file is checked out by another user by looking at the icon displayed in Visual Basic's Project Explorer, you can't tell who has a file checked out. Visual SourceSafe Explorer offers this as well as other information and functionality not available within the Visual Basic IDE. Since you'll be using Visual SourceSafe Explorer at times, you should be familiar with checking files in and out through Visual SourceSafe Explorer's interface.
To check out a file by using Visual SourceSafe Explorer, follow these steps:
- Select the file or files. To select multiple files, use the Ctrl and Shift keys in conjunction with clicking an item or items.
- Right-click the selected file or files to display a shortcut menu.
- Choose Check Out, as shown in Figure 15-16. (Note that Check Out is also available from the SourceSafe menu.)
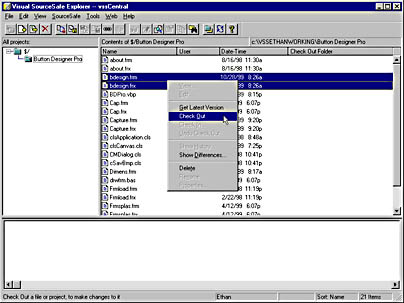
Figure 15-16. Use Visual SourceSafe Explorer to check out files only when necessary. Using the Visual Basic IDE is a better way to check out files.
NOTE
When you check out a file ”such as the .frm file of a form object ”from within the Visual Basic IDE, Visual SourceSafe knows to check out the corresponding .frx file automatically. However, when you check out such a file by using Visual SourceSafe Explorer, you must check out the associated binary file manually or you will have problems.
The only file that can be checked out by more than one developer at a time is the main project file (.vbp). Whether a given developer should check out the project file depends on what the developer is doing. For instance, to add a new form to a project, you must have rights to modify the .vbp file because information on all forms in a project is maintained within the .vbp file; if you don't have the project's .vbp file checked out, you cannot add new forms to the project. Also, if you use the Increment Version option when compiling distributable components , Visual Basic needs to be able to write the new version information to the .vbp file, so once again you'll have to have the project file checked out to do this.
When a file is checked out to a user, its icon changes ”a red check mark and border are added ”making it very easy to determine which files are checked out. (See Figure 15-17.) In addition, the name of the user who has a file checked out is displayed in the list next to the file, as well as the working folder containing the checked out version of the file.
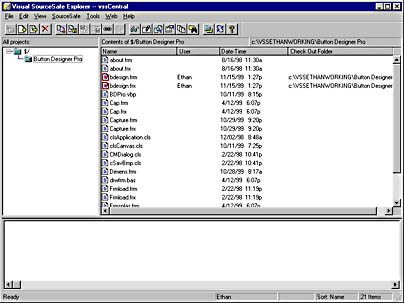
Figure 15-17. Visual SourceSafe Explorer makes it easy to determine who has a file checked out and where the working copy is located.
Once you've set up a working folder and retrieved the latest versions of the source files, you're ready to begin using the project with Visual Basic. To do so, open the working copy of the project in the working folder.
Checking Files In and Out from the Visual Basic IDE
Although you can check files in and out by using Visual SourceSafe Explorer, most of the time you'll do this directly from within Visual Basic. When you have a file checked out, the file's icon in the Project Explorer contains a red check mark, as shown in Figure 15-18. Unfortunately, the only visual clue indicating that another user has a file checked out is the border of the document icon ”its color will have changed from black to dark gray. This is hard to notice when you're running in a high resolution mode. To check out an object file (or files), right-click the object and choose Check Out, as shown in Figure 15-19.
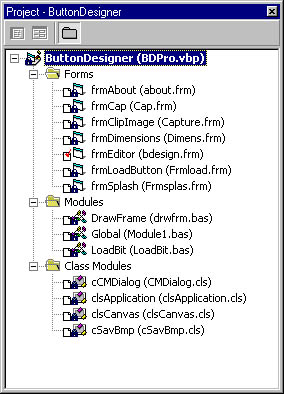
Figure 15-18. Each file you have checked out appears with a red check mark in its icon.
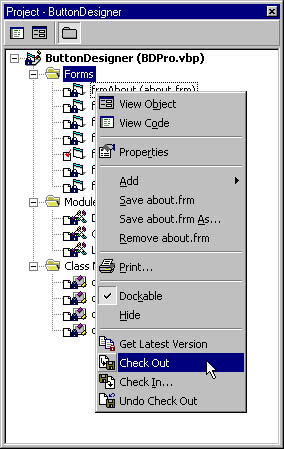
Figure 15-19. Right-clicking an object in the Project Explorer window accesses the Visual SourceSafe functionality applicable to the object.
Once you have an object (comprising one or more files) checked out, you can make changes to it as you do any object in a project not under source code control. If you attempt to make changes to an object that you do not have checked out, you'll receive an error similar to that shown in Figure 15-20.
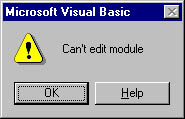
Figure 15-20. When you don't have a file checked out, you have only read rights for the file. Attempting to edit such a file generates an error similar to this one.
To check in a file that you've modified, right-click the file's icon in the Project Explorer window and choose Check In from the shortcut menu. (Refer back to Figure 15-19.) When you elect to check in a file, the Check In Files To SourceSafe dialog box shown in Figure 15-21 is displayed.
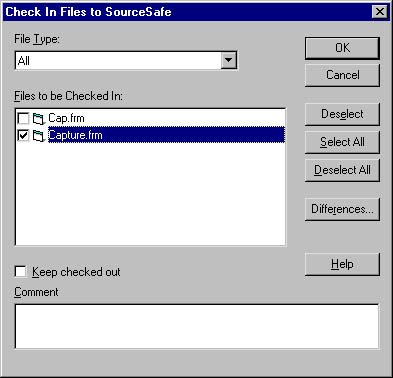
Figure 15-21. You can check in more than one file at a time by using this dialog box.
Check In Files To SourceSafe is a very useful dialog box, which lets you check in multiple files at once. No corresponding dialog box allowing you to check out multiple files at one time exists in the Visual Basic IDE. To check out multiple files simultaneously , you have to use Visual SourceSafe Explorer.
The Check In Files To SourceSafe dialog box displays all files that you currently have checked out. When you check in a file, your changes replace the original file in the Visual SourceSafe project. This is the only way that a developer can make changes to the master project. If you plan to continue working with the files, select Keep Checked Out. Select all the files that you want to check in, and click OK.
At times, you might make changes to a file that you have checked out and later find that you don't want to commit those changes. To undo a file checkout, right-click the object in the Project Explorer window and choose Undo Check Out from the shortcut menu. (Refer to Figure 15-19.)
Adding New Files to a Project Under Source Code Control
When you add a new object to a project under source code control, Visual SourceSafe won't do anything with the new file until you attempt to save it. At that point, Visual SourceSafe prompts you to add the file to Visual SourceSafe, as shown in Figure 15-22.
NOTE
If you do not have the main project file checked out, Visual SourceSafe won't allow you to add a file to the project.
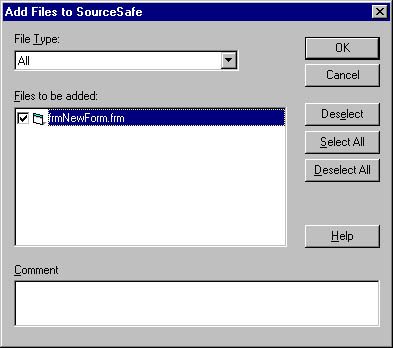
Figure 15-22. After saving a new file, Visual SourceSafe displays its Add Files To SourceSafe dialog box, allowing you to place the file under source code control.
Each user who adds new files to a project should save the new files in his or her working folder. When you add the file to Visual SourceSafe and save it in your working folder, Visual SourceSafe adds the file to the master project in its own format. Users obtain copies of new files by pulling the latest version of the project file, as I'll discuss in the next section.
NOTE
Visual SourceSafe has a number of quirks , and here's one that's particularly annoying: When you add a new file to Visual SourceSafe, you are not given the option of keeping the file checked out to you. To continue making modifications to the file, you'll have to check the file out manually (as discussed earlier in this chapter).
Getting the Latest Version of Files
When a developer checks in files, other users don't automatically receive the new files. To get copies of newly created files, or copies of files changed by other users, you must explicitly obtain the latest version of the project files. You can do this using Visual SourceSafe, or you can do this from within the Visual Basic IDE. You can also have Visual SourceSafe get the latest version of files automatically when you open a project ”or have it prompt you when you open a project ”by using the Source Code Control Options dialog box shown in Figure 15-23. To access this dialog box in Visual Basic, choose SourceSafe from the Tools menu and then choose Options. Note that you can also use this dialog box to tailor how Visual SourceSafe treats adding new files and removing existing files from your Visual Basic project.
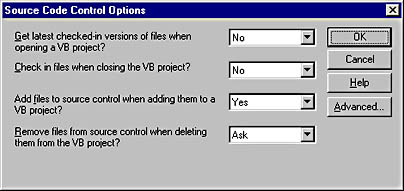
Figure 15-23. Use the Source Code Control Options dialog box to streamline the interaction between you and Visual SourceSafe.
When you retrieve the current version of files under source code control, the latest version of each file is retrieved and placed into your working folder, overwriting any older versions there. Visual SourceSafe will not overwrite any files that you have checked out. At any time, you can right-click an object in the Project Explorer window and click Get Latest Version to retrieve the current version of a file. This is useful when you know that another developer has checked in changes to a specific file.
In addition to getting the latest versions of files through the Visual Basic IDE, you can also get them through Visual SourceSafe Explorer by selecting the file or files and then choosing Get Latest Version from the Tools menu. When you do this, Visual SourceSafe shows you the dialog box in Figure 15-24. The dialog box asks you to confirm the folder in which you want to place the latest version of the selected file or files ”the working folder by default ”and allows you to set a few options.

Figure 15-24. When using Visual SourceSafe Explorer, you have a little more control when getting the latest version of files than you do from within the Visual Basic IDE.
One setting of particular importance is the Make Writable check box. Earlier in this chapter, I discussed how Visual SourceSafe sets the read-only flag of files that you do not have checked out. It does this to prevent you from making changes to these files. If you want the ability to modify files you do not have checked out, select the Make Writable check box. Visual SourceSafe will then create copies of the files in your working folder, but it will not set the read-only flag. However, this essentially removes the file or files from Visual SourceSafe control, and you might encounter problems if you alter the files.
If you choose to get the latest version of a file that you currently have checked out and that you have modified, Visual SourceSafe displays the dialog box shown in Figure 15-25. You must be very careful when dealing with this dialog box. If you choose to replace the file, you'll overwrite your changes with the latest checked-in version of the file. Your best bet 99 percent of the time is to select the Apply To All Items check box and then click Leave.
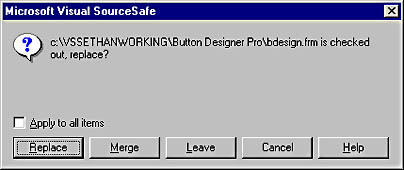
Figure 15-25. When you see this dialog box, stop and consider your actions carefully before proceeding.
Comparing Revisions
Visual SourceSafe maintains a full history of revisions to every file under source code control. To view the history of a file, select the file in Visual SourceSafe Explorer and choose Show History from the Tools menu to display the History Options dialog box shown in Figure 15-26. You can use this dialog box to tailor the history list, but most of the time you'll probably use the defaults.
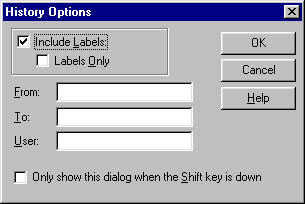
Figure 15-26. Use the History Options dialog box to tailor the history list. For instance, you might choose to view history for only a specific user, for a date range, or for both.
Clicking OK in the History Options dialog box commits your selections and displays the History dialog box. (See Figure 15-27.) This dialog box shows you all revisions of the file. A revision is essentially a version of the file as it was checked in by a user. Each time a new version of the file is checked in, it becomes a new revision.
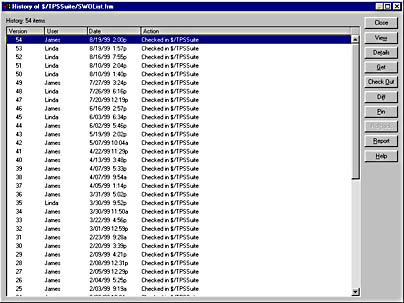
Figure 15-27. This History dialog box shows you all revisions of a file and even lets you compare any two revisions of a file.
One of the most powerful features of the History dialog box is the ability to compare two revisions. To view the differences between any two revisions, select two revisions by clicking the first item and then clicking the second item while holding down the Ctrl key. Once you have two files selected, click Diff to view the differences between the two files.
After clicking Diff, the Difference Options dialog box is displayed, as shown in Figure 15-28. This dialog box shows you the two files that are being compared, along with some additional options.
If you want to compare a certain revision to the file in your working folder (perhaps to see what changes you have made), use the Browse button to locate and select the file from your working folder for either the Compare or the To text box. If you select only one file in the History dialog box and click Diff, the file is automatically compared to the version in your working folder. Once you are satisfied with the settings ”the defaults work well most of the time ”click OK to view the differences.
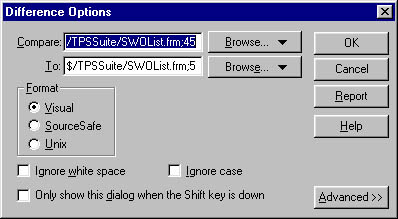
Figure 15-28. Use the Difference Options dialog box to tailor the way files are compared.
The Differences Between window shown in Figure 15-29 has two panes. Each pane has the contents of a single file. All differences between the two files are shown color-coded. Deleted lines appear in blue, changed lines are red, and inserted lines are green. The Differences Between window is display-only; you can't make changes to either of the files. However, you can copy text from either file to the clipboard and then paste the text into your project.
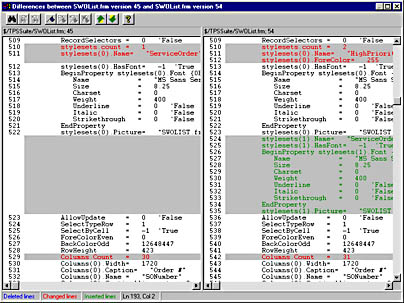
Figure 15-29. Differences between two files are clearly highlighted with an appropriate color.
NOTE
The fact that you can copy text is not immediately apparent because right-clicking on selected text does not give you a shortcut menu. However, you can highlight text to select it and then use the keyboard command Ctrl+C to copy the selected text.
Visual SourceSafe is a powerful tool that can greatly enhance the efficiency and reliability of team development. Attempting to manually accomplish some of the operations that are performed automatically by Visual SourceSafe takes quite a bit of effort. Some of the actions performed by Visual SourceSafe, such as allowing only one person to modify a file at a time and the ability to compare versions of a file, are almost impossible to perform any other way. If you develop projects as part of a team ”even if that team is only two developers ”you should seriously consider using Visual SourceSafe to manage your development efforts.
EAN: 2147483647
Pages: 57