ADO.NET in Visual Studio .NET
| for RuBoard |
Because data access is so central to the design of most corporate enterprise applications, VS .NET includes a wealth of features designed to make using ADO.NET simple. These include the use of the Server Explorer, component designer, and wizards to graphically manipulate the underlying database and write the code to work with the ADO.NET classes.
To begin, let's walk through the construction of a very simple ASP.NET application in C#. This application queries the ComputeBooks product catalog and allows the user to make some modifications to demonstrate the graphical features of VS .NET that can be used with ADO.NET.
First, of course, you need to create an ASP.NET Web site using the New Project dialog accessed by clicking File, New Project or through the New Project button on the VS .NET Start Page. In this case, under Visual C# projects, select ASP.NET Web Application and call it ComputeBooksSimple. When completed, a new virtual directory will have been created on the Web server and the project will contain AssemblyInfo.cs, WebForm1.aspx, Global.asax, and Web.config files.
| | Before getting started keep in mind that the application you're walking through today is an example of what I refer to as a two- tier Web application. That means that the code used to create the user interface uses ADO.NET objects directly to communicate with a database. Although you can certainly create two-tiered applications effectively with ASP.NET, ADO.NET, and VS .NET, a more robust design pattern for enterprise applications calls for the use of an n-tiered model where the ADO.NET code (referred to as the data services tier ) is abstracted from the user interface code (the presentation tier ) and also from reusable business logic (the business services tier ) . Designing applications using this approach allows their constituent parts to be more maintainable , reusable, and scalable at the cost of increased complexity. On Days 15 through 17, you'll explore how an n-tiered pattern can be used with ADO.NET. |
Using the Server Explorer
The Server Explorer window is available in all VS .NET projects and can be used for viewing resources such as message queues, event logs, performance counters, services, and databases on a local or remote machine. The purpose of the Server Explorer is to enable graphical interaction with these services and visual designers within the development environment. It can be accessed from the View menu or by typing Ctrl+Alt+S. Like other windows in VS .NET, it will by default auto-hide itself when your cursor is not over it. To pin it to the surface, use the pin icon in the upper-right corner.
Tip
If you don't like the default way in which the windows behave or are arranged, click on the Start Page and go to My Profile. Here you can choose from seven profiles (or build your own) to customize the look and feel based on your previous experience. In this book, I'll use the default Visual Studio Developer profile, although others for Visual Basic, Visual C++, and Visual InterDev developers are available.
In addition to the server-based resources, the Server Explorer also contains a Data Connections node that can be used to connect to and view a particular data source. If you're familiar with the Visual Studio 6.0 IDE, you'll recognize this as analogous to the Visual Data Tools.
Creating a Connection
To create a connection to a data source, simply right-click on the Data Connections node and click Add Connection. You'll notice that you can create both a SQL Server database and a data connection simultaneously by selecting Create New SQL Server Database.
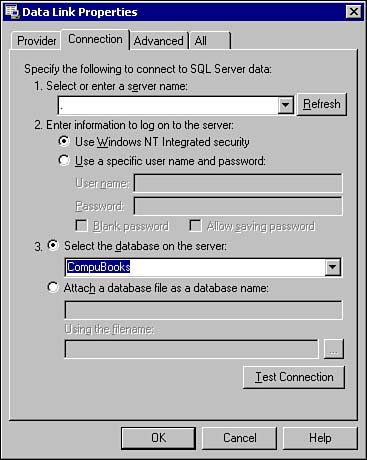
The resulting dialog, shown in Figure 2.1, is the familiar Data Link Properties dialog. Through this dialog, you can configure the connection. By default, it assumes you're going to connect to SQL Server, although this can be changed by selecting the appropriate OLE DB provider in the Provider tab. In this case we're going to connect to the ComputeBooks database you created during the exercise on Day 1, "ADO.NET in Perspective," on the local server (denoted by using a "." in the server name field), and authenticate using Windows NT integrated security. Obviously, you would change these settings if the location or authentication requirements of your server differed.
Figure 2.1. Data Link Properties. This dialog is used to create a data connection in the Server Explorer.
Note
Note that even though we're using SQL Server for our data connection, we're not yet using the SQL Server .NET Data Provider. The connections made through the Server Explorer use the SQL Server OLE DB provider. This is evident by selecting the connection in the Server Explorer window and choosing Properties.
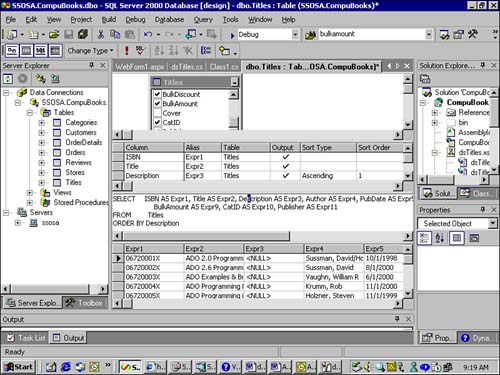
When it's connected, the new connection will appear in the Server Explorer. You can then drill down through it to view the tables, views, and stored procedures. By double-clicking on a table, you can view and edit the data (depending on your permissions as defined by how you authenticated). Figure 2.2 shows the IDE after double-clicking the Titles table and using the Query toolbar to activate all the panes (diagram, grid, SQL, results) available. You can use the panes to modify the query, as was done in this case, to show only some of the data by selecting particular columns or to add a where clause or sorting condition.
Figure 2.2. Using a data connection. You can use a data connection to inspect and edit the data in the underlying database.
Tip
In the Professional edition of VS .NET, you can view and edit data and execute views and stored procedures, but cannot create and alter these objects. These features are enabled in the Enterprise Developer and Enterprise Architect versions of the product. To ensure that all readers will be able to follow along, in this book I'll use the features of the Professional edition.
| | You'll also notice that you can inspect the SQL Server databases on the local server by drilling down into the SQL Servers node in the Server Explorer window. Although this provides the same level of functionality as creating your own connection, again depending on your permissions, the database connections are permanent connections and will be loaded each time you start a new instance of VS .NET. The VS .NET documentation distinguishes between these by calling the connection we just created a database reference, while referring to connections under the SQL Servers node, database connections. The other primary difference is the additional functionality you gain when using a reference if you have the Enterprise versions of VS .NET as noted. |
Creating a Data Adapter
When the connection (or reference) has been established to the database, you can use it to incorporate data access code into your project. To do so, simply drag and drop an object from the connection onto a designer in the IDE. For example, to create code to access the Titles table, drag and drop the table onto the WebForm1.aspx designer surface.
A Bit About DesignersOne of the interesting features of the .NET Framework and VS .NET is the interaction between classes and designers. The Framework ships with several visual designers, each of which is implemented by a type. The designer's type is then associated with a class through the use of metadata, specifically , the DesignerAttribute type. This allows developers to create and associate their own designers with their custom classes, thereby extending the development environment. In our example, to create code to access the Titles table, a table is dragged onto a Web Form and its associated designer. However, you can also create your own components that can be added to the Toolbox and subsequently dragged and dropped on a designer surface by directly or indirectly implementing the System.ComponentModel.IComponent interface. Finally, you can graphically interact with inherently non-visual components by creating a class derived from System.ComponentModel.Component because it is associated with the designer implemented by the System.ComponentModel.Design.ComponentDesigner type. |
As a result of dragging and dropping the table onto the WebForm1.aspx designer surface, two objects, sqlConnection1 and sqlDataAdapter1 , will be created and placed at the bottom of the designer surface. By dropping the table, VS .NET assumed you wanted to connect to the database and select, insert, update, and delete data from the table and so it added both objects to the form. You can then inspect and change the default properties it set for the objects by clicking on them and viewing their properties in the Properties window. To provide easier configuration, if the Data Adapter Configuration Wizard does not open automatically, you can invoke it by right-clicking on the sqlDataAdapter1 object and selecting Configure Data Adapter.
This wizard has several interesting features, including the ability to generate SQL statements and stored procedures to populate the data adapter. To begin, it allows you to choose an existing data connection or create a new one on the fly. After selecting the connection, you are presented with the dialog shown in Figure 2.3.
Figure 2.3. Choose a query type. This part of the Data Adapter Configuration Wizard allows you to specify how data from the database is accessed.
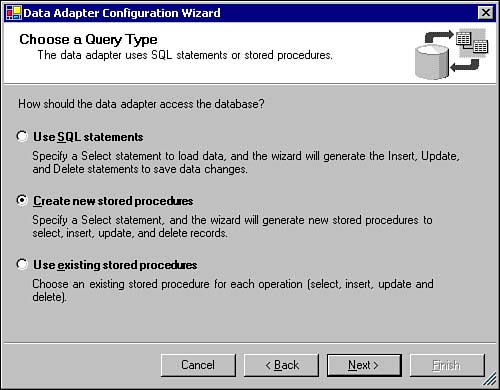
| | This dialog is used to specify how the data adapter will communicate with the data store. Because ADO.NET was designed with the goal of flexibility, it's just as easy to use a SQL statement as it is a stored procedure. In most enterprise applications, you'll want to use stored procedures because of the added performance, abstraction, and security they provide. We will discuss this in more detail on Day 10, "Working with Commands." |
In this case, you'll choose Create new stored procedures and click Next . From here, you can specify a SQL statement to use as the basis for specifying the data that the data adapter will access, or you can use the query builder to build a SQL statement graphically. By default, a SELECT statement with all the columns will be created. In this case, either use the Query Builder or simply modify the SQL to remove the Cover column from the SELECT clause and sort the result set in ascending order by title. This dialog also contains the Advanced Options button, which controls how the stored procedures are to be written. The three options allow you to specify
-
Whether insert, update, and delete statements are generated in addition to a select statement
-
Whether optimistic concurrency is used when formulating the WHERE clauses in the update and delete stored procedures
-
Whether a SELECT statement will be added to the insert and update stored procedures
| | If you unselect the optimistic concurrency option, only the primary key will be used in the WHERE clause. As changes hit the database, they will overwrite existing records that might have been changed by other users since the data was first selected. This increases concurrency (the ability to have many users using the database simultaneously) and decreases the chances of an error. Leaving the option checked ensures that the data has remained untouched. However, it means that the stored procedure must be passed both the new and original values, and will obviously increase the likelihood that a change will fail, thereby decreasing concurrency. For this example, turn off the Use Optimistic Concurrency option. |
The third option to refresh the DataSet is useful, especially in situations where the table contains server-generated values such as IDENTITY columns and default values in order to make sure they are visible if the modifications are successful. Click OK to close the Advanced Options dialog and click Next to move to the Create the Stored Procedures step shown in Figure 2.4.
Figure 2.4. Naming procedures. This step of the Data Adapter Configuration Wizard allows you to pick names for the stored procedures, and optionally review and save the script used to create them.
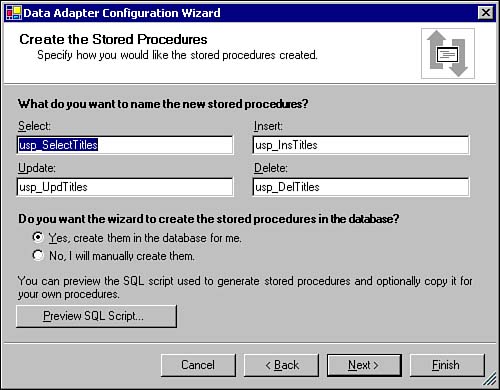
In the step shown in Figure 2.4, you have the option of naming the stored procedures that are about to be created and either allowing the wizard to create the procedures or saving the script and running it at a later time. You should use the latter option when you do not have permissions to create objects in the database or if you want to further modify the script by, for example, adding additional SQL Data Definition Language (DDL) statements to it.
As shown in the figure, you should publish and use a naming convention in your organization for your procedures so that other developers can easily identify them. In this example, we're using the convention where the procedure is prefixed with usp (so as not to be confused with the sp prefix reserved for system stored procedures), followed by Select , Ins , Upd , or Del , depending on the function of the procedure and finally the name of the table affected.
Developer RightsIt's important to remember that in SQL Server 2000 it's not adequate to simply be logged on with an account that's a member of the db_ddladmin or even the db_owner fixed database role. Being a member of the role will certainly allow you to create a stored procedure; however, the procedure will be created under your account and so its fully qualified name will be, for example, ssosa.dfox.usp_SelectTitles . In other words, the object will be owned by your account and not the database owner ( dbo ), as is preferred. Having the objects owned by dbo allows all accounts access to the objects transparently without having to specify the owner using dot notation. This situation can be avoided in one of three ways. First, if you're a member of the sysadmin fixed server role, any objects you create will be owned by dbo . Second, if you're a member of the dbcreator fixed server role and create the database in which you are attempting to create objects, they'll be owned by dbo . Finally, the option that is typically used, the server administrator can alias your account as dbo by using the system stored procedure sp_addalias . In this way, any object you create will be owned by dbo . This option gives you the necessary control of the database while not allowing you to administer the server or create other databases. Of course, it goes without saying that developers can be aliased to dbo in development databases, but certainly not in production. |
You should then preview the SQL script using the appropriate button to make sure that the script is as you specified. By clicking Next, the wizard presents a final checklist and then creates the procedures and writes the necessary code in the Web Form to instantiate, populate, and invoke the SqlConnection and SqlDataAdapter objects.
In this example, in addition to querying data for the Titles , we also need to query data from the Categories table because there is a foreign key relationship between Titles and Categories (each book belongs to exactly one category). To query the Categories table, simply drag and drop it on the Web Form and once again invoke the Data Adapter Configuration Wizard. This time, however, instead of creating stored procedures, select Use existing stored procedures and select the existing usp_SelectCats stored procedure for the Select command. Because the Categories table will not be modified in this application, you needn't fill in the rest of the commands. You'll notice that the wizard allows you to modify the names of the columns in the data row that map to the parameters that are required by the stored procedure. As you'll learn on Day 12, "Using a Data Adapter," the data adapter contains a mapping collection that is used to map columns in the data source to those in the DataSet . By default, mappings are assumed to use identical names and so you don't need to change the default values.
After finishing the wizard, you will now see two data adapter objects and one SqlConnection in the designer. To make things simpler to read, you can rename sqlDataAdapter1 to daTitles and sqlDataAdapter2 to daCategories using the Properties window.
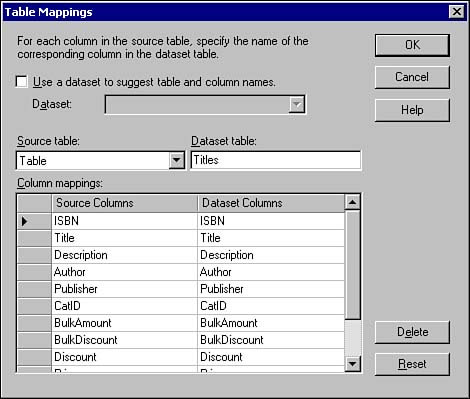
As a final touch, invoke the Table Mappings dialog for the daCategories object by clicking on the ellipses button next to the TableMappings property in the Properties window. The dialog shown in Figure 2.5 can be used to modify the table mappings discussed previously. It can also be used to set the name of the table in the DataSet this data adapter will fill. Change the name from usp_SelectCats to Categories .
Figure 2.5. Table mappings. This dialog is primarily used to provide the mapping layer between a DataSet and the data adapter.
Tip
After the data adapters are configured, you can preview them by choosing the Preview Data option on their context menus . The resulting dialog simply allows you to see the data selected by the adapter, and that will be used to populate a DataSet .
Creating a DataSet
Now that the project contains two data adapters that will provide the communication to the data source, you must add a DataSet to cache the data for display and modification. To do so, right-click on the designer near the objects you just created and select Generate DataSet .
The Generate DataSet dialog presents a list of the data tables it found in the Web Form; in this case, finding both the Titles and Categories tables from the data adapters. By selecting both tables, the tool will create a DataSet that contains two distinct tables that can contain data from different data adapters. The obvious implication is that DataSet objects can be used to store and combine heterogeneous data easily. You can also change the name of the DataSet ; in this case, change it to dsTitles .
The DataSet then will be added to the project (viewable in the Solution Explorer window) as dsTitles.xsd (because the structure of a DataSet is represented by the XML Schema Definition [XSD] grammar). By double-clicking on the DataSet , the schema editor will be invoked showing the two data tables side by side. As mentioned previously, in the ComputeBooks database, the Titles and Categories tables have a foreign key relationship. To represent that relationship in the DataSet , you need to create a relation by right-clicking on the CatID element (column) and selecting Add, New Relation. You can then use the Edit Relation dialog, shown in Figure 2.6, to set the properties of the relationship, including the name of the relation, the parent and child elements, the fields that will participate, and any additional constraints such as mandating cascading deletes or setting the child field to Null in the event the parent field is deleted. In this case, the child element should be set to Titles , which will automatically change the name as well.
Figure 2.6. Editing relations. You can visually edit and define relationships between data tables in a DataSet using the Edit Relation dialog.
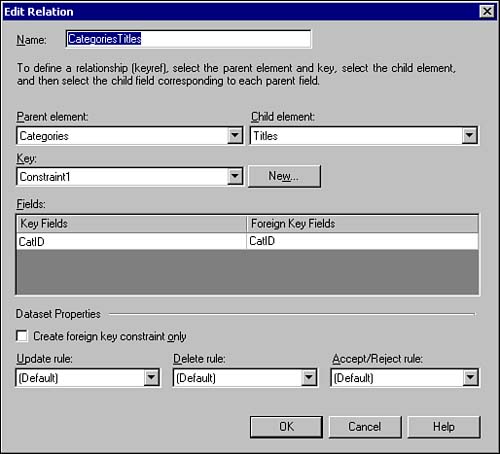
By clicking OK, the relation will be created and depicted with a dotted line.
At this point, you can view the XSD syntax for the DataSet by clicking on the XML pane at the bottom of the editor. You'll learn more about the syntax shown here on Day 7, " DataSet s and XML." You can also get a preview of Day 6, "Building Strongly Typed DataSet Classes," by clicking on the Show All Files icon in the Solution Explorer and expanding the dsTitles.xsd node. You'll see that beneath the DataSet is a file called dsTitles.cs. This code file contains the programmatic definition of a typed DataSet that maps to the schema.
Viewing the Code
One glaring fact should be pointed out before going any further: Up until this point, we've not written a single line of code in order to declare, instantiate, populate, or invoke any of the objects we've manipulated graphically. So, where's the code?
To access the code for the Web Form, right-click on the designer and choose View Code. The code for the form should appear similar to that shown in Listing 2.1.
Listing 2.1 The generated code. This listing shows the code generated by the various wizards used thus far today.
using System; using System.Collections; using System.ComponentModel; using System.Data; using System.Drawing; using System.Web; using System.Web.SessionState; using System.Web.UI; using System.Web.UI.WebControls; using System.Web.UI.HtmlControls; namespace ComputeBooksSimple { /// <summary> /// Summary description for WebForm1. /// </summary> public class WebForm1 : System.Web.UI.Page { protected System.Data.SqlClient.SqlDataAdapter daTitles; protected System.Data.SqlClient.SqlDataAdapter daCategories; protected System.Data.SqlClient.SqlCommand sqlSelectCommand2; protected System.Data.SqlClient.SqlCommand sqlSelectCommand1; protected System.Data.SqlClient.SqlCommand sqlInsertCommand1; protected System.Data.SqlClient.SqlCommand sqlUpdateCommand1; protected System.Data.SqlClient.SqlCommand sqlDeleteCommand1; protected ComputeBooksSimple.dsTitles dsTitles1; protected System.Data.SqlClient.SqlConnection sqlConnection1; private void Page_Load(object sender, System.EventArgs e) { // Put user code to initialize the page here } #region Web Form Designer generated code #endregion } } | | You'll notice that although declarations have been created for the SqlConnection , two SqlDataAdapter s, and several SqlCommand objects, no code to manipulate these objects is evident. Because the code was generated by a wizard and can therefore be changed by a wizard, the Web Form Designer places the code in the expandable region after the Page_Load method. By expanding the region, you can view the roughly 130 lines of code that were generated, which we'll discuss later today. |
Creating the User Interface
The only remaining task to make this application functional is to put a user interface on the Web Form and write some minimal code to get things rolling.
To begin, you'll need to drag and drop a DataGrid control, found in the Toolbox on the Web Forms tab, onto the Web Form. As you'll learn on Day 16, "ADO.NET in the User Services Tier," VS .NET ships with a variety of controls that can be bound to a DataSet , data reader, or in fact any object whose class implements the IEnumerable interface. When the grid is positioned and sized correctly, right-click on it and choose Property Builder to invoke the Properties dialog. From the Properties dialog, you can configure almost all the properties necessary to allow the user to display and edit the information in the product catalog.
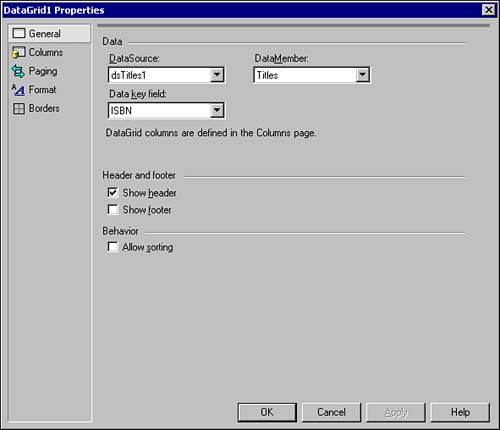
Under the General tab, you first must bind the DataGrid to the dsTitles1 DataSet by choosing it from the drop-down menu. In addition, you must set the DataMember property to Titles because dsTitles1 contains two tables and therefore can be used to display both Titles and Categories data. You can then set the Data key field option to ISBN because ISBN is the primary key of the Titles table, as shown in Figure 2.7.
Figure 2.7. The DataGrid Properties dialog. The General tab is used to set up data binding on the DataGrid .
You'll do most of your work under the Columns tab. As you'll notice, the Create columns automatically at run time option is selected by default and will set up the grid for you automatically. In this case, because you want to allow editing of the grid, you should uncheck the box and select (All Fields) from the Available columns list and move it across to the Selected columns list using the arrow button.
As you scroll through the Select columns list, you'll notice that properties, such as the header text, can be set for each column. In this case, because you want the user to be able to edit only certain columns, you can go through the columns and mark ISBN , Title , Author , Publisher , and PubDate as read-only. In addition, because several of the columns ( BulkDiscount , Discount , and Price ) display currency, change their data formatting expression to "{ 0:c} " in order to display the amounts correctly.
For the grid to allow the user to shift a particular row into edit mode and subsequently update that row, you must add a Edit, Update, Cancel column to the grid found under the Button Column node in the Available columns list. After selecting it and moving to the Selected columns list, be sure to move it to the top of the list using the arrow button.
The only remaining task in the Columns tab is to transform the editable columns into template columns. Simply put, template columns can be used in a DataGrid control to render data items differently depending on the edit mode. In this case, we want to make sure that each editable column is rendered with a TextBox control to allow the user to change its values. To create the template columns, simply click on each editable column ( Description , BulkAmount , BulkDiscount , Discount , and Price ) in the Select columns list and click the link found at the bottom of the dialog to convert the column into a template column.
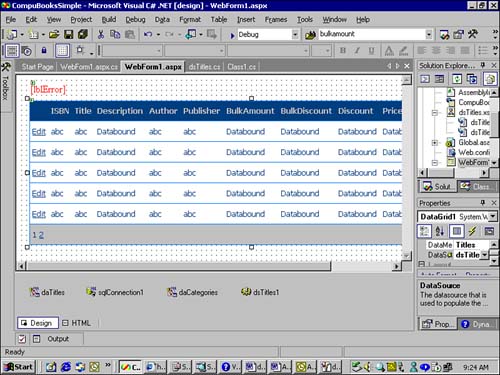
Also, in the Properties dialog, you can set the paging options using the Paging tab to ensure that only a specific number of rows is visible at any particular time. In this case, you might check the Allow paging option and set the page size to 5. Other navigation options are available, although the defaults will suffice in this case. Of course, you might also want to format the grid using the Format tab, for example, to change the font and size of the text that displays for the DataGrid , header, footer, or to even alternate items. After you've set the options you want, click OK and the grid should appear with the bound columns on the Web Form, as shown in Figure 2.8.
Figure 2.8. A formatted DataGrid control. Note that the Properties window can also be used to configure properties such as data binding for the grid.
Tip
To easily format the grid with a professional appearance, right-click on it in the designer and select Auto Format. The grid shown in Figure 2.8 has been formatted using the Colorful 2 option.
As mentioned previously, in this example we're using template columns to allow users to edit some of the columns when they click on the Edit link for a particular row. To provide specific names for the TextBox controls that are displayed, you can right-click the grid and select Edit Template. You'll see the five templated columns displayed. Click on each one in turn and the grid will show the template editor. Note that a templated column can render the header template, item template (the default view of the column), edit template, and footer template. The EditItemTemplate should already contain a TextBox , so you can simply click on it and change its ID in the Properties dialog. The names you can use might include txtDesc , txtBulkAmount , txtBulkDiscount , txtDiscount , and txtPrice . When you've renamed each of the controls, select End Template Editing from the context menu.
In addition to the grid control, add a Label control from the Web Forms tab of the toolbox to the top of the Web Form. This control will be used for rudimentary error handling, so rename the control lblError . You can place it at the top of the page.
At this point, we need to add code to the page to query the database and bind the data to the grid, to handle the paging of the grid, and to respond to the user clicking on Edit, Update, or Cancel for a particular row. To view the code, again right-click on the designer and select View Code or double-click on the WebForm1.aspx.cs code file in the Solution Explorer.
Retrieving Data
First, in a Web Form, the Load event of the page is called each time the page is first loaded and when the page is posted back to the Web server in response to a user action such as clicking the Edit link. To make the data from the database available to code in the page, you must write code that queries the database, populates the DataSet , and binds it to the DataGrid control. To do so, you can write the code shown in Listing 2.2.
Note
One of the great things about ASP.NET is that it provides an event-driven programming model for Web-based applications similar to that familiar to developers who have used Visual Basic in the past. As in this example, you can simply write code that handles events fired (actually posted) as the user manipulates the page. The ASP.NET page framework handles the details of posting the events and calling the correct event handlers on the server side. For more information about the sequence and processing that takes place, see Chapter 11 of my book Building Distributed Applications with Visual Basic .NET, published by Sams.
Listing 2.2 Page Load event. The Load event of the page can be used to populate the DataSet and bind it to controls on the page.
private void Page_Load(object sender, System.EventArgs e) { // Fill the dataset daCategories.Fill(dsTitles1, "Categories"); daTitles.Fill(dsTitles1, "Titles"); if (!Page.IsPostBack) { // Bind the Data DataGrid1.DataBind(); } } | | In Listing 2.2, we first use the two data adapters to query the database using their Fill methods . The Fill method invokes the SelectCommand associated with the data adapter, and uses the results to populate the DataSet passed as a parameter. The Fill method is overloaded (that is, it has multiple sets of arguments), and in this case, you can pass the DataSet along with the name of the table within the DataSet that should be populated . Then, to make sure that the data is bound to the grid, you simply call the DataBind method of the control. This snippet also shows wrapping the execution of the DataBind method in a check of the IsPostBack property of the page so that the binding occurs only when the page is first loaded, and not in response to user actions such as putting the grid into edit mode. |
Allowing Navigation
Next, you can add code for the PageIndexChanged event raised when the user navigates to a new page. Although the Properties dialog sets up all the required properties, it does not write the code to handle the event, which is shown in Listing 2.3.
Listing 2.3 Handling navigation. The PageIndexChanged event will fire when the user navigates to a new page within the grid control.
private void DataGrid1_PageIndexChanged(object source, DataGridPageChangedEventArgs e) { DataGrid1.CurrentPageIndex = e.NewPageIndex; DataGrid1.DataBind(); } | | As you can see in Listing 2.3, the DataGridPageChanged object contains the number of the page the user is navigating to in its NewPageIndex property. Setting the CurrentPageIndex property of the DataGrid and then calling DataBind displays the appropriate page in the grid. |
Handling Editing Events
Finally, the most sophisticated code you need to write handles the three events raised when the user initially selects a row for editing, updates the row, or chooses the cancel option. Keep in mind that these options are available because you added the button column to the grid in the Property Builder dialog.
The three events can be handled using the code shown in Listing 2.4.
Listing 2.4 Handling editing events. This listing shows how you can handle the events fired when the user edits data in a DataGrid control.
private void DataGrid1_EditCommand(object source, DataGridCommandEventArgs e) { DataGrid1.EditItemIndex = e.Item.ItemIndex; DataGrid1.DataBind(); } private void DataGrid1_CancelCommand(object source, DataGridCommandEventArgs e) { DataGrid1.EditItemIndex = -1; DataGrid1.DataBind(); } private void DataGrid1_UpdateCommand(object source, DataGridCommandEventArgs e) { // Extract the data from the template controls TextBox descBox = (TextBox)(e.Item.Cells[1].FindControl("txtDesc")); string desc = descBox.Text; TextBox baBox = (TextBox)(e.Item.Cells[1].FindControl("txtBulkAmount")); string bulkAmount = baBox.Text; TextBox bdBox = (TextBox)(e.Item.Cells[1].FindControl("txtBulkDiscount")); string bulkDiscount = bdBox.Text; TextBox disBox = (TextBox)(e.Item.Cells[1].FindControl("txtDiscount")); string discount = disBox.Text; TextBox prBox = (TextBox)(e.Item.Cells[1].FindControl("txtPrice")); string price = prBox.Text; try { // Update the DataSet dsTitles1.Titles[e.Item.DataSetIndex].Description = desc; dsTitles1.Titles[e.Item.DataSetIndex].BulkAmount = System.Int16.Parse(bulkAmount); dsTitles1.Titles[e.Item.DataSetIndex].BulkDiscount = System.Decimal.Parse(bulkDiscount); dsTitles1.Titles[e.Item.DataSetIndex].Discount = System.Decimal.Parse(discount); dsTitles1.Titles[e.Item.DataSetIndex].Price = System.Decimal.Parse(price); // Update the database daTitles.Update(dsTitles1.GetChanges()); } catch (Exception ex) { lblError.Text = "An error occurred:" + ex.Message; return; } // Switch out of edit mode. lblError.Text = ""; DataGrid1.EditItemIndex = -1; DataGrid1.DataBind(); } | | As you can see from Listing 2.4, two of the events are trivial. The EditCommand and CancelCommand events of the DataGrid are used to simply shift the grid into and out of edit mode. This is done by setting the EditItemIndex property of the DataGrid to 1 and “1 , respectively, and calling the DataBind method to bind the data from the dsTitles1 object to the grid. |
The code in the UpdateCommand , however, is more complicated because it's responsible for extracting the modified data from the TextBox controls and saving the data to the database. As you can see, the first section of the code extracts the values from the Text property of the TextBox controls by finding the control in the current row using the FindControl method. The Item (row) that is being edited is passed in the DataGridEventArgs object and its cells accessed through the Cells collection.
Next, the DataSet and database updates are wrapped in a try catch block in order to intercept any exceptions that might be thrown and display the message in the lblError control before exiting the method. Exiting the method before changing the EditItemIndex property back to “1 ensures that the grid will remain in edit mode, and gives the users a chance to correct their errors and resubmit the changes. The DataSet needs to be updated because while the columns in the grid are bound to the DataSet for display, they do not automatically update the DataSet . In this case, the DataSetIndex property of the Item can be used to determine which row in the DataSet was changed, and then its properties are set accordingly using the Titles DataTable object exposed by the dsTitles class. Note that the data types of the columns must be honored, so the strings must be converted to short or decimal data types in this case.
Note
As you learned yesterday , the ability to access data both relationally and in an object-oriented syntax was a design goal for ADO.NET. The typed DataSet dsTitles exposes objects such as Titles that make accessing the underlying data much easier.
To actually perform the database update, call the Update method of the daTitles data adapter and pass it a DataSet to update. The GetChanges method of the DataSet simply creates a DataSet with only the modified rows in it. This obviously cuts down on the amount of data being passed to the method, and is particularly effective when passing data between processes or machines in a distributed application. The Update method looks for modified and deleted rows and invokes its UpdateCommand or DeleteCommand , respectively. In this case, the usp_UpdTitles stored procedure that was created previously will be called with the new data.
Tip
When using SQL Server, to see the statements invoked on the server and to aid in debugging, use the Profiler utility found in the Microsoft SQL Server program group .
If no exceptions occur, the EditItemIndex property is set back to “1 to take the grid out of edit mode and the new data is bound to the grid for display.
Binding the Events
The final step is to bind the three methods in Listing 2.4 and the method for the PageIndexChanged event to the events of the grid control. This can be done graphically by clicking on the lightning bolt in the Properties window for the grid and dropping down the appropriate event and selecting the methods you just created. This adds code like that shown in Listing 2.5 to the Web Form Designer generated code in the InitializeComponent method.
Listing 2.5 Binding the events. This listing shows how you add event handlers for the events of the DataGrid control.
this.DataGrid1.PageIndexChanged += new System.Web.UI.WebControls.DataGridPageChangedEventHandler( this.DataGrid1_PageIndexChanged); this.DataGrid1.CancelCommand += new System.Web.UI.WebControls.DataGridCommandEventHandler( this.DataGrid1_CancelCommand); this.DataGrid1.EditCommand += new System.Web.UI.WebControls.DataGridCommandEventHandler( this.DataGrid1_EditCommand); this.DataGrid1.UpdateCommand += new System.Web.UI.WebControls.DataGridCommandEventHandler( this.DataGrid1_UpdateCommand);
Note
In case you're not familiar with C#, the this operator is used to reference members of the current instance. In other words, this.DataGrid1 refers to the instance of the DataGrid1 object associated with the current page.
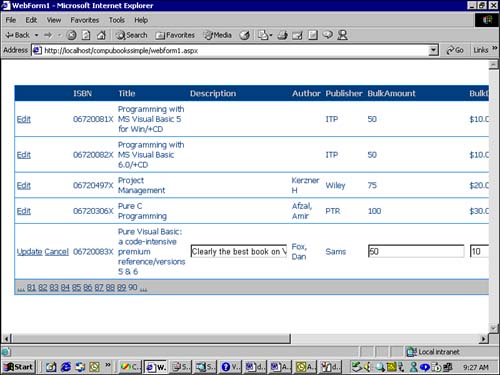
You can then run the page in the browser and it should appear as shown in Figure 2.9. Note that in this figure the Edit link for the row has been clicked and the row's data has been edited. The product catalog application can be tested by modifying the values and clicking Update to save the record to the database.
Figure 2.9. Running the product catalog. Here the row is in edit mode and its data can be modified.
| for RuBoard |
EAN: 2147483647
Pages: 158