CREATING A NEW APPOINTMENT
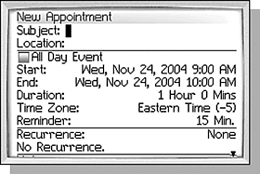
| You can create a new appointment from any view by clicking the New menu item. This will show the New Appointment screen, which allows you to enter all the details of the new appointment (see Figure 11.5). Figure 11.5. The New Appointment screen is where all the action takes place for setting up a new appointment.
There are also ways to create new appointments utilizing shortcuts on each of the other views:
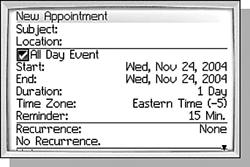
When creating a new appointment, there are two portions of the screen that you will be using most often. In the top portion of the New Appointment screen are the Subject and Location fields. The text of these fields is shown in the Daily and Agenda views, so make sure that you put something appropriate here. If there is an entry in the Location field, it is shown in parentheses after the Subject. The other portion of the screen that is used most often contains the time information of the appointment. The Start and End fields allow you to set both a date and time. The Duration field shows the duration of the appointment in hours and minutes. Although you can determine the duration yourself, having it as a separate field is very nice and saves time. It seems pretty straightforward; however, not all of these options work the way you would expect them to. The following sections detail the options in the New Appointment screen. SETTING AND CHANGING THE START, END, AND DURATION FIELDSThe Start, End, and Duration fields are linked together, and changing the entry in one field causes the other fields to change accordingly. For example, if you change the time in the End field, the Duration field changes to reflect the new duration of the appointment. One important thing to note here is that changing the Start field does not change the duration. Instead, it causes the End field to change so that the time reflected in the Duration field remains the same. For example, changing the start of a 1-hour meeting from 9 a.m. to 8 a.m. causes the end to change from 10 a.m. to 9 a.m. In addition, you can change the duration directly as well. Changing the duration causes the End field to change accordingly. Although generally just the time portion of the Start and End fields is used, having a date and time means that you can block out time for marathon, 36- hour appointments. Most appointments that last a whole day or more should use the All Day Event check box, however, because it more accurately represents how the time is being used and is easier to enter. This check box is discussed in the next section. SETTING AN ALL DAY EVENTChecking the All Day Event check box causes the New Appointment screen to change slightly. Now, the Start and End fields show only the date and the Duration field counts the time of the appointment in days instead of hours (see Figure 11.6). Appointments with the All Day Event check box checked are displayed differently in all of the views to indicate that the entire day is used up. Even if you have several appointments that together utilize all of the time in the day, they will not look the same as appointments with the All Day Event check box checked. Figure 11.6. The New Appointment screen with the All Day Event checked gives you slightly different options than those seen in Figure 11.5.
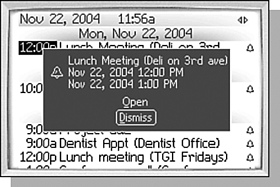
USING THE TIME ZONE FIELDSometimes someone will arrange an appointment and tell you the time in terms of their local time zone, which might be different from yours. If this happens, you can avoid the problems of manually converting the time to your time zone by simply changing the time zone of the appointment. If you are asked to be on a conference call at 12 p.m. Pacific and you are on Eastern time, simply change the time zone to Pacific and make the start time 12 p.m. The software will automatically make the time zone adjustment and block out the correct time in the time zone that you have set for the handheld. Be aware that if the time zone of your handheld is not set correctly to where you are located, this field won't be of much use to you. note Only one reminder is allowed for each Appointment. There is no way to add an additional reminder and there is no "snooze" feature as on an alarm clock. SETTING REMINDER NOTIFICATIONSThe Reminder is a notification of your upcoming appointment at a set time before the appointment is to begin. The default is 15 minutes, but you can change it from 0 Minutes to 1 Week or disable it totally. To disable the reminder for an appointment, simply select None in the Reminder field. The way that the notification alerts you is defined by the profile that you have selected. A dialog will always be shown as well; an example of this is shown in Figure 11.7. The dialog has two buttons. Clicking the Open button will cause the appointment to be opened so you can see the details of it. To dismiss the reminder, simply dismiss the dialog. Figure 11.7. This dialog is shown when a reminder is activated. Click the trackwheel on Dismiss to close the dialog and dismiss the reminder.
MARKING AN APPOINTMENT AS PRIVATEOne of the new features in the 4.0 version of the handheld software is the Mark As Private field for appointments. When this field is checked, the appointment will be considered private and the details of the appointment will not be visible to other people. This doesn't really mean anything on the handheld, but when the record is synchronized with your desktop calendar system it can be beneficial. Many calendar systems, such as Lotus Notes and Microsoft Exchange, allow calendar appointments to be shared with other people in the company. You may want to experiment with this feature to determine whether your system supports private appointments. USING THE NOTES FIELDThe final portion of the screen is for the Notes field. The Notes field is not displayed in any of the views, but is a place where you can enter additional textual information about this appointment. This is a good place to take notes during an appointment, or if you know you will need some information, such as driving directions, for an appointment, you can enter it here. |