Introducing ColdFusion Components
| Like the ColdFusion templates you have already seen, ColdFusion Components are ColdFusion files that you create and use. Both are plain text files and both contain CFML code, but that's where the similarities end.
NOTE If you have experience with object-oriented development and are familiar with the concept of objects, much of this will be familiar. ColdFusion Components are a form of object, essentially providing the basics of object functionality without the pain associated with so many object-oriented languages. If you have no idea what an object is, don't let that scare you. In true form, ColdFusion makes this all as simple as CFML. You will be using ColdFusion Components (CFCs for short) extensively throughout the rest of this book. In this chapter we will revisit examples from the previous chapter, this time using CFCs. As already explained, CFCs are plain text files, so they can be created using any editor, including Dreamweaver. However, Dreamweaver comes with sophisticated built-in support for creating and using CFCs, and we'll use these features shortly. NOTE Developers use the term refactor to describe the process of taking applications and restructuring them to make them more reusable and more efficient. Creating Your First CFCTo create ColdFusion Components, you need to learn some important new CFML tags, we'll start by creating a CFC manually. Later in the chapter you will get to use Dreamweaver's CFC wizard. NOTE As before, examples in this chapter use the data in the ows data sources and database. These must be present before continuing. All the files created in this chapter need to go in a directory named 11 under the application root (the ows directory under the Web root). The first thing you need to create a ColdFusion Component is a new file, so create a file named intro.cfc in the 11 folder. Delete any automatically generated content, and make sure that the file is empty. The <cfcomponent> TagColdFusion Components are defined using a tag named <cfcomponent>. (Intuitive, eh?). All of the code that makes up the CFC must be placed in between <cfcomponent> and </cfcomponent> tags. Nothing may be placed before the opening <cfcomponent> or after the closing </cfcomponent>. Listing 11.2. intro.cfcIntroduction CFC Step 1<!--- This is the introductory CFC ---> <cfcomponent> </cfcomponent> Once you have typed in this code, save your new file as intro.cfc. You have just created a ColdFusion Component. It does absolutely nothing at this point, but it's a ColdFusion Component nonetheless. TIP I just stated that nothing can be before the opening <cfcomponent> or after the closing </cfcomponent>, but as you can see in Listing 11.2 that isn't entirely accurate. No code may be outside of those tags, but comments are indeed allowed (and should be used). The <cffunction> TagColdFusion Components usually contain one or more functions (often called methods; the two terms are effectively interchangeable). A function is simply a block of code that performs an operation, and usually returns results. Each function is defined using a tag named <cffunction> and terminated with the matching closing tag </cffunction>. <cffunction> takes a series of attributes, but only two are really important:
Listing 11.3 is intro.cfc again, but this time we've introduced three functions. Listing 11.3. intro.cfcIntroduction CFC Step 2<!--- This is the introductory CFC ---> <cfcomponent> <!--- Get today's date ---> <cffunction name="today" returntype="date"> </cffunction> <!--- Get tomorrow's date ---> <cffunction name="tomorrow" returntype="date"> </cffunction> <!--- Get yesterday's date ---> <cffunction name="yesterday" returntype="date"> </cffunction> </cfcomponent> As you can see, each function is defined with a pair of <cffunction> tags. The functions in Listing 11.3 have no content yet. If there were contentand there will be shortlyit would go in between those tags. Each function is uniquely named, and each function has its return data type specified. In this example all three functions return a date, today's date, tomorrow's date, and yesterday's date, respectively. TIP The returntype attribute may be omitted, but you should get into the habit of always defining the return type. This provides greater error checking and will ensure safer function use. The <cfreturn> TagWhen a ColdFusion Component is used, the name of the function to be executed is specified. Any code in that function is processed, and a result is returned back to the calling code. To return data, a <cfreturn> tag is used. Listing 11.4 is a modified version of the previous listing, this time with <cfreturn> tags included in the body. Listing 11.4. intro.cfcIntroduction CFC Step 3 <!--- This is the introductory CFC ---> <cfcomponent> <!--- Get today's date ---> <cffunction name="today" returntype="date"> <cfreturn Now()> </cffunction> <!--- Get tomorrow's date ---> <cffunction name="tomorrow" returntype="date"> <cfreturn DateAdd("d", 1, Now())> </cffunction> <!--- Get yesterday's date ---> <cffunction name="yesterday" returntype="date"> <cfreturn DateAdd("d", -1, Now())> </cffunction> </cfcomponent> Usually CFC functions contain lots of processing and then a result is returned by <cfreturn>. But that need not be the case, as seen here. These three functions have single-line bodies, expressions being calculated right within <cfreturn> tags. The today function returns Now(), tomorrow uses DateAdd() to add 1 day to Now(). yesterday adds -1 day to Now(), essentially subtracting a day from today's date.
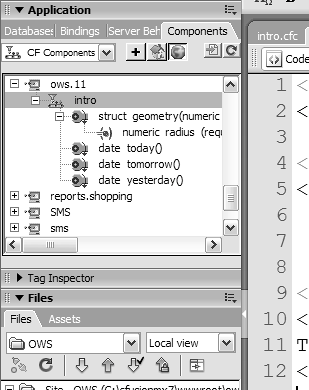
Of course, performing calculations in the returned expression is optional, and this code: <!--- Get tomorrow's date ---> <cffunction name="tomorrow" returntype="date"> <cfreturn DateAdd("d", 1, Now())> </cffunction> could have been written as: <!--- Get tomorrow's date ---> <cffunction name="tomorrow" returntype="date"> <cfset result=DateAdd("d", 1, Now())> <cfreturn result> </cffunction> This latter form is what most CFC functions tend to look like. TIP Every CFC function should have oneand only one<cfreturn> tag and one only. Avoid the bad practice of having multiple <cfreturn> tags in a single function. TIP Technically, functions need not return a result, but best practices dictate that every CFC function return something, even if it is a simple true/false flag. The <cfargument> TagThe functions defined thus far are simple ones, in that they accept no data and return a result. But many of the functions that you'll create will need to accept data. For example, if you were creating a CFC function that returned movie details, you'd need to pass the desired movie ID to the function. In CFC lingo, passed data are called arguments and the tag that is used to define arguments is the <cfargument> tag. If used, <cfargument> must be the very first code within a <cffunction>, and multiple <cfargument> tags may be used if needed. TIP You may sometimes see the word parameter used too. Parameters and arguments are one and the same. The following code snippet demonstrates the use of <cfargument>: <cfargument name="radius" type="numeric" required="yes"> This code (which would go into a <cffunction>) defines an argument named radius that is required and must be a numeric value. type and required are both optional, and if not specified then any type will be accepted, as would no value at all. To demonstrate the use of arguments, here is a complete function: <!--- Perform geometric calculations ---> <cffunction name="geometry" returntype="struct"> <!--- Need a radius ---> <cfargument name="radius" type="numeric" required="yes"> <!--- Define result variable ---> <cfset var result=StructNew()> <!--- Save radius ---> <cfset result.radius=radius> <!--- First circle ---> <cfset result.circle=StructNew()> <!--- Calculate circle circumference ---> <cfset result.circle.circumference=2*Pi()*radius> <!--- Calculate circle area ---> <cfset result.circle.area=Pi()*(radius^2)> <!--- Now sphere ---> <cfset result.sphere=StructNew()> <!--- Calculate sphere volume ---> <cfset result.sphere.volume=(4/3)*Pi()*(radius^3)> <!--- Calculate sphere surface area ---> <cfset result.sphere.surface=4*result.circle.area> <!--- Return it ---> <cfreturn result> </cffunction> The geometry function performs a series of geometric calculations. Provide it with a radius value and it will return a structure containing two structures. The first is named circle and contains the calculated circumference and area of a circle of the specified radius. The second is named sphere and contains the calculated surface area and volume of a sphere of the specified radius. If all that sounds like something from a long-forgotten math class, don't worry. The point isn't the geometry itself, but the fact that these calculations can be buried within a CFC function. (That, and the fact that I really do love math.) As before, the function is named using the <cffunction> name attribute, and this time returntype= "struct" (a structure). The <cfargument> tag accepts a required numeric value as the radius. The code then uses the following code to define a structure named result that will contain the values to be returned: <!--- Define result variable ---> <cfset var result=StructNew()>
The rest of the code defines two nested structures, and then uses <cfset> tags to perform the actual calculations (saving the results of the calculations into the result structure). The last line of code returns the structure with a <cfreturn> tag. NOTE You may have noticed that the <cfset> used to create the result structure included the word var. We'll explain this in later chapters. For now, suffice to say that all local variables within CFC functions should be defined using var as seen here. Listing 11.5 contains the final complete intro.cfc. Listing 11.5. intro.cfcIntroduction CFC Step 4 <!--- This is the introductory CFC ---> <cfcomponent> <!--- Get today's date ---> <cffunction name="today" returntype="date"> <cfreturn Now()> </cffunction> <!--- Get tomorrow's date ---> <cffunction name="tomorrow" returntype="date"> <cfreturn DateAdd("d", 1, Now())> </cffunction> <!--- Get yesterday's date ---> <cffunction name="yesterday" returntype="date"> <cfreturn DateAdd("d", -1, Now())> </cffunction> <!--- Perform geometric calculations ---> <cffunction name="geometry" returntype="struct"> <!--- Need a radius ---> <cfargument name="radius" type="numeric" required="yes"> <!--- Define result variable ---> <cfset var result=StructNew()> <!--- Save radius ---> <cfset result.radius=radius> <!--- First circle ---> <cfset result.circle=StructNew()> <!--- Calculate circle circumference ---> <cfset result.circle.circumference=2*Pi()*radius> <!--- Calculate circle area ---> <cfset result.circle.area=Pi()*(radius^2)> <!--- Now sphere ---> <cfset result.sphere=StructNew()> <!--- Calculate sphere volume ---> <cfset result.sphere.volume=(4/3)*Pi()*(radius^3)> <!--- Calculate sphere surface area ---> <cfset result.sphere.surface=4*result.circle.area> <!--- Return it ---> <cfreturn result> </cffunction> </cfcomponent> You now have a complete ColdFusion Component containing four methods. Greatbut how do you actually use your new creation? Using ColdFusion ComponentsColdFusion Components are used by other ColdFusion code, although rather than used, CFCs are said to be invoked. A special tag is used to invoke ColdFusion Components, and not surprisingly the tag is named <cfinvoke>. To invoke a ColdFusion Component you'll need to specify several things:
Listing 11.6 is a simple file named testcfc.cfm. As its name suggests, it tests the CFC file you just created. Listing 11.6. testcfc.cfmCFC Tester Step 1<!--- Title ---> <h1>Testing intro.cfc</h1> <!--- Get today's date ---> <cfinvoke component="intro" method="today" returnvariable="todayRet"> <!--- Output ---> <cfoutput> Today is #DateFormat(todayRet)#<br> </cfoutput> Let's take a quick look at this code. The <cfinvoke> needs to know the name of the component to be used, and component="intro" tells ColdFusion to find a file named intro.cfc in the current folder. As already seen, CFCs can contain multiple functions, so ColdFusion needs to know which method in the CFC to invoke. method="today" tells ColdFusion to find the function named today and invoke it. today returns a value (today's date), and so returnvariable="todayRet" tells ColdFusion to save whatever today returns in a variable named todayRet. NOTE If the variable name specified in returnvariable doesn't exist, it will be created. If it does exist it will be overwritten. When ColdFusion processes the <cfinvoke> tag it locates and opens the intro.cfc file, finds the today function, executes it, and saves the result in a variable named todayRet. The code then displays that value using a simple <cfoutput> block. If you were to run testcfc.cfm you would see a result like to the one in Figure 11.1. Figure 11.1. CFC processing is hidden from ColdFusion-generated output.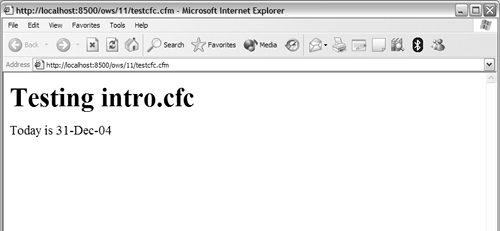 NOTE Be sure to run the .cfm file and not the .cfc file or the results won't be what you expect. Pretty simple, right? Well, it gets even simpler when using Dreamweaver. Using Dreamweaver CFC SupportDreamweaver features sophisticated support for ColdFusion Components. This includes:
We'll now look at each of these. Simplified CFC Method InvocationYou have seen how to use <cfinvoke> to invoke a ColdFusion Component method. You'll now learn how to invoke a CFC method without writing any code at all. Here are the steps:
testcfc.cfm should now look like Listing 11.7. Listing 11.7. testcfc.cfmCFC Tester Step 2<!--- Title ---> <h1>Testing intro.cfc</h1> <!--- Get today's date ---> <cfinvoke component="intro" method="today" returnvariable="todayRet"> <!--- Get tomorrow's date ---> <cfinvoke component="ows.11.intro" method="tomorrow" returnvariable="tomorrowRet"> </cfinvoke> <!--- Output ---> <cfoutput> Today is #DateFormat(todayRet)#<br> Tomorrow is #DateFormat(tomorrowRet)#<br> </cfoutput> Run testcfc.cfm. You should see a page like the one in Figure 11.4. Figure 11.4. Be sure to test ColdFusion Component invocations by executing test code.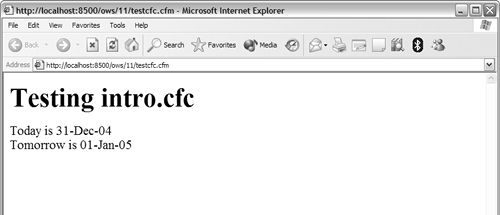 You'll notice that Dreamweaver generated a closing </cfinvoke> tag. This was not needed in our simple invocation, but it does no harm being there either. NOTE The CFC path generated by Dreamweaver is the full path (starting from the Web root). This is only required when accessing a component in another directory, but does no harm here. You can change component="ows.11.intro" to component="intro" if you like. The ColdFusion Component method you just used is a simple one. It accepts no arguments and returns a simple value. Let's try this again, but now using a more complicated method, the geometry method. Here are the steps:
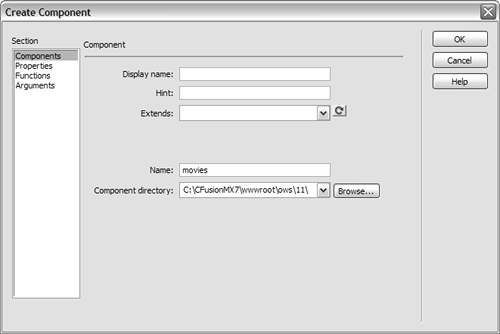
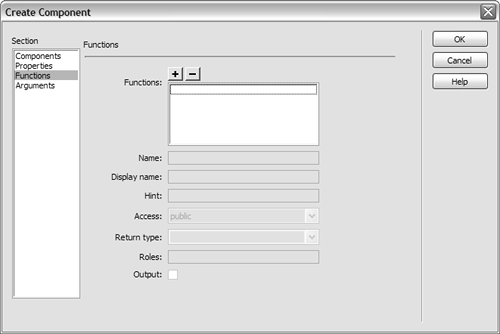
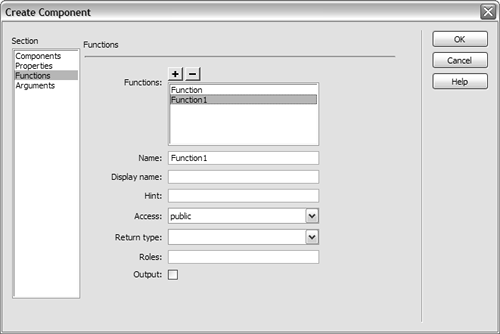
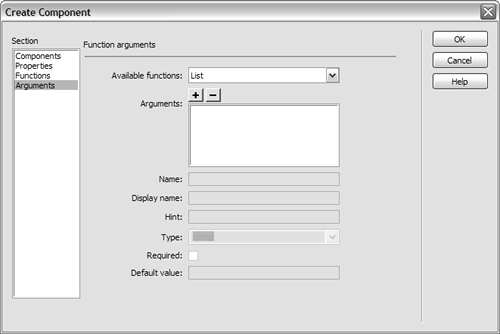
The final test code should look like Listing 11.8. Run the page. You should see output that looks like that in Figure 11.5. Listing 11.8. testcfc.cfmCFC Tester Step 3<!--- Title ---> <h1>Testing intro.cfc</h1> <!--- Get today's date ---> <cfinvoke component="intro" method="today" returnvariable="todayRet"> <!--- Get tomorrow's date ---> <cfinvoke component="ows.11.intro" method="tomorrow" returnvariable="tomorrowRet"> </cfinvoke> <!--- Output ---> <cfoutput> Today is #DateFormat(todayRet)#<br> Tomorrow is #DateFormat(tomorrowRet)#<br> </cfoutput> <!--- Geometry test ---> <cfinvoke component="ows.11.intro" method="geometry" returnvariable="geometryRet"> <cfinvokeargument name="radius" value="10"/> </cfinvoke> <!--- Display it ---> <cfdump var="#geometryRet#"> Figure 11.5. Use <cfdump> to quickly display complex data types.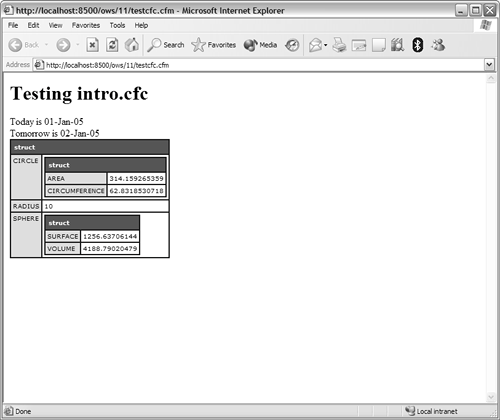 Before we go any further, let's take another look at the invocation of the geometry method. This is the code generated by Dreamweaver: <cfinvoke component="ows.11.intro" method="geometry" returnvariable="geometryRet"> <cfinvokeargument name="radius" value="10"/> </cfinvoke> <cfinvoke> takes the name of the component, the method, and the name of the returnvariable, as it did previously. The radius that must be passed to geometry is passed using a <cfinvokeargument> tag that takes a name (the argument name) and a value (the value for that argument). If multiple arguments were needed then multiple <cfinvokeargument> tags could be used. NOTE You can now see why Dreamweaver inserted a closing </cfinvoke> tag, as this is needed when nested <cfinvokeargument> tags are used. There is another way to pass arguments to a CFC method, without using <cfinvokeargument>. Take a look at this code snippet: <cfinvoke component="ows.11.intro" method="geometry" radius="10" returnvariable="geometryRet"> This code is functionally identical to the previous snippet, but it doesn't use <cfinvokeargument>. Instead, it simply passes the argument as a name=value pair, in this case radius="10". Although Dreamweaver generates the former when using drag-and-drop method selection, you are feel free to use either syntax. TIP Many developers find the name=value syntax better suited for simple methods without lots of arguments, and the <cfinvokeargument> better suited for more complex methods with lots of arguments (and possibly optional arguments). As you have seen, Dreamweaver makes using existing ColdFusion Components very easy. Over time you will likely accumulate quite a collection of ColdFusion Components, and being able to simply select and invoke them is very handy. Wizard-Based CFC CreationYou have now created a ColdFusion Component manually, and invoked that component both manually and using Dreamweaver generated code. Now I'd like to show you how Dreamweaver can actually help you write ColdFusion Components too. NOTE In case you're wondering why I first made you to it manually and am only now showing you the shortcut, it's because ColdFusion Components are incredibly important, and a good understanding of exactly how they work (and the syntax used) is critical. Now that you know what CFCs are and how they are used, I can show you the shortcuts. In Chapter 10 we created an application that listed all Orange Whip Studios movies, and allowed them to be clicked on to display more details. The final versions of those files (movies8.cfm and details3.cfm in the 10 folder) each contain <cfquery> tags, and refer to query columns in <cfoutput> blocks. We'll now revisit that application, this time moving the database interaction out of the two .cfm files and into a new file named movies.cfc. But instead of creating movies.cfc from scratch, we'll use Dreamweaver's Create Component wizard. Here are the steps to follow:
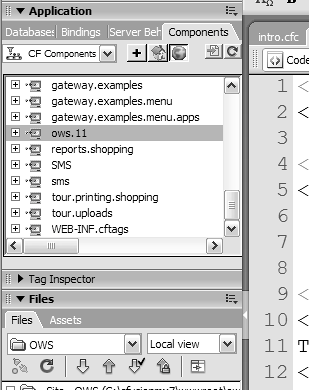
The generated ColdFusion Components isn't complete, because Dreamweaver can't know what you intend to do within the CFC methods. But Dreamweaver was able to create the following basic layout, allowing you to fill in the missing pieces: <cfcomponent> <cffunction name="List" access="public" returnType="query" output="false"> <!--- List body ---> <cfreturn > </cffunction> <cffunction name="GetDetails" access="public" returnType="query" output="false"> <cfargument name="FilmID" type="numeric" required="true"> <!--- GetDetails body ---> <cfreturn > </cffunction> </cfcomponent> Notice that Dreamweaver inserted comments where you need to place your method body code. You now need to insert a query into each of the methods. The List method query should be: <!--- Get movie list from database ---> <cfquery name="movies" datasource="ows"> SELECT FilmID, MovieTitle, PitchText, Summary, DateInTheaters FROM Films ORDER BY MovieTitle </cfquery> and the GeTDetails method query should be: <!--- Get a movie from database ---> <cfquery name="movie" datasource="ows"> SELECT FilmID, MovieTitle, PitchText, Summary, DateInTheaters, AmountBudgeted FROM Films WHERE FilmID=#ARGUMENTS.FilmID# </cfquery> These queries are the same as the ones used in Chapter 10, with the exception of the WHERE clause in the second query, which has been changed from WHERE FilmID=#URL.FilmID# to WHERE FilmID=#ARGUMENTS.FilmID# as the FilmID is now a CFC method argument instead of a URL parameter. TIP Feel free to copy and paste the <cfquery> tags from movies8.cfm and details3.cfm in the 10 folder. Now that each method contains its query, edit the <cfreturn> tag in each so that the query is returned. Listing 11.9 contains what your final edited movies.cfc should look like: Listing 11.9. movies.cfcMovie data-abstraction component<cfcomponent> <cffunction name="List" access="public" returnType="query" output="false"> <!--- Get movie list from database ---> <cfquery name="movies" datasource="ows"> SELECT FilmID, MovieTitle, PitchText, Summary, DateInTheaters FROM Films ORDER BY MovieTitle </cfquery> <cfreturn movies> </cffunction> <cffunction name="GetDetails" access="public" returnType="query" output="false"> <cfargument name="FilmID" type="numeric" required="true"> <!--- Get a movie from database ---> <cfquery name="movie" datasource="ows"> SELECT FilmID, MovieTitle, PitchText, Summary, DateInTheaters, AmountBudgeted FROM Films WHERE FilmID=#ARGUMENTS.FilmID# </cfquery> <cfreturn movie> </cffunction> </cfcomponent> The code in Listing 11.9 should be quite familiar by now. It contains two methods, List and GeTDetails. List executes a query to obtain all movies and returns that movies query. Getdetails accepts a FilmID as an argument, then uses <cfquery> to retrieve that movie, then returns that movie query. TIP Check the ColdFusion Components listed in the Dreamweaver Application Panel's Components tab. It should show your new movies.cfc ready for use. If it does not, click the Refresh button (the one with the circular blue arrow) to update the list. Now that you have movies.cfc complete, you need the .cfm pages that will invoke the CFC methods. Listing 11.10 contains movies.cfm (which is based on 10/movies8.cfm) and Listing 11.11 contains details.cfm (which is based on 10/details3.cfm). TIP To save time and typing, feel free to start by copying from the two aforementioned files in the 10 folder. Listing 11.10. movies.cfmCFC-driven movie list<!--- Name: movies.cfm Author: Ben Forta (ben@forta.com) Description: CFC driven data drill-down Created: 12/15/04 ---> <!--- Get movie list ---> <cfinvoke component="movies" method="List" returnvariable="movies"> <!--- Create HTML page ---> <html> <head> <title>Orange Whip Studios - Movie List</title> </head> <body> <!--- Start table ---> <table> <tr> <th colspan="2"> <font size="+2"> <cfoutput> Movie List (#Movies.RecordCount# movies) </cfoutput> </font> </th> </tr> <!--- loop through movies ---> <cfoutput query="movies"> <tr bgcolor="##cccccc"> <td> <strong #CurrentRow#: <a href="details.cfm?FilmID= #URLEncodedFormat(Trim(FilmID))#">#MovieTitle#</a> </strong> <br> #PitchText# </td> <td> #DateFormat(DateInTheaters)# </td> </tr> <tr> <td colspan="2"> <font size="-2">#Summary#</font> </td> </tr> </cfoutput> <!--- End of movie loop ---> </table> </body> </html> Listing 11.11. details.cfmCFC-driven movie details <!--- Name: details.cfm Author: Ben Forta (ben@forta.com) Description: CFC driven data drill-down details with complete validation Created: 12/15/04 ---> <!--- Movie list page ---> <cfset list_page="movies.cfm"> <!--- Make sure FilmID was passed ---> <cfif not IsDefined("URL.filmid")> <!--- it wasn't, send to movie list ---> <cflocation url="#list_page#"> </cfif> <!--- Get movie details ---> <cfinvoke component="movies" method="GetDetails" returnvariable="movie" Film> <!--- Make sure have a movie ---> <cfif movie.RecordCount IS 0> <!--- It wasn't, send to movie list ---> <cflocation url="#list_page#"> </cfif> <!--- Build image paths ---> <cfset image_src="/books/2/448/1/html/2/../images/f#movie.FilmID#.gif"> <cfset image_path=ExpandPath(image_src)> <!--- Create HTML page ---> <html> <head> <title>Orange Whip Studios - Movie Details</title> </head> <body> <!--- Display movie details ---> <cfoutput query="movie"> <table> <tr> <td colspan="2"> <!--- Check of image file exists ---> <cfif FileExists(image_path)> <!--- If it does, display it ---> <img src="/books/2/448/1/html/2/../images/f#filmid#.gif" alt="#movietitle#" align="middle"> </cfif> <b>#MovieTitle#</b> </td> </tr> <tr valign="top"> <th align="right">Tag line:</th> <td>#PitchText#</td> </tr> <tr valign="top"> <th align="right">Summary:</th> <td>#Summary#</td> </tr> <tr valign="top"> <th align="right">Released:</th> <td>#DateFormat(DateInTheaters)#</td> </tr> <tr valign="top"> <th align="right">Budget:</th> <td>#DollarFormat(AmountBudgeted)#</td> </tr> </table> <p> <!--- Link back to movie list ---> [<a href="#list_page#">Movie list</a>] </cfoutput> </body> </html> I'm not going to walk through all of Listing 11.10 and 11.11, as most of that code was explained in detail in Chapter 10. However, notice that in both listing the <cfquery> tags have been removed and replaced with <cfinvoke> tags. The <cfinvoke> in Listing 11.10 passes no arguments and receives a query as a result (which I named movies to match the original name so as to not have to change any other code). The <cfinvoke> in Listing 11.11 passes URL.FilmID as an argument to Getdetails (previously it had been used in a <cfquery> directly). Run movies.cfm. The code should execute exactly as it did in Chapter 10, but this time you are running a multi-tiered application, one that will be much easier to manage and maintain in the future. Now that we are done, let's consider the solution. Have we actually solved any problems? Haven't we merely moved the problem from one file to another? To go back to our original concernthe fact that data access code and presentation code were too closely tiedisn't that still the case? If a table column name changed, wouldn't presentation code still break? Actually, we've made life much better. True, all we did was move the SQL from one file to another, but in doing so we reduced the number of times SQL statements occur, and also divorced the presentation code from the data access code. If a table column name did change, all you'd need to do is modify the method that accesses the data. The methods could still return the column names you expected previously (perhaps using SQL aliases, or by building queries manually), so while you'd need to update the relevant CFC methods, you should not need to update anything else at all. This is definitely a major improvement. Using CFCs as RecordsetsDreamweaver features all sorts of sophisticated page layout and code generation options, some of which were introduced in Chapter 2, "Introducing Macromedia Dreamweaver 2004." Many of these features work with recordsets (Dreamweaver-speak for queries, the data returned by a <cfquery> tag is used by Dreamweaver as a recordset). Dreamweaver can also use ColdFusion Component methods as a way to obtain recordsets. To demonstrate this, we'll create a movie-browsing application without writing any code at all (and leveraging the movies.cfc that you already created). NOTE The steps described below will only work if the ColdFusion MX 7 Dreamweaver extensions have been installed. Here are the steps to follow:
And that's it. Save the file and run browse.cfm. ColdFusion will display the movies and page browsing links using the movies.cfc created previously. |
EAN: N/A
Pages: 282
 The Now() function was introduced in Chapter 8, "Using ColdFusion."