Section 16.3. Scripting Inline Styles
16.3. Scripting Inline StylesThe crux of DHTML is its ability to use JavaScript to dynamically change the style attributes applied to individual elements within a document. The DOM Level 2 standard defines an API that makes this quite easy to do. In Chapter 15, you saw how to use the DOM API to obtain references to document elements either by tag name or ID, or by recursively traversing the entire document. Once you obtain a reference to the element whose styles you want to manipulate, you use the element's style property to obtain a CSS2Properties object for that document element. This JavaScript object has properties corresponding to each CSS1 and CSS2 style attribute. Setting these properties has the same effect as setting the corresponding styles in a style attribute on the element. Reading these properties returns the CSS attribute value, if any, that was set in the style attribute of the element. The CSS2Properties object is documented in Part IV. It is important to understand that the CSS2Properties object you obtain with the style property of an element specifies only the inline styles of the element. You cannot use the properties of the CSS2Properties object to obtain information about the stylesheet styles that apply to the element. By setting properties on this object, you are defining inline styles that effectively override stylesheet styles. Consider the following script, for example. It finds all <img> elements in the document and loops through them looking for ones that appear (based on their size) to be banner advertisements. When it finds an ad, it uses the style.visibility property to set the CSS visibility attribute to hidden, making the ad invisible: var imgs = document.getElementsByTagName("img"); // Find all images for(var i = 0; i < imgs.length; i++) { // Loop through them var img=imgs[i]; if (img.width == 468 && img.height == 60) // If it's a 468x60 banner... img.style.visibility = "hidden"; // hide it! } As an aside, you can transform this simple script into a "bookmarklet" by converting it to a javascript: URL and bookmarking it in your browser (see Section 13.4.1.). 16.3.1. Naming Conventions: CSS Attributes in JavaScriptMany CSS style attributes, such as font-family, contain hyphens in their names. In JavaScript, a hyphen is interpreted as a minus sign, so it is not possible to write an expression like: element.style.font-family = "sans-serif"; Therefore, the names of the properties of the CSS2Properties object are slightly different from the names of actual CSS attributes. If a CSS attribute name contains one or more hyphens, the CSS2Properties property name is formed by removing the hyphens and capitalizing the letter immediately following each hyphen. Thus, the border-left-width attribute is accessed through the borderLeftWidth property, and you can access the font-family attribute with code like this: element.style.fontFamily = "sans-serif"; There is one other naming difference between CSS attributes and the JavaScript properties of CSS2Properties. The word "float" is a keyword in Java and other languages, and although it is not currently used in JavaScript, it is reserved for possible future use. Therefore, the CSS2Properties object cannot have a property named float that corresponds to the CSS float attribute. The solution to this problem is to prefix the float attribute with the string "css" to form the property name cssFloat. Thus, to set or query the value of the float attribute of an element, use the cssFloat property of the CSS2Properties object. 16.3.2. Working with Style PropertiesWhen working with the style properties of the CSS2Properties object, remember that all values must be specified as strings. In a stylesheet or style attribute, you can write: position: absolute; font-family: sans-serif; background-color: #ffffff; To accomplish the same thing for an element e with JavaScript, you have to quote all of the values: e.style.position = "absolute"; e.style.fontFamily = "sans-serif"; e.style.backgroundColor = "#ffffff"; Note that the semicolons go outside the strings. These are just normal JavaScript semicolons; the semicolons you use in CSS stylesheets are not required as part of the string values you set with JavaScript. Furthermore, remember that all the positioning properties require units. Thus, it is not correct to set the left property like this: e.style.left = 300; // Incorrect: this is a number, not a string e.style.left = "300"; // Incorrect: the units are missing Units are required when setting style properties in JavaScript, just as they are when setting style attributes in stylesheets. The correct way to set the value of the left property of an element e to 300 pixels is: e.style.left = "300px"; If you want to set the left property to a computed value, be sure to append the units at the end of the computation: e.style.left = (x0 + left_margin + left_border + left_padding) + "px"; As a side effect of appending the units, the addition of the unit string converts the computed value from a number to a string. You can also use the CSS2Properties object to query the values of the CSS attributes that were explicitly set in the style attribute of an element, or to read any inline style values previously set by JavaScript code. Once again, however, you must remember that the values returned by these properties are strings, not numbers, so the following code (which assumes that the element e has its margins specified with inline styles) does not do what you might expect it to: var totalMarginWidth = e.style.marginLeft + e.style.marginRight; Instead, you should use code like this: var totalMarginWidth = parseInt(e.style.marginLeft) + parseInt(e.style.marginRight); This expression simply discards the unit specifications returned at the ends of both strings. It assumes that both the marginLeft and marginRight properties were specified using the same units. If you exclusively use pixel units in your inline styles, you can usually get away with discarding the units like this. Recall that some CSS attributes, such as margin, are shortcuts for other properties, such as margin-top, margin-right, margin-bottom, and margin-left. The CSS2Properties object has properties that correspond to these shortcut attributes. For example, you might set the margin property like this: e.style.margin = topMargin + "px " + rightMargin + "px " + bottomMargin + "px " + leftMargin + "px"; Arguably, it is easier to set the four margin properties individually: e.style.marginTop = topMargin + "px"; e.style.marginRight = rightMargin + "px"; e.style.marginBottom = bottomMargin + "px"; e.style.marginLeft = leftMargin + "px"; You can also query the values of shortcut properties, but this is rarely worthwhile because typically you must then parse the returned value to break it up into its component parts. This is usually difficult to do, and it is much simpler to query the component properties individually. Finally, let me emphasize again that when you obtain a CSS2Properties object from the style property of an HTMLElement, the properties of this object represent the values of inline style attributes for the element. In other words, setting one of these properties is like setting a CSS attribute in the style attribute of the element: it affects only that one element, and it takes precedence over conflicting style settings from all other sources in the CSS cascade. This precise control over individual elements is exactly what you want when using JavaScript to create DHTML effects. When you read the values of these CSS2Properties properties, however, they return meaningful values only if they've previously been set by your JavaScript code or if the HTML element with which you are working has an inline style attribute that sets the desired properties. For example, your document may include a stylesheet that sets the left margin for all paragraphs to 30 pixels, but if you read the marginLeft property of one of your paragraph elements, you'll get the empty string unless that paragraph has a style attribute that overrides the stylesheet setting. Thus, although the CSS2Properties object is useful for setting styles that override any other styles, it does not provide a way to query the CSS cascade and determine the complete set of styles that apply to a given element. Section 16.4. briefly considers the getComputedStyle() method and the IE alternative, the currentStyle property, which do provide this ability. 16.3.3. Example: CSS Tool TipsExample 16-4 is a module of JavaScript code for displaying simple DHTML tool tips, like those pictured in Figure 16-5. Figure 16-5. A CSS tool tip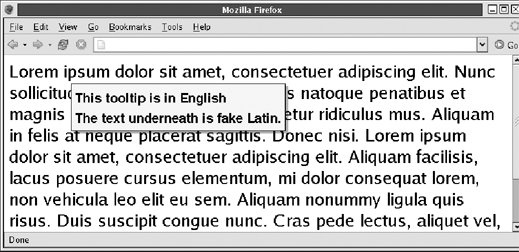 The tool tips are displayed in two nested <div> elements. The outer <div> is absolutely positioned and has a background that serves as the tool tip shadow. The inner <div> is relatively positioned with respect to the shadow and displays the content of the tool tip. The tool tip gets styles from three different places. First, a static stylesheet specifies the shadow, background color, border, and font of the tool tip. Second, inline styles (such as position:absolute) are specified when the tool tip <div> elements are created in the Tooltip() constructor. Third, the top, left, and visibility styles are set when the tool tip is displayed with the Tooltip.show() method. Note that Example 16-4 is a simple tool tip module that simply displays and hides tool tips. This example will be extended to be more practical in Example 17-3, which adds support for displaying tool tips in response to mouseover events. Example 16-4. Tool tips with CSS
16.3.4. DHTML AnimationsSome of the most powerful DHTML techniques you can achieve with JavaScript and CSS are animations. There is nothing particularly special about DHTML animations; all you have to do is periodically change one or more style properties of an element or elements. For example, to slide an image into place from the left, you increment the image's style.left property repeatedly until it reaches the desired position. Or you can repeatedly modify the style.clip property to "unveil" the image pixel by pixel. Example 16-5 contains a simple HTML file that defines a div element to be animated and a short script that changes the border color of the element every 500 milliseconds. Note that the color change is done simply by assigning a value to a CSS style property. What makes it an animation is that the color is changed repeatedly, using the setInterval() function of the Window object. (You'll need to use setInterval() or setTimeout() for all DHTML animations; you may want to refresh your memory by reading about these Window methods in Part IV.) Finally, note the use of the modulo (remainder) operator (%) to cycle through the colors. Consult Chapter 5 if you've forgotten how that operator works. Example 16-5. A simple color-changing animation
Example 16-5 produces a very simple animation. In practice, CSS animations typically involve modifications to two or more style properties (such as top, left, and clip) at the same time. Setting up complex animations using a technique like that shown in Example 16-5 can get quite complicated. Furthermore, in order to avoid becoming annoying, animations should typically run for a short while and then stop, unlike the animation in Example 16-5. Example 16-6 shows a JavaScript file that defines a CSS animation function that makes it much easier to set up animations, even complex ones. Example 16-6. A framework for CSS-based animations
The animateCSS() function defined in this example is passed five arguments. The first specifies the HTMLElement object to be animated. The second and third arguments specify the number of frames in the animation and the length of time each frame should be displayed. The fourth argument is a JavaScript object that specifies the animation to be performed. The fifth argument is an optional function that should be invoked once when the animation is complete. The fourth argument to animateCSS() is the crucial one. Each property of the JavaScript object must have the same name as a CSS style property, and the value of each property must be a function that returns a legal value for the named style. Every time a new frame of the animation is displayed, each function is called to generate a new value for each style property. Each function is passed the frame number and the total elapsed time and can use these arguments to help it return an appropriate value. The code in Example 16-6 is fairly straightforward; all the real complexity is embedded in the properties of the animation object that you pass to animateCSS(), as you'll see shortly. animateCSS() defines a nested function called displayNextFrame() and does little more than use setInterval() to arrange for displayNextFrame() to be called repeatedly. displayNextFrame() loops through the properties of the animation object and invokes the various functions to compute the new values of the style properties. Note that because displayNextFrame() is defined inside animateCSS(), it has access to the arguments and local variables of animateCSS(), even though displayNextFrame() is invoked after animateCSS() has already returned. (If you don't understand why this works, you may want to review Section 8.8.) An example should make the use of animateCSS() much clearer. The following code moves an element up the screen while gradually uncovering it by enlarging its clipping region: // Animate the element with id "title" for 40 frames of 50 milliseconds each animateCSS(document.getElementById("title"), 40, 50, { // Set top and clip style properties for each frame as follows: top: function(f,t) { return 300-f*5 + "px"; }, clip: function(f,t) {return "rect(auto "+f*10+"px auto auto)";} }); The next code fragment uses animateCSS() to move a Button object in a circle. It uses the optional fifth argument to animateCSS() to change the button text to "Done" when the animation is complete. Note that the element being animated is passed as the argument to the function specified by the fifth argument: // Move a button in a circle, then change the text it displays animateCSS(document.forms[0].elements[0], 40, 50, // Button, 40 frames, 50ms { // This trigonometry defines a circle of radius 100 at (200,200): left: function(f,t){ return 200 + 100*Math.cos(f/8) + "px"}, top: function(f,t){ return 200 + 100*Math.sin(f/8) + "px"} }, function(button) { button.value = "Done"; }); The Scriptaculous JavaScript library includes a sophisticated animation framework with many powerful predefined animation effects. Visit the cleverly named web site http://script.aculo.us/ to learn more. |
EAN: 2147483647
Pages: 767