Customizing InfoView
| There are three ways you can change the look and functionality of the InfoView application. Administrators can globally change the behavior of InfoView for all users. The users, if permitted, can set their preferences by selecting the Preferences icon. Finally, because this application is based on a published API, the application can be modified by changing the underlying code. Note Crystal Server Pages (CSP) has been deprecated for both the UNIX and Windows platforms. Although CSP on the Windows platform might still work, it is recommended that any custom ePortfolio CSP pages be migrated to JSP pages for the UNIX platform or ASPX pages for the Windows platform. Global InfoView SettingsDuring the implementation of the InfoView, an organization might want to globally change the InfoView application to tailor the application to suit its needs. This might include cosmetic changes such as adding its logo or security changes that remove certain functionality from the users. The changes made to InfoView will change the application in its entirety and will affect all users. This differs from the user preferences discussed later in the User Preferences section because those preferences are saved on a user-by-user basis and not for the InfoView application as a whole. To access the InfoView administration page, the administrator or a user with administrator rights can, via the CMC, click the BusinessObjects Enterprise Applications and then select InfoView. This should open the page seen in Figure 24.8. Figure 24.8. The properties page of InfoView.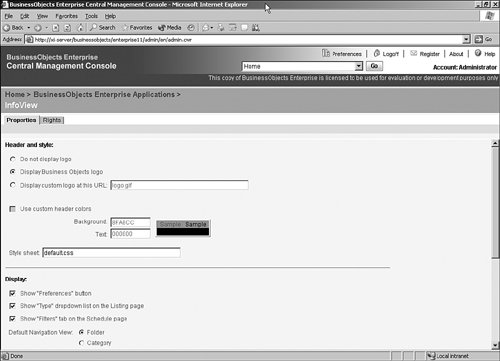 Header and StyleThe properties page is broken down into multiple sections as described in Table 24.8.
DisplayThis section hides or displays certain features, as described in Table 24.9.
Objects ListingIf a user has view rights, he can click the object's title to view the object. The administrator can select between either running the object against its data provider or against its latest successful scheduled instance. ViewersIf checked, this option allows the users to use the Advanced DHTML Viewer. The Advanced DHTML Viewer enables report modification and this requires that the Report Application Server be running. See Chapter 27 for more information on the Report Application Server. The Default Viewer sets the default viewer for InfoView when viewing Crystal Reports. The User PreferencesA user can set or change her individual InfoView interface and interactions with user preferences. General PreferencesThe General Preferences tab of the Preferences screen provides access to a number of customizable user display settings for InfoView XI. These are described in Table 24.10.
Web Intelligence Document PreferencesThe preferences for Web Intelligence documents will differ by the platform on which Business Objects is installed. The differences are explained in Table 24.11.
OLAP Intelligence PreferencesIf Enterprise XI is licensed for Crystal Analysis, the user can select between running the ActiveX (sometimes called the rich client) or the DHTML versions of the viewer. Crystal Reports PreferencesThis page allows the user to set preferences specifically around the Crystal Reports viewers. Table 24.12 highlights the different options available.
The final two tabs are the Password tab where the user can change his password and the About tab that describes the version. Customizing My InfoViewMy InfoView is a page that allows a user to add the most important report or report parts onto a single page. Each frame within the template can contain one reference. The reference can point to a supported object type, such as Crystal Reports, a Crystal Reports part, an instance or an instance filtered by username, a Web Intelligence report, an OLAP Intelligence report, any Microsoft Office document, a PDF, or a hyperlink. After the page is complete, it can be saved by clicking the Save link, which will save the page to the user's Favorites folder. Multiple versions of My InfoView can be saved by using the Save As link. The My InfoView button launches the object called My InfoView from the user's Favorites folder. If this page is deleted, clicking the My InfoView button brings up a blank page and the user can re-create the page. To create this page, click the My InfoView icon and select a template from the list. This can alternately be accomplished by choosing the New drop-down box and selecting Single Dashboard. If the user is unsure of what the template looks like or which one will be best suited to her needs, she can select the template (see Figure 24.9) and preview it. If all the templates are unsuitable, the user can select the Split Screen button to split the screen horizontally, vertically, or a combination of the two. Figure 24.9. Select a suitable template for your InfoView.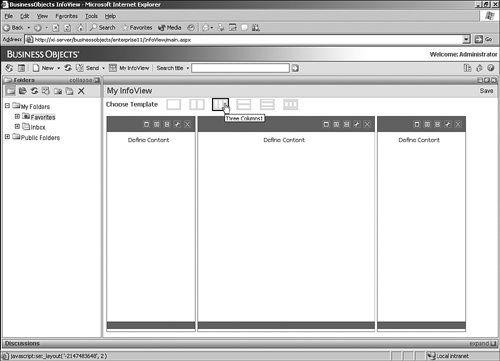 After the user is satisfied with the page splits, the user selects the Define Content link for each section of My InfoView to define the object that will populate that section. This brings up the form where the user selects the object she wants to display in that pane. The selections on the right are context sensitive to the object selected. For example, if the user selects a Crystal Report, she gets to select whether she wants a report part or the whole page, as shown in Figure 24.10. If the user selects a Web or OLAP Intelligence report, this option does not appear because report parts are not supported with this object type. Figure 24.10. The Crystal Report Specific Options area has options for defining the content of a pane within My InfoView. Note The Object list displays only what the user has the rights to see. Also, if the view time security has been defined by either a Business View or universe, the data displayed is limited to only what the user is allowed to see. See Chapter 18, "Using a Semantic LayerBusiness Views and Universes," for more information. After the user is satisfied, she can return to My InfoView to see the result. If the object is too large for the pane, a scrollbar will be automatically added (see Figure 24.11). The user can repeat the process until all the panes on the page are populated. Figure 24.11. A report part added to My InfoView. Programmatically Customizing InfoViewAs mentioned earlier, InfoView is based off of a published API. The use of this API is described in Chapter 30, "Using the BusinessObjects Enterprise APIs." Some configuration files require further explanation. Web.xml in the Java version and web.config in the .NET version of InfoView contain certain settings where an administrator can functionally and cosmetically change the way InfoView works. In the Java edition, the web.xml file (usually located under the WEB.INF directory) contains some of the settings that might be of use to an administrator (see Table 24.13). This XML file is well documented and an administrator should be able to determine what each tag describes.
|
EAN: 2147483647
Pages: 365