Section 16.3. JAC ARCHITECTURE FOR DISTRIBUTION
16.3. JAC ARCHITECTURE FOR DISTRIBUTION16.3.1. Aspects Deployment and DistributionThis section presents the features of the architecture set up in JAC to handle distribution. This architecture is called AODA (aspect-oriented distributed architecture). The AODA provides functionalities to deploy base programs and aspect components. The idea is to allow the natural and consistent cohabitation between distribution and aspects. To do this, the AODA provides core features to support distributed aspects. Figure 16-7 shows how the AODA manages distributed aspects. The top of the figure is a simple application composed of a set of components. The curly line and the crosses symbolize the pointcut relation. The middle of the figure shows the same application, but extended by a sample aspect. Finally, the bottom part depicts the application deployed. Each container holds a local instance of the original aspect; hence, the aspect is applied on each container in the same way. The set of containers where the aspect is present is called an aspect-space; it can be regarded as a single but distributed aspect. Figure 16-7. AODA: Distributed support for aspects. Our motivation for distributed aspect support is to allow the aspect programmer to express global and decentralized program properties. Indeed, it often happens that a non-functional property crosscuts a set of objects that are not located on the same container. For instance, when adding an authentication concern, the capacities may be checked on several server containers so that it is useful to modularize all the authentication definition in one unique aspect definition. 16.3.2. Distributed Application ExampleThis section presents a simple example of a distributed application with JAC. Readers interested in more detailed examples of distributed programming with JAC can refer to [20] where, among other things, a replicated load-balanced server is described. Consider a three-node ring that passes a token around the members of a ring. The functional base program is composed of three objects that are the nodes of the ring. The first step is to develop some base-level classes (this code sample can also be found in the JAC version that can be downloaded from [10]). public class Ring { public static void main( String[] args ) { RingElement element0 = new RingElement(); RingElement element1 = new RingElement(); RingElement element2 = new RingElement(); element0.setPrevious( element2 ); element1.setPrevious( element0 ); element2.setPrevious( element1 ); element2.roundTrip( 9 ); } } public class RingElement { public RingElement previousElement; public RingElement() {} public RingElement( RingElement previousElement ) { this.previousElement = previousElement; } public void setPrevious( RingElement previousElement ) { this.previousElement = previousElement; } public void roundTrip( int step ) { if( step > 0 ) previousElement.roundTrip( step-1 ); } } One can develop an aspect component that deploys the three created objects in JAC containers or use the existing DeploymentAC aspect component provided with JAC. Each aspect component woven to an application can be associated with a configuration file that gives, with a script-like syntax, the steps needed to configure it. Each step corresponds to calling a method of the aspect component. For instance, the following script instructs the instance of DeploymentAC woven to the previous base program, to
deploy "ringelement0" "rmi://host0/s0" createAsynchronousStubsFor "ringelement0" "rmi://host0/s0" "rmi://host2/s2" deploy "ringelement1" "rmi://host1/s1" createAsynchronousStubsFor "ringelement1" "rmi://host1/s1" "rmi://host0/s0" deploy "ringelement2" "rmi://host2/s2" createAsynchronousStubsFor "ringelement2" "rmi://host2/s2" "rmi://host1/s1" Figure 16-8 illustrates the topology generated by this configuration script for the deployment aspect. Figure 16-8. Deployment of the ring application.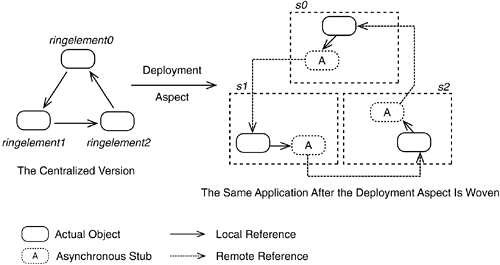 16.3.2.1 Adding a Tracing Aspect to the RingAssume we want to see the round-trip progression on the different containers (in other words, where the token is). Of course, we could modify the RingElement.roundTrip method implementation to add a println. However, this technique has several drawbacks.
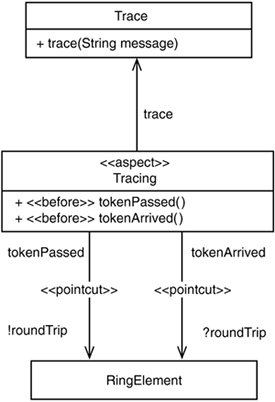
For all these reasons, you may want to implement this tracing feature within an aspect. Figure 16-9 shows the tracing aspect design. The code following the figure is the straightforward JAC implementation of this model. public class TracingAC extends AspectComponent { Trace trace = new Trace(); TracingAC() { pointcut( "RingElement", "!roundTrip(int):void", TracingAC.TracingWrapper, "tokenPassed" ); pointcut( "RingElement", "?roundTrip(int):void", TracingAC.TracingWrapper, "tokenArrived"); } class TracingWrapper extends Wrapper { public Object tokenPassed( Interaction i ) { trace.trace("The token has been passed by "+i.wrappee); return proceed(); } public Object tokenArrived( Interaction i ) { trace.trace("The token has arrived in "+i.wrappee); return proceed(); }}} Figure 16-9. A simple tracing aspect for the ring example.
Neither the figure nor the JAC code mention distribution. This means that the aspect works whether the application is centralized or distributed. By using the AODA, we have not only completely separated the distribution concern from the tracing one, but we have also made the aspects and their pointcut semantics inherently distributed. This distributed semantics greatly reinforces the AOP expressiveness by allowing the modularized definition of extensions that crosscut distributed applications. The way the trace object is actually distributed can be implemented within a deployment aspect (an aspect for the tracing aspect). For instance, if you want all the traces to be centralized on the s0 container, then just configure a distribution aspect as follows so that all the calls to the trace features are forwarded on s0. deploy "trace0" "s0" createStubsFor "trace0" "s0" "*" The final ring application architecture is given in Figure 16-10. Figure 16-10. The ring example completed with the distribution and tracing aspects.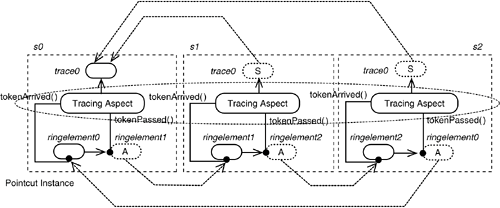 |
EAN: 2147483647
Pages: 307