| One of the first things that should be considered after installing SharePoint Portal Server and creating the default workspace is to create and customize an efficient document folder hierarchy under the Documents folder within the workspace. After creating the document folder hierarchy, the next step is to assign security roles to allow access to the workspace and subfolders within the document folder. Once security is enabled on a folder, all subfolders inherit the parent's existing security by default. The folder Coordinator has the ability to set folder security to allow subfolders to dynamically change as security settings are modified. Alternatively, the Coordinator can allow subfolders to retain existing security settings even when security for the parent is modified. The default view of the workspace shows the four top-level folders: Documents, Management, Categories, and Portal Content (see Figure 3.10). Figure 3.10. Default workspace folder hierarchy. 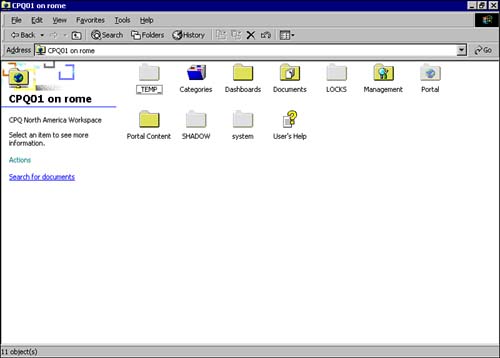 In the next few pages, we will drill down into each of these four top-level folders.  For great detail on configuring and managing the major components of the workspace, see "Introduction to the Workspace," p. 220 in Chapter 9. For great detail on configuring and managing the major components of the workspace, see "Introduction to the Workspace," p. 220 in Chapter 9. The Documents Folder The Documents folder is used to provide a document location within the workspace or dashboard site for end users. Additional subfolders can be created for organizing and managing documents. SharePoint Portal Server allows you to create two types of folders within the workspace: standard and enhanced. NOTE Only files stored in the Documents or Portal Content folders will be included in the index, which will allow users to search for these documents from the dashboard site.
By default, the Documents folder is specified as an enhanced folder, and unless specified otherwise , all subfolders created underneath the Documents folder inherit all parent folder enhanced settings (see Figure 3.11). Figure 3.11. Notice the difference in the icon for standard folder vs. enhanced folders. 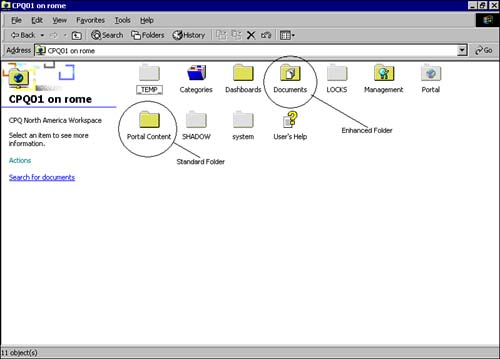 The only way to create a standard folder beneath an enhanced folder is to manually modify the properties page within the new folder, as illustrated in Figure 3.12. Click on the General tab of the document properties page, and then click the check box indicating Enhanced to enable enhanced folders. Figure 3.12. SharePoint Portal Server makes it easy to change the status of a folder from Standard to Enhanced. 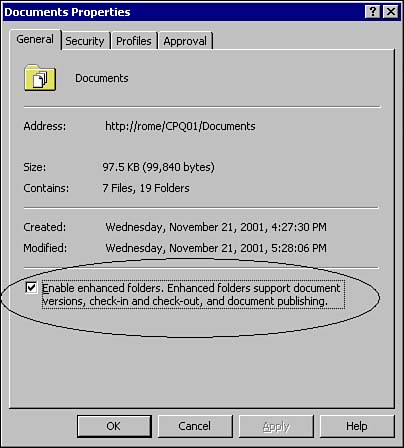 Standard folders provide only limited document management features and benefits of SharePoint Portal Server. For example, all documents that are placed in standard folders are automatically published, and all users have the ability to view and search for documents residing in a standard folder. Only enhanced folders allow private views of documents based on security, as well as check in and check out, version tracking, automated approvals , and so on. Creating and managing enhanced and standard folders are covered in greater depth in "Comparing Standard to Enhanced folders," p. 71 in Chapter 4. The Management Folder The Management folder is used to configure and manage the workspace, document profiles, and content sources. It includes various tools and folders that Coordinators can use to manage the portal's data, and to configure the workspace, document profiles, and content sources. While other tools, Web Parts, and so on exist to manage data, this folder allows specifically for managing the following: -
Document Profiles -
Content Sources -
Subscriptions -
Discussions These are each discussed in more detail in the following sections. Document Profiles Within the Management folder, a subfolder exists called Document Profiles. This folder is used to create and store document profiles for the entire workspace. When you create subfolders within the workspace, you associate one of the document management profiles with the folder. TIP All documents within the workspace must be associated with a document profile that contains a set of properties. This association of the metadata specified within the document profile is what users use to easily search for and locate documents.
SharePoint Portal Server includes a document profile base document template which includes general properties that can be applicable to all documents or individual documents. Examples of these properties are title and keywords. The properties included within this base template can be configured to be included on other customized document profiles you create. Alternatively, inclusion of these properties can be overridden. To configure the properties, double-click Management, then Document Profiles, then Base Document. Once you pull up the Base Document template, click on the Properties tab. Make changes as required. Note that Document Profiles are associated with a folder. Content Sources Within the Management folder, a subfolder exists called Content Sources. The content source represents a location for documents outside the workspace that can be accessed and included within a SharePoint Portal Server index. Content sources are represented by location and specified by a URL. Since one server can house several workspaces, the content source location could point to content outside of the workspace but on the same server, on another server on your intranet, or to locations on the Internet. Once content sources are configured, an index for the content is created and updated regularly, based on index settings enabled. Users with appropriate roles can then search for and view desired content from the SharePoint Portal Server dashboard through a Web browser. Figure 3.13. Note the various properties that may be associated with a Document Profile. 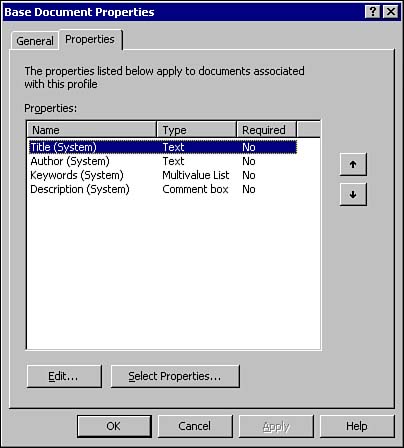 NOTE Native SharePoint Portal Server document management functionality such as checking out or editing documents is not possible for data exposed through content sources.
You can then search for and display content source information through the workspace. Content sources are added by running the Add Content Source Wizard (see Figure 3.14), which can be accessed from within the Content Sources folder beneath the Management folder within the workspace. Figure 3.14. View of Content Sources Web Folder from within the workspace. 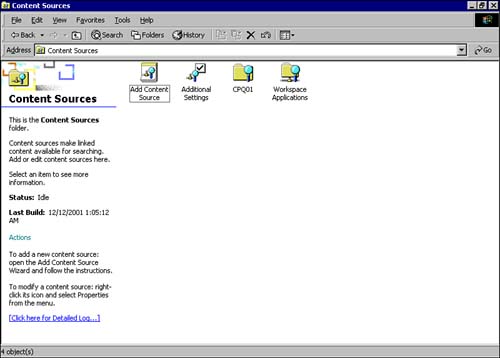 TIP The Content Sources folder cannot be accessed using a computer running Microsoft Windows 98 or Windows NT. To create and manage content sources, you must have Windows 2000 installed on your computer.
The following content sources can be created within SharePoint Portal Server: -
Web links ” such as http://www.compaq.com/sharepoint. -
Web folders ” Folders located in another workspace. -
File share ” such as file:// server / share / folder_name . -
Microsoft Exchange 5.5 public folders ” such as exch://Exchange_Server_Name /. -
Microsoft Exchange 2000 public folders ” such as http://server/Public/PublicFolders/folder_name/. -
Lotus Notes databases. NOTE If you configure a content source in a Lotus Notes Server, you will need to install a Lotus Notes client on SharePoint Portal Server. In addition, you will need to configure the server with a Lotus Notes utility called NotesSetup. Notes Server integration is discussed in more detail in Chapter 18, "Configuring SharePoint Portal Server to Crawl Other Content Sources. "
Categories Folder Another top-level folder within the root of the workspace is the Categories folder. In contrast to the Documents folder, the Categories folder permits special subfolders to be created which are organized into a logical hierarchy based on topics and subtopics. Categories are used to enable your end users to efficiently locate content, and can contain documents and information from content sources that are external to the workspace. Categories can be used to sort documents into a hierarchy of groups under different headings according to subject matter, and they can include an easy-to-manage set of terms that helps users consistently characterize documents. Categories are not mandatory, but provide an extremely useful way to logically classify and organize documents. The use of categories can help make sure your end users can search for and locate documents based on document relevance. Categories are configured as a workspace setting, so only the Coordinator role within the workspace can create and modify categories within the hierarchy. Coordinators can configure a dedicated category contact for each category, or a single contact to be responsible for multiple categories. The contact can become a focal point for end user feedback for required category changes that may help to further classify your content. Since categories provide a link to documents regardless of location, multiple categories can be associated with a single document. This may be useful when a single document includes topics that are related to a variety of categories. For example, you may have a document that has both benefits and payroll information. This document could be associated with both the Payroll and Benefits categories. Adding documents to categories, as opposed to creating or modifying them, can be done by the author of the document, a category contact, or the Coordinator of the workspace. The Category Assistant The Category Assistant is an automated categorization tool that can be used within the workspace. It can be used to reduce the amount of time required to implement categories and categorize documents. This feature is accessed through the properties page of the Categories folder. The Category Assistant will be discussed in more depth in Chapter 12, "Configuring the Category Assistant," p. 310. To access the Category Assistant, right-click on the Categories folder within the workspace, and then click on Properties (see Figure 3.15). Figure 3.15. Accessing the Category Assistant is easily performed by right-clicking the Categories folder and then clicking Properties. 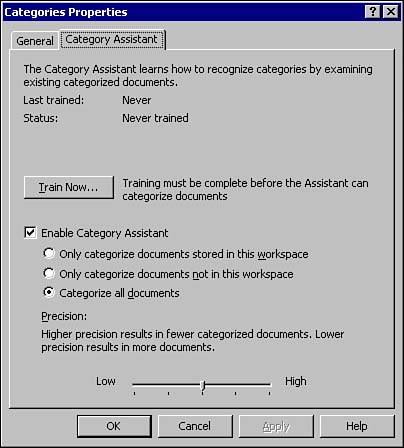 Document categorization can be done through use of the document profile form, as well through use of the Search and Categories tab, which is accessed from the Properties page of the document. The Search and Categories option is illustrated in Figure 3.16. Browse down through the Documents folder to the subfolder that contains the document you want to manage. Right-click on the document, and then click Properties. Click the Search and Categories tab to bring up the dialog box. Figure 3.16. Note that the Search and Categories tab is one of a number of tabs associated with the properties of a document. 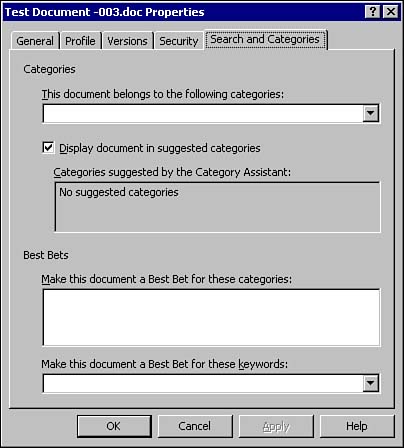 Once categories are enabled, your end users can begin to browse through and search the category hierarchy to learn how content is logically organized. Portal Content Folder The fourth and final top-level folder is called Portal Content. The purpose of this folder is to store default folders, which are used to configure and manage the information displayed within the default Web Parts displayed through the SharePoint Portal Server dashboard site. Default portal content such as News, Announcements, and Quick Links (see Figure 3.17) are configured as required by a workspace level Coordinator. This is done by adding documents to the News, Announcements, and Quick Links subfolders within the workspace. These are in fact default Web Parts, and can be either removed or not shown as required. Figure 3.17. View of the default subfolders within the Portal Content folder. 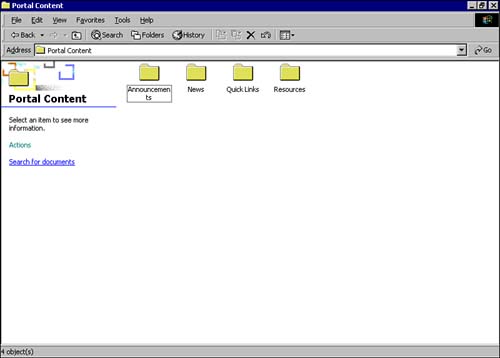 | 