| You must name a field before you can specify any of its other characteristics. There are a few general principles to keep in mind when you choose a field's name. Using Meaningful Names A meaningful name is important, even more so than when you're choosing a name for an Excel list. Whether by means of the Access interface or via Excel, much of your work with the table will require you to supply the names of the table's fields. Whether you're putting a field onto a screen form where a user can supply a value, or adding a field to a query, or making reference to a field in VBA code, your task will be much easier if you've given the field a name such as SocSecNum or FICA_Rate. Your task is that much harder if you've used a name such as Field1 or VariableB. Excel is different. With an Excel list, you can often just glance at its values to know what it represents. When you see a value such as 800-555-1212 or Republican, it's usually pretty clear what the field represents. (But not always: Is that 800-number a voice line or a fax line?) In contrast, it's unusual to be looking at a field's values when you're doing design work in a database, or managing a database from the Excel platform. There's no good contextual clue, and you'll save yourself hours in the long run by spending a few seconds at the outset in the selection of a meaningful name. Living with Your Choices At one time or another, we've all thought, "I just need to get the table built right now. I'll come back and fix the field names later." But "later" never comes soon enough. Shortly after you've built the table, you're creating queries that depend on the presence of a field named Field1 and VariableA. Those queries are meant to pass data along to a user form, so the form itself comes to depend on those names. And shortly you find that your VBA code, whether it's in Access or Excel, has those names scattered throughout. These misnomers create a problem, but you can solve it by changing every instance of the field's name in the table, in any query that refers to the field, in any form that refers to those queries, and so on. It can be a major and error-prone project, but it's feasible because you can put your hands directly on the field's name no matter where it appears. The problem is worse if you have an external data range in an Excel worksheet. To change the field's name then, you'll have to edit the query that populates the data range. If you start by changing the field's name in the database, Microsoft Query won't be able to find it; if you start by changing the reference in Microsoft Query, you'll be told that the field doesn't exist. The least obnoxious solution is to change the field's name in the database, and then rebuild the external data range from scratch. Name AutoCorrect Access 2000 introduced a feature termed Name AutoCorrect. The idea is that you can change the name of a database object, such as a field name, and Access will automatically correct other objects' references. So, if in a table you change a field's name from Profit to NetProfit, a query that uses the field will be corrected automatically to refer to NetProfit. Access keeps a log of such changes. To invoke Name AutoCorrect, choose Options from the Tools menu, click the General tab, and fill the appropriate check boxes. But this feature brings with it its own problems. It slows processing, particularly in a database with user-level security enabled. It does not change names in macros or VBA procedures. And messages in Usenet newsgroups (not a uniformly reliable source of information) have blamed other problems on Name AutoCorrect problems that just seem to go away when the user turns it off. |
I admit that I have some databases still in use that have fields with meaningless names. By the time I was ready to bite the bullet and change the names wherever they appeared, they had spread like mold, through queries, forms, linked tables, VBA code, documentation, and so on. At this point, it's more effective to live with the problem than to fix it. At least these databases are a constant reminder to me to get my field names right at the outset. Using Spaces in Names You can use spaces in field names; for example, Retained Earnings. NOTE You can't start the name of a field with a space, or include a period, an exclamation point, an accent grave (that's the character below the tilde), square brackets, or the control characters represented by ASCII 0 through 31.
Suppose that you embed a blank space in a field name, and later drag the field onto a user form to create a control. Access replaces the space with an underscore in any VBA references (see Figure 9.3). Figure 9.3. Access inserts an underscore in place of the embedded blank space. 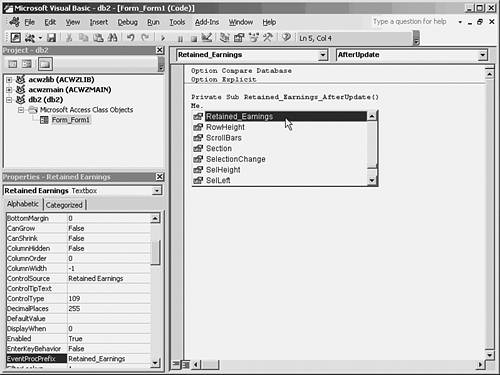
NOTE There are other ways to create controls on forms. For example, you could drag a text box control from the Toolbox onto the form. By default it would be named Text12 or Text25, depending on how many controls were already on the form. Later, you can associate that text box with a field in a table, and (until you rename the control itself) it would retain its original, default name.
The field named Retained Earnings is represented in the form's VBA code as a control named Retained_Earnings. The field's name itself does not change. If you open the table, you'll note that it's still Retained Earnings. And if you examine the control's properties, you'll find that on the form it's still termed Retained Earnings. But in any VBA code that's saved with the user form, such as the code for its After Update event, the control is referred to by the name Retained_Earnings. It's very convenient for VBA code referring to controls on forms to use the same name as the field they represent. Suppose that you're writing VBA code that runs in response to a user clicking an OK button on a form named FinancialForm. You want to perform a calculation based on the value that the user typed in the form. You're calculating the average quarterly earnings, given the annual earnings figure supplied by the user. If the control in question is named Text18, your code might look like this: MeanQuarterlyEarnings = FinancialForm.Text18 / 4
Subsequently, while reviewing the code, you realize that you don't know what kind of earnings the control named Text18 stores: retained earnings, earnings per share, diluted earnings, or something else. So, it's handy for the code to refer to Retained_Earnings instead of Text18, but there's still a source of confusion. Your field's name has an embedded blank, but the control's VBA reference has an embedded underscore. That causes problems when you're writing code, especially if you're writing code in Excel to manage the database. Then you're a whole application away from the field names. All that really matters is to arrange things so that names are consistent. In the long run, you'll save yourself headaches by taking one of these two approaches: Avoid using separators in field names. A field named RetainedEarnings, dragged onto a form named MyForm to create a control, is referred to as MyForm.RetainedEarnings. The VBA reference is the same as the field's name. If you want to use a separator in a field name, use an underscore. A field named Retained_Earnings, dragged onto a form named MyForm to create a control, is referred to as MyForm.Retained_Earnings. Again, the VBA reference is the same as the field's name.
After you've settled on an approach even if you choose to use embedded spaces in names use that approach consistently. You'll spend a lot less time reopening databases and tables to check how you named something. Setting Field Types When you create a new field in a table, it is given a default type. The type determines what sort of data the field can contain. You can, of course, change a field's default type to another, more appropriate one. Text is the default type that Access assigns unless you change the default. You do so by choosing Tools, Options and clicking the Tables/Queries tab (see Figure 9.4). Figure 9.4. Use the Text and the Number boxes to set the size of the default field type; for example, 50 for Text or Byte for Number. 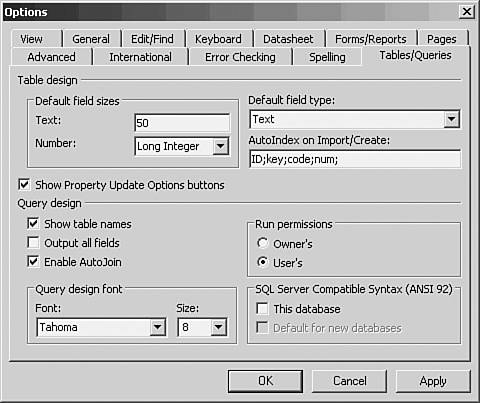
If you want each new field that you establish to automatically be a Number type, choose Number from the Default Field Type dropdown. Then choose one of the Number field sizes from the Number dropdown. These sizes are available for the Number data type: Byte Integer Long Integer Single (single precision; supports 38 digits to the right of the decimal point) Double (double precision; supports 308 digits to the right of the decimal point) Decimal (supports 28 digits to the right of the decimal point) Replication ID (a 16-byte field normally used in replicas of databases)
NOTE Single- and double-precision variables can contain numbers in the ranges from about -3.4 * 10^38 to 3.4 * 10^38, and about -1.7 * 10 ^ 308 to 1.7 * 10 ^ 308, respectively. This doesn't mean that they can do so precisely, however. A double-precision variable, for example, is precise to 15 digits. A number that requires more than 15 digits of accuracy cannot be stored precisely in a double-precision variable.
Access offers these data types: Text Memo (Access 2000, 2002, and 2003 support indexing on Memo fields) Number Date/Time Currency AutoNumber (a Long Integer that increments itself automatically as new records are added to a table) Yes/No OLE Object Hyperlink
Your choice of data type for a given field is usually dictated by the values you want it to store. If it can have letters for example, a person's name you'll choose Text (limited to 255 characters) or Memo (not limited). If the field will store numbers only, your choice depends on whether the numbers are always integers, such as number of family members, or possibly floating point, such as area in square feet. Given a choice between two or more data types, you usually choose the more parsimonious. Where possible, choose Byte over Integer, Integer over Long Integer, Single Precision over Double, and so on. (Memo is the most roomy data type.) But there's another consideration, one that's raised by joins. When you join two tables in a query, the joined fields must be compatible, and that means that you must plan ahead. There are three field types that cannot be used in a join: Memo, OLE Object, and Hyperlink. So, if you know that you're going to join, say, a Hospitals table with a HospitalTypes table, don't give either field that will comprise the join a type of Memo, OLE Object, or Hyperlink not even if both fields have the same type. NOTE Note that although you can now index on Memo and Hyperlink fields, it doesn't mean that you can join tables using them.
A join can be successfully created using two Text fields, regardless of their length. For example, if the field UnitName is a Text field with a maximum length of 50, and UnitTypeID is a Text field with a maximum length of 2, you can create a join with those two fields. But you cannot create a join using a Text field and a numeric field of any type. (Bear in mind that Date/Time and Yes/No fields qualify as numeric types.) So, an easy rule of thumb is to type fields that might be used for joins as either both Text or both Number. Preparing Table Joins Access provides a Relationships window, which enables you to define joins between tables. Either click the Relationships button or choose View, Relationships. When you do so, the Relationships window opens. If you open it before any relationships have been defined, a Show Table dialog box also appears; if at least one relationship already exists, you can display the Show Table dialog box by choosing Relationships, Show Table. To add a table to the Relationships window, click the table in the Show Table dialog box and then click the Add button or simply double-click the table. When you've finished adding tables, click Close to dismiss the Show Table dialog box. You now see the tables in the Relationship window (see Figure 9.5). Figure 9.5. The line between the two fields is the default, inner join. 
In the Relationships window, you can define the joins that you want between the tables in your database. With at least two tables showing, click on a field in one table and drag the mouse pointer to a field in another table. When you release the mouse button, the join between the two tables appears. There is an advantage to creating the join in the Relationships window instead of in a query window. Access will create a join automatically for you in a query if there are two tables with identically named fields, and if one of those fields is a primary key. But if those two conditions are not met, Access won't create the join for you. The Relationships window can help here. If you create a join in the Relationships window, that join automatically appears when you subsequently design a query based on the joined tables regardless of whether the fields have the same name, and regardless of whether one of them is a table's primary key. NOTE Neither the Relationships window nor the Query Design window warns you if you're creating an illegal join, such as between a Text and an Integer field. You won't get an error message until you try to use the join, as you would if you tried to open the query.
Choosing Join Types Table joins can represent either one-to-one or one-to-many relationships. In a one-to-one relationship, each table has only one instance of a value in its join field. In a one-to-many relationship, one table has only one instance of a value whereas the other table can have multiple instances of the same value.  Another type of join, many-to-many, is really two instances of a one-to-many join; see "Using Multiple Field Indexes" later in this chapter for more information. Another type of join, many-to-many, is really two instances of a one-to-many join; see "Using Multiple Field Indexes" later in this chapter for more information.
Understanding One-to-Many Relationships One-to-many relationships are by far the most common type. A typical example consists of a table, Voters, with data on many people, some of whom are registered Democrats and others who are registered Republicans. A record gets a value of 1 on the PartyID field if the person is a Democrat and a 2 if a Republican. There are many instances of each value in the Voters table. Another table, Parties, contains two fields: PartyID and PartyName. One record has a 1 on PartyID and the label Democrat on PartyName. The other record has a 2 on PartyID and the label Republican on PartyName. You join the Voters table and the Parties table in a query using PartyID as the common field. Instead of displaying either instance of PartyID, you show PartyName. In this way, you can see which party each person identifies with. It's a one-to-many relationship: There's one instance of each PartyID value in Parties, and many instances of each PartyID value in Voters. Understanding One-to-One Relationships One-to-one relationships are much less common. They occur when each table has only one instance of each value on the fields that establish the join. They are less common because you would usually put all the fields in one table, rather than in separate tables joined by a common field. One reason to use a one-to-one relationship is security. In a networked, human resources application, you might want to show all users the full name, department, and telephone extension of each employee. At the same time, you might want to hide from most users the employee's salary and Social Security number. One way to handle that is to split the data into two tables: one that has information for public consumption and one for HR purposes only. You can set database permissions so that all users can open one table, but only certain users can open both tables. By linking the two tables in a one-to-one relationship, by means of some field such as EmployeeID, you can tie together all the data for a particular employee, while maintaining security for the confidential information. Defining and Identifying Relationships In Access, a one-to-one relationship is shown with a 1 on both ends of the join line. A one-to-many relationship is denoted by a 1 at the end near the one-table, and an infinity symbol at the end near the many-table (see Figure 9.6). Figure 9.6. DirectorID is the primary key of the Directors table, so it's the one side of the one-to-many relationship. 
There are a few requirements that you must meet before you can define a relationship as one-to-many or one-to-one. You need to use the Relationships window. You cannot define a one-to-many or one-to-one relationship in a query's design view. In a one-to-many relationship, the join field in one of the tables must be its primary key or the basis for a unique index. This ensures that there really is just one instance of each value on the one-side of the relationship. In a one-to-one relationship, the join field must be the primary key (or the basis for a unique index) in both tables. Referential integrity must be enforced.
Referential integrity is a highfalutin' term for a fairly simple concept: You have to preserve matching values in joined tables. The next section discusses this notion in greater detail. Preserving Referential Integrity You've taken some trouble to create a relationship between two tables: Voters and Parties. Both tables have a Byte field, PartyID, which is the primary key of the Parties table (in this context, the Parties table is termed the primary table). The Parties table has just two records: one for Democrats and one for Republicans. You add both tables to the Relationships window, and join them by clicking on PartyID in one table and dragging to PartyID in the other table. Figure 9.7 shows the result. Figure 9.7. Choose Relationships, Show Direct to hide indirect relationships and tidy up a window cluttered by tables. 
Subsequently you fine-tune the join by right-clicking on the join line and choosing Edit Relationship from the shortcut menu. The Edit Relationships dialog box appears as shown in Figure 9.8. Figure 9.8. The Cascade check boxes are enabled only after you fill the Enforce Referential Integrity check box. 
NOTE The Edit Relationships dialog box appears by default if you've just created the join. If you're editing the relationship at a later time, you get to the dialog box by right-clicking the join or by choosing Relationships, Edit Relationship.
On the Edit Relationships dialog box, fill the Enforce Referential Integrity check box and click OK. You have now prevented yourself, and other users of these tables, from taking three actions. These actions are as follows: You can't add unmatched records on the many side. Access won't let you add a record to the Voters table with a value of 3, perhaps representing Whigs, on the PartyID field. The idea here is that you should prepare the ground by adding a new record in the primary table before you use its value in the related table. If you begin by adding a record to the Parties table, one with 3 on PartyID and Whig on PartyName, you can subsequently add a record to the Voters table with 3 on PartyID. You can't delete a record from the primary table. Access won't let you delete either the Democrat or the Republican record from the Parties table if there is at least one matching record in the Voters table. More generally, under referential integrity, you can't delete a record from the primary table if it has a matching record in the related table. But if you had a Whig record in the Parties table and no Whig record in the Voters table, you could delete it from Parties. You can't change a value in the primary key. Suppose that you decide you don't like using the value 1 on PartyID to represent Democrats you'd rather use 18. If you try to change the 1 in Parties to 18, Access won't let you. To do so would leave you with a bunch of orphaned Democrats in the Voters table.
And that's what referential integrity means: You can't add a record to the related table if it isn't matched in the primary table; you can't delete a record from the primary table if it's matched in the related table; and you can't modify a value in the key of the primary table. Actually, you can do two of those things if you want. Refer to Figure 9.8 and notice that there are two additional check boxes. If you fill the Cascade Update Related Fields check box, you can change a key value in the primary table. Using the Voters example, you could change the Democrat record in the Parties table to have a value of 18 instead of 1. Then a cascade update would change the value 1 to 18 in all matching records of the Voters table. If you fill the Cascade Delete Related Records check box, you can delete a record from the primary table, even if it's matched by records in the related table. However, the related records are also deleted (you're warned first, and have a chance to stop the procedure from going forward). Establishing Keys The term key usually means a primary key. A primary key is a field (or fields) in a table that uniquely identifies each record in that table. If each of these is true You are represented in a record in a table named ExcelUsers. Your record has the value 3 on the field named UserID in the table named ExcelUsers. The field named UserID is the primary key of the table named ExcelUsers.
then no other record in ExcelUsers can have the value 3 in the field named UserID. Furthermore, no record can have a null value in the field named UserID. When you read about database design, you often find that you're advised to establish a primary key for each table in your database. That's frequently good advice. But it's more important to understand why you should do something than it is to know you're supposed to do it. There are only a few reasons to use primary keys. The most important ones are discussed in the following sections. Finding a Specific Record You'll see more about indexes in the next section, but for now be aware that a unique index associates a position in a table with a value on the table's primary key. As a result, a database is able to locate a particular record much faster than if it had to look through all the table's records, one by one. NOTE When you establish a field as a table's primary key, Access automatically indexes the table on that field. If in addition you want to index a table on a different field, you must do it manually or by means of the AutoIndex feature (see the following section).
Suppose that a table used by a human resources department has employee's Social Security number (SSN) as its primary key. You want to search for the record of the employee whose SSN is 987-65-4321 which, although you don't yet know it, is the 32,767th record in the table. The database management system (DBMS) uses a very fast search algorithm to find that SSN in the index. Once it finds in the index the SSN you're after, the database engine has also found the SSN's location in the table. That's what the index does: It pairs the SSN (in this case, 987-65-4321) with the table location of the record that has the SSN (in this case, 32,767). Knowing the record's location enables the DBMS to display the full record to the user: the employee's name, date of hire, SSN, rate of pay, W-4 deductions, and so on. Establishing Indexes As you saw in the previous section of this chapter, "Finding a Specific Record," indexes can help a DBMS find a record very fast. It's a homely old analogy, but a good one: A table's index is like a book's index. With a book's index, you look up a word you're interested in and find a page where the word exists. With a table's index, the DBMS looks up a value that you're interested in and finds the record where that value exists. DBMS use a very fast search strategy to locate an entry in an index. The strategy is termed b-tree, and it involves drilling down through a series of either-or choices. Continuing the book index analogy (which starts to break down about here), you might look in the first half of the index to find a word beginning with c, and then in the second quarter to find a word beginning with ch, and then in the third eighth to find a word beginning with cha, and so on until you locate the word chasm. Similarly, DBMS continuously divide the entries in the index into balanced (hence the b in b-tree) groupings until they locate the field value being sought. In Access, when you have identified a field as a table's primary key, Access automatically creates an index for that field. There are two general ways, other than establishing a primary key, by which you can create an index for a field. Establishing an Index Automatically Suppose that it's your practice to provide a particular prefix or suffix for names of fields that you want to index. For example, you might use the suffix CD, short for code. Then your indexed fields might be named PhysicianCD, AccountCD, ProgramCD, and so on. If you use CD as a prefix instead, you might name fields CDPhysician, CDAccount, and CDProgram. If you want Access to automatically index a field based on a prefix or suffix, begin with a database active and then choose Tools, Options. Click the Tables/Queries tab (see Figure 9.9). Figure 9.9. Separate prefixes or suffixes by semicolons, not commas. 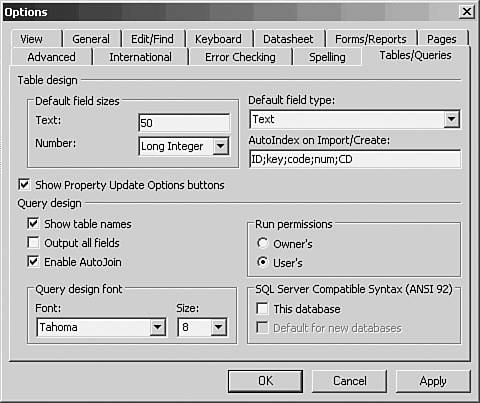
Following the existing list of prefixes and suffixes, enter ;CD. This establishes CD as a string which, affixed to a field's name, causes Access to automatically index the field when it's created. Creating an Index Manually There are several ways to create an index other than automatically. Two of them use a table's Design view, as shown in Figure 9.10. Figure 9.10. The Field Properties pane enables you to set various field properties. 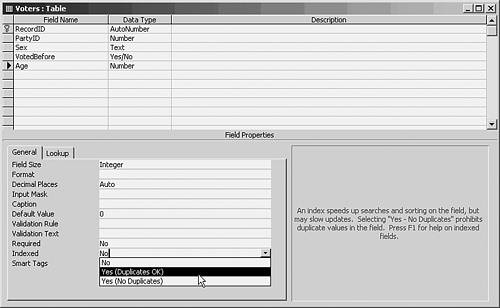
In Figure 9.10, the field named Age is selected. To set an index on this field using the Field Properties pane, take these steps: - In the General tab, click in the box to the right of the Indexed caption.
- A drop-down arrow appears. Click it to display the drop-down list.
- Click either Yes (Duplicates OK) or Yes (No Duplicates).
- Save the table.
To use the other method, choose View, Indexes (or click the Indexes button). The dialog box shown in Figure 9.11 appears. Figure 9.11. You can give the index a meaningful name if you use the Indexes dialog box. 
Take these steps: - Type a name, which could be the name of the field itself, in the Index Name column.
- Click in the Field Name column, and select the field you want to index from the dropdown list.
- Indicate whether you want the index to put the records in ascending or descending order according to their value on the indexed field.
- Set the Primary, Unique, and Ignore Nulls options to either Yes or No.
- Click the X button to close the dialog box.
Setting the Primary option to Yes means that the field used by the index becomes the table's primary key. Because you can reset this option to Yes on a different index, it's clear that a table can have more than one primary key although it can use only one index at a time as its primary key. In some rare cases, you'll want to index a field that might contain null values. If you set Ignore Nulls to Yes, records that contain null values on that field will not enter the index. (A primary key cannot contain null values; therefore, the Ignore Nulls setting is not used for primary key indexes.) The Unique option, if set to No, allows more than one instance of the same value in the indexed field. This raises the question of which fields to index. Indexes are a mixed blessing. They do usually make data retrieval quicker, although you won't perceive an increase in speed unless you have many, many records to search. On the other side of the medal, you have to keep indexes updated. When you add a record, for example, the DBMS must account for that record's value on the index's field. It needs to add to the index the record's value and its position in the table. The situation is similar when you delete a record. The DBMS must remove that record's instance, its field value as well as its position in the table, from the index. That by no means exhausts the jobs that the DBMS must perform to keep the index current. If you delete a record, for example, that alters the position in the table of all the subsequent records. Their position values in the index have to be updated. The reverse occurs, of course, when you add a new record. Only experience can tell you whether establishing an index for a field will result in a net gain or net loss whether the gain in retrieval speed outweighs the loss due to index maintenance. The more sophisticated DBMS assist you in making this judgment with statistical sampling techniques, and tools that you can use to fine-tune your choice of indexes. Using Multiple Field Indexes You're not limited to a single field in an index. It can sometimes pay to index a table on two, and rarely more than two, fields. You can find an example of a multiple field index in the Northwind database that accompanies Microsoft Access. The Order Details table provides a junction between the Products table and the Orders table. In the Northwind database, any given product can appear on many different orders; for example, Johnson's Ketchup could be part of orders number 1, 10, and 25. But any given order can contain many different products: Roger's Clams, Neal's Wine, and Garlic By Fred might all appear on order number 31. This is an example of a many-to-many relationship. Northwind's Order Details table associates many products with many orders. Each record in the table represents one product on one order. The Northwind database uses the junction table to relate the Products table and the Orders table. Figure 9.12 shows the design of a query that joins the two tables. Figure 9.12. In Query Design view, referential integrity assigns the junction table the many side of one-to-many relationships. 
To maximize the junction table's efficiency, its primary key should consist of both a product field and an order field. To establish this multiple field key, take these steps: - With the table in Design view, click the box to the left of the name of the first of the two fields. The entire row is selected.
- Hold down the Ctrl key and click the box to the left of the name of the second of the two fields. Both rows are now selected.
- Click the Primary Key button. The key icon appears next to both fields in the design grid (see Figure 9.13).
Figure 9.13. It's the combination of the two fields that must be unique in the junction table. Either field can by itself assume duplicate values. 
- Save the table.
If you prefer, you can establish a multiple field index via the Indexes dialog box. Take these steps: - Choose View, Indexes.
- Enter a name for the index in the Index Name column of the first blank row.
- In the same row, select the first field from the dropdown list in the Field Name column.
- Set the Primary dropdown to Yes.
- In the next row down, leave the Index Name column blank, but select the second field from the dropdown list in the Field Name column (see Figure 9.14).
Figure 9.14. Notice that both fields have the key icon, indicating that they are combined to form the table's primary key. 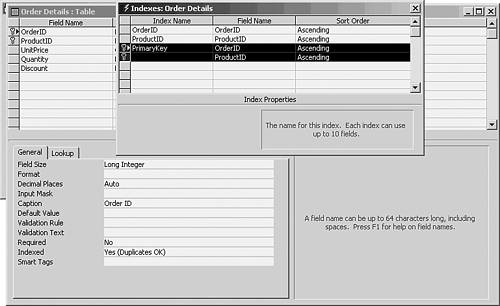
- Click the X box to close the dialog box.
When I first started designing databases, I had the idea that many-to-many relationships of the sort discussed here were rare and exotic. It wasn't until I kept running into them in real-world situations that I saw how commonplace they are, and how using them made many of my queries much more efficient. |