Viewing Contacts
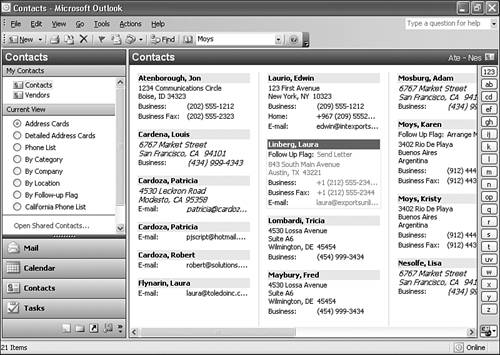
| If you've entered more than five or six contacts, you'll probably utilize several different views, depending on the specific information you need at the time. Outlook has a variety of different types of views to choose from. Using the Address Card ViewThe default view of the Contacts folder is the Address Card view. In this view, items are displayed in large squares much like index cards. Figure 10.31 shows a typical Address Card view of the Contacts folder. Figure 10.31. The Contacts folder offers two different card views.
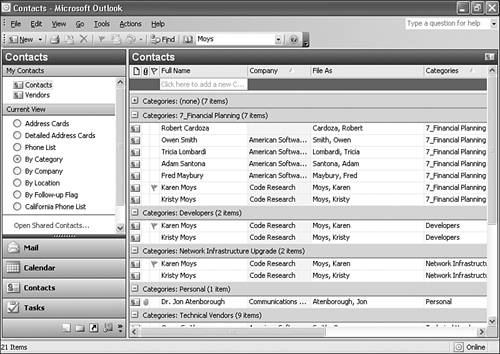
Within the Address Card views are a number of ways to maneuver around the folder. You can type any letter on the keyboard and Outlook will navigate to the first contact whose File As field begins with that letter. You can also use the contact index on the right side of the folder to select a letter or group of letters. Outlook will jump to the first contact with a File As field that begins with the first letter of that group. If your screen resolution is large enough, you'll have one index button for each letter. If you're using a smaller screen resolution, you might have groups of several letters. The fields displayed in the Address Card view are the mailing address, phone, and email fields that are populated with data. For example, in Figure 10.31, the contact Jon Atenborough has two telephone numbers listed: Business and Mobile. His address is complete and her company is filled in. The next contact, Louis Cardena, has two emails entered, but no telephone information. The Detailed Address Card view displays additional information including the contact's department, Web site, and the first few lines of notes available for the contact. Using Other Contact ViewsThe other views available for the Contacts folder are all table views. They list information in rows and columns. The By Category table view is shown in Figure 10.32. This view groups your contacts by their category. If you have a contact in multiple categories, that contact is listed in each category. So, using the By Category view might result in a number of apparent duplicates. But if you open a contact under its first category and make changes to it, those changes are available no matter which category you find the contact under. Figure 10.32. The By Category view enables you to group your contacts by category.
Advanced View OptionsIn addition to changing the Contacts folder's view using the radio buttons in the Navigation Pane, you can also customize each individual view or create a new view.
To customize the current view, click the Customize Current View link in the Navigation Pane to display Figure 10.33. Figure 10.33. Use the Customize View dialog box to customize your standard view.
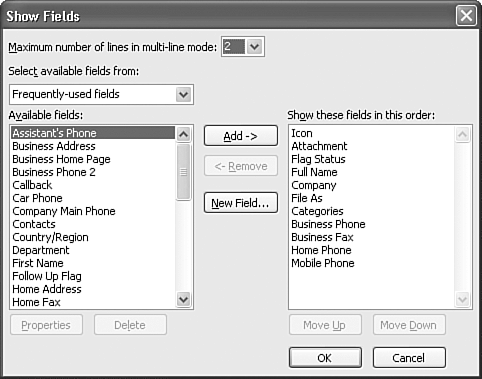
You can control all aspects of the view from this dialog box. You can add or remove fields from the view, change grouping (in all views except Address Card Views), specify a sort order, create filtered views, change fonts, set automatic formatting rules, and format the columns in a table view. You can also reset your current view to its default state. To change the fields displayed in your view, click the Fields button to display Figure 10.34. The fields already displayed in the view are shown in the list box on the right side of the dialog box. The list box on the left side of the dialog box displays all available fields you can add to your view. Fields are divided into field sets. The default field set from which to select fields is the Frequently Used Fields. You can use the Select Available Fields From drop-down list to change the available field set. For the Contacts folder, the largest and most appropriate field set is All Contact Fields. Figure 10.34. Select from any available field in the Address Card view.
To add a field to your view, select the field in the list box on the left and click Add. To remove a field from your view, select the field in the list box on the right and click Remove. You can change the order of the fields in your view by selecting the field in the list box on the right and clicking either Move Up or Move Down. TIP You can move multiple fields this way as well. Select the fields using the Ctrl or Shift key, and then move the group of fields up or down. When you've finished changing the fields in your view, click OK to save your changes. By default, all views are sorted by their File As field. You can change the sort order in a table view simply by clicking on the column you want to sort by. This instantly sorts the view by that column. If you want to sort by more than one column, click the Sort button from the Customize Current View dialog box to display the Sort dialog box (see Figure 10.35). Figure 10.35. You can sort by up to four different columns.
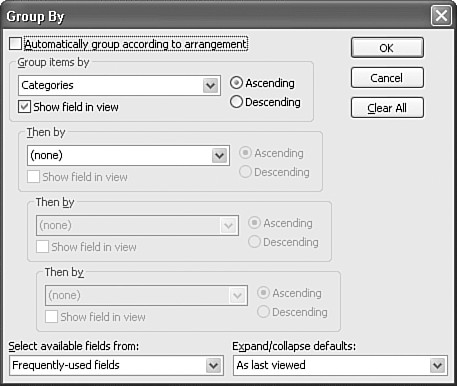
Use the drop-down boxes to choose the fields you want to sort by. As with the Show Fields dialog box, you can change your available field set by using the Select Available Fields From drop-down. You don't have to show a field in the view to use it for sorting. If you want to clear all sorting and start over, click the Clear All button. When you're done making your changes, click OK. In all table views, you can also group by one or more fields. The By Category view is an example of a grouped view. To group the Phone List view by State, use the following steps:
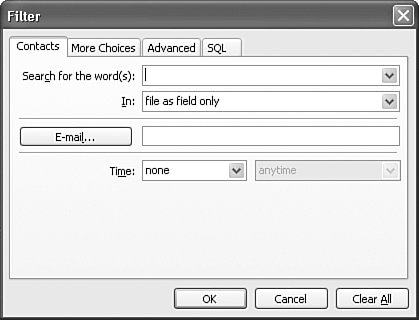
Filtering Contacts in a ViewIf you want to display only certain items in your view, add a filter to your view. To filter your view, select the Filter button on the Customize Current View dialog box to display Figure 10.37. Figure 10.37. The Filter dialog enables you to specify a variety of criteria.
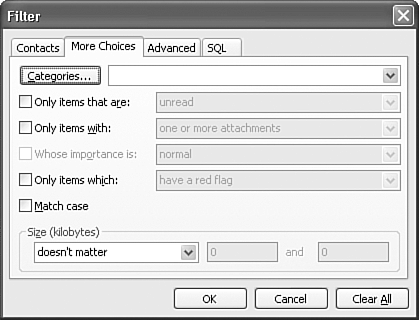
Use the Contacts tab of the Filter dialog box to enter specific words to add to your filter. To filter by customers in Seattle, enter Seattle in the Search for the Word(s) box and select Address Fields Only from the In drop-down box. You can filter by any word in just about any group of fields. To find all contacts with a Hotmail email address, type @hotmail.com in the Search for the word(s) box and select E-mail Fields Only from the In drop-down box. To specify additional filter settings, select the More Choices tab (see Figure 10.38). Figure 10.38. The More Choices tab enables you to filter by category, size, and attachments.
Use this tab to filter by category, size of the item, or whether the item has an attachment.
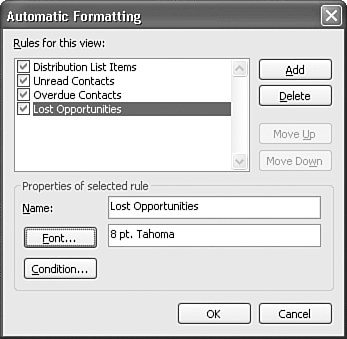
Automatic FormattingAutomatic formatting enables you to display items in different colors and fonts based on specific criteria. To set up automatic formatting rules, click Automatic Formatting from the Customize Current View dialog box to display Figure 10.39. Figure 10.39. The Automatic Formatting dialog box enables you to specify display rules for items.
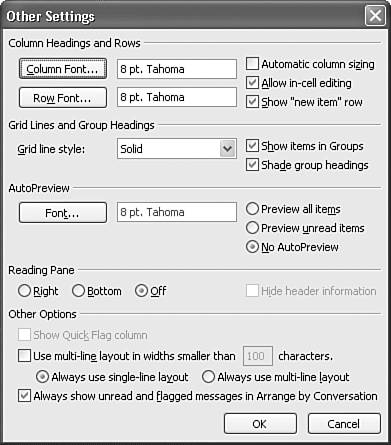
Every Outlook folder contains some default formatting rules. You cannot delete these default formatting rules, but you can edit the fonts used. To create a new automatic formatting option, click the Add button. This creates a new untitled rule. Change the name of the rule to a meaningful name. Click Font to specify a font, size, and color for items to use when they meet the specified criteria. Click the Condition button to display the Condition dialog box. This box is almost identical to the Filter dialog box shown previously in Figure 10.37. Specify your condition or conditions and click OK three times to apply your changes and return to your view. You can delete any user-defined automatic formatting rules by selecting the rule and clicking Delete. You cannot delete any of Outlook's default automatic formatting rules. Other Settings and In-Cell EditingThe Other Settings button in the Customize Current View dialog box displays Figure 10.40. You can change the font for the card headings and the card body. You can also change the default card width. The last two options in the Other Settings dialog box enable you to turn on in-cell editing and display empty fields. In-cell editing enables you to click directly in a field either in a table view or in the Address Card view and edit the contact without actually opening the item. This can make editing a large number of contacts significantly easier. Click OK to save your changes. Figure 10.40. Use the Other Settings dialog box to turn on in-cell editing and change fonts.
|
 For more information about creating new views,
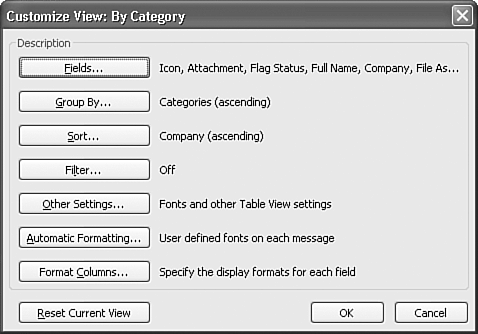

EAN: 2147483647
Pages: 426