Using Your Address Book as a Resource List
| It can be time-consuming to enter all the resources you need for a particular project. If you already have these individuals in your Outlook Contacts folder, there's no need to enter them a second time in your Project file. Outlook enables you to eliminate duplicate data entry by creating a resource list from your Contacts folder. Creating a Resource List in ProjectA resource list is a list of individuals you can use when assigning tasks. To create your resource list from your Outlook Contacts folder, use the following steps:
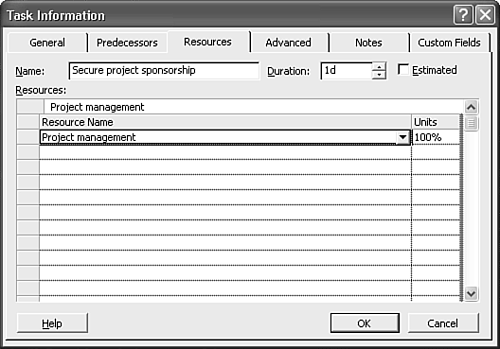
In addition to selecting individual contacts to add to your resource list, you also can add entire distribution lists to your Project resource list. When you add a distribution list to your resources list, Project asks whether you want to expand the distribution list to its individual names. If you choose to expand the list, you cannot assign a task to the entire distribution list without selecting each individual member of the list separately. If you choose not to expand the list, you cannot assign a task to only one or two members of the distribution list unless you add them to your resource list separately. Assigning Resources to Your TasksNow that you've built your resource list, you can begin assigning resources to the various tasks you have in Project. There are two ways to assign a resource to a task: You can assign tasks using the Assign Resources dialog box, or view the Task Information dialog box and assign resources using the Resources tab. To view the Task Information dialog box, either double-click the Task or right-click the task and select Task Information. Click the Resources tab to display Figure 35.7. Figure 35.7. You can assign resources to a task through the Task Information dialog box.
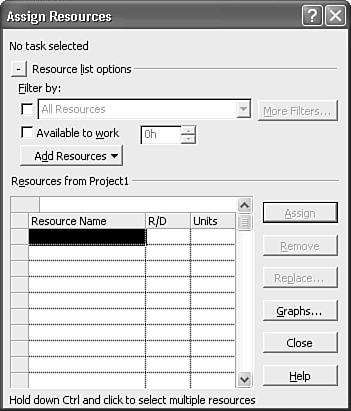
To assign a resource to your task, click the line underneath Resource Name and choose one of your resources from the drop-down list. You can also choose a percentage of time this resource should devote to the task. You can also assign resources to a task by selecting the task and choosing Tools, Assign Resources to display the dialog box shown earlier in Figure 35.5. All available resources are shown in the Resources area. To assign a resource to your task, just click a name and click the Assign button. You can also add resources at any time by clicking the Add Resources button. When you're done assigning resources, click Close. |
EAN: 2147483647
Pages: 426