Introduction to Custom Forms
| A form is basically an Outlook item. The item is customized through the use of various controls such as text boxes, labels, image controls, and combo boxes. All custom forms in Outlook are based on some existing Outlook item type. There are eight basic item types in Outlook:
Each of these items can be customized to meet your needs. The first step in designing a custom form is to pick your base item type. Choose the item type that most closely meets your needs without customization. You can take advantage of the item type's built-in controls, properties, and methods. This can save you time when you're designing your custom form. NOTE You cannot create a custom Outlook form without using one of the previously listed item types. You cannot create a purely custom type. Different forms enable you to do different things. This might sound painfully obvious, but read on. An appointment form is meant to be filled out and posted, or saved, directly in a Calendar folder. It isn't designed to be sent to other people. A meeting request, on the other hand, is designed to be both posted in a Calendar folder and sent to other individuals. A message item is designed to be sent to others, whereas a post item is not. So, choose the type of item that most closely mirrors what you want to do. If you need to send a message type form to another person, do not use a post form as your base item type. Understanding Item Types and Message ClassesEach item type in Outlook has its own message class. A message class is much like a file extension. It contains the form definition and all the fields, controls, properties, and methods attached to the form. Outlook's default message classes include the following:
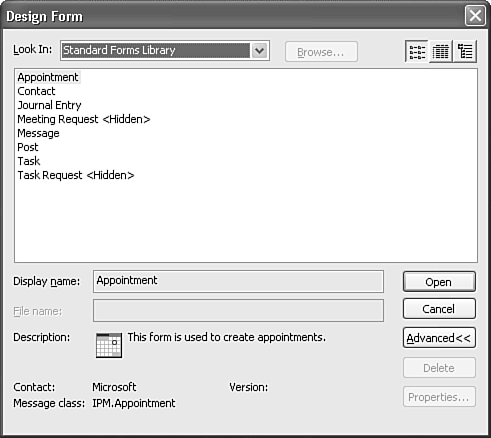
You'll see the message class only when you're publishing the form and if you refer to the item in code. Still, it's good to understand what they mean and how they work. Creating a Custom Form from a Standard FormAs previously mentioned, all custom forms are based on a standard form. There are a number of ways you can customize a form. The customization might be as simple as adding a line of code to check for the entry of a subject or the presence of an attachment, or as complicated as adding multiple pages and hundreds of lines of code. All forms in Outlook are stored in libraries. Some of the available libraries are the standard forms library, the organizational forms library (only with Exchange Server), and the personal forms library. Each library can contain any standard or custom item type. To begin designing a form, select Tools, Forms, Design a Form to display the Design Form dialog (see Figure 32.1). Figure 32.1. Use this dialog box to choose the type of form you want to create.
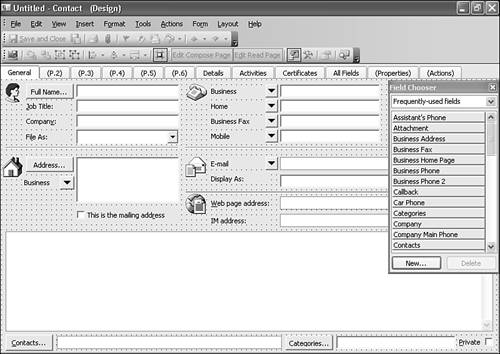
The default forms library displayed is the standard forms library. This library contains all of Outlook's default forms. You can select a different library by using the Look In drop-down list. In addition to the libraries previously described, every Outlook folder can be thought of as a library. If you click the drop-down box, you'll see an entry for every folder in your Outlook mailbox, Personal Folders file, and Public Folder. Each folder has its own folder forms library. After you select the forms library you need, you'll see a list of the available forms in that library. Working in Form Design ModeTo view the message class, icon, description, and version of any of the standard forms, select the form and click the Advanced button to display the lower section of the Design Form window. Select the form you want to modify and click Open. The form opens in design mode, ready for your modifications. Figure 32.2 shows the Contacts form in design mode. Figure 32.2. Design mode of a Contacts form.
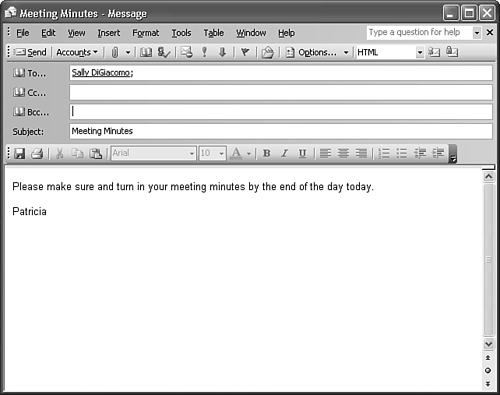
One of the first things you'll notice about a form in design mode is that the form's background is no longer smooth gray, but contains a grid pattern. You cannot click on a button and have it perform its action. You cannot single-click inside a control such as a text box and then type in it. Every form has at least eight pages in design mode. In the Contacts form, those pages are named General, (P.2), (P.3), (P.4), (P.5), (P.6), Details, Activities, Certificates, All Fields, (Properties), and (Actions). Pages with names in parentheses are not currently displayed. The Properties and Actions pages are never displayed. The other pages (usually named P.2 through P.6) are not displayed unless you explicitly request them to be displayed. Click the page name to switch to that page. Clicking through the pages of a contact form shows no controls on pages 2 through 6. The Details, Certificates, Activities, and All Fields pages do not display a grid on the page's background. This is because these pages don't contain any controls that you can modify. This is one limitation of custom forms. Certain pages of certain forms cannot be modified. If a form page does not display a grid on the form background, it cannot be modified. There are two different ways to display a page on a form that's currently hidden. Placing a control on a hidden page automatically makes the page visible. When a page is made visible, the parentheses disappear from the page name. You can also display a form page by selecting Form, Display This Page. To hide a page that is currently displayed, click Form, Display This Page again and the page is hidden. NOTE So now that you've made P.2 visible, what can you do with it? How do you access that page and what can that do for you? After you publish the form, you can access the newly visible page and enter data in the fields and controls on that page. Adding fields and publishing forms is covered later in this chapter. TIP If you want to modify a page of a form that's read-only (such as the first page of a Journal form), hide the first page and create your own new first page. You can duplicate almost all the existing functionality on your own custom page. Compose Page Versus Read PageThere's one very important concept to master when dealing with pages in an Outlook form: the difference between a Compose Page and a Read Page. Consider a message form. When you compose a new message, your email looks much like Figure 32.3. Figure 32.3. The Compose page of an email form.
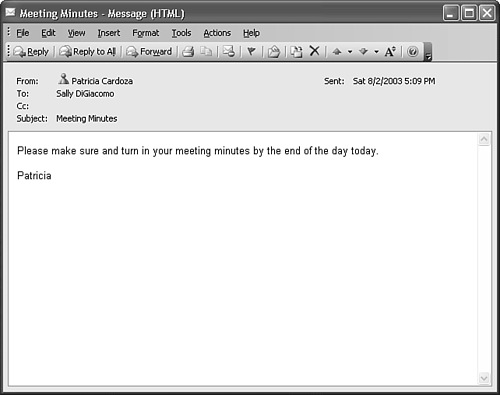
When you receive a message, however, the form looks quite different, as shown in Figure 32.4. Figure 32.4. The Read page of the same message does not allow you to modify some fields.
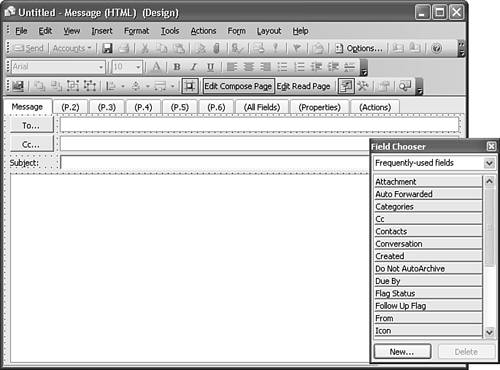
When you compose the message, you can modify the address fields, subject field, and message body. When you receive the message, you cannot modify the address fields or the message body. The message is actually composed of two different pages: a Compose page and a Read page. Each page of an Outlook form has two versions you can modify: the Compose page and the Read page. To switch between the Compose and Read pages, click either Edit Compose Page or Edit Read Page as shown in Figure 32.5. Figure 32.5. A custom message form contains both Compose and Read pages.
NOTE Think of the difference between Compose and Read pages as two sides of a coin. No matter which side you look at, you're looking at the same coin, but each side contains different information. The Compose and Read pages of a form can actually display some of the same information, but they can also display completely different information. It's very important to always be aware which page you're working on. If you're currently working on the Compose page, the Edit Compose Page button will appear in orange. If you're working on the Read page, the Edit Read Page button will be orange. When you open a form in design mode and that form has separate Compose and Read pages, the Compose page is selected. NOTE Some forms, such as the Contact form, do not have separate compose and read pages. If the form you're working on doesn't have separate compose and read pages, both buttons will be orange and disabled. If you want your form to look the same whether you're composing or reading the form, consider disabling the two modes of a page. It's best to make the decision to merge the pages before you spend much time customizing the form. If you merge the Compose and Read pages, you'll lose any changes you made to the Read page. To merge the two pages, select Form, Separate Read Layout. This unchecks the Separate Read Layout option. Outlook informs you that all changes on the read layout pages will be lost. |
EAN: 2147483647
Pages: 426