Offline Access Versus Remote Access
| Using Outlook in offline mode and using remote access are actually two different scenarios. Think of them as two sides of the same coin. When you work offline with Outlook, you don't have any sort of connection to your Exchange Server. You might not have any network connection at all, or you might be connected to a network that isn't your own. You have no interaction with the messages actually stored on your Exchange Server and instead are working with only messages stored on your local computer. You can perform just about any operation on any message stored in your Offline Folders file. You can read messages that have been downloaded to your Offline Folders file, reply to those messages, compose new messages, delete messages, and work with all the rest of your Outlook data including contacts, tasks, journal, notes, and calendar items. When you connect to the server at a later time, you move into online mode. All the changes you made when you were working offline are synchronized to the server. Messages you deleted from your Offline Folders file are removed from the server, messages waiting in your Outbox are sent, and messages that you received while you were offline are downloaded to your computer. Remote access to Exchange requires you to actually be connected to the server. That connection could be over a dial-up connection in a hotel room, a VPN connection over another network, or an HTTP connection from your local coffee shop or airport. When you're connected to Exchange and using the remote mail features, you can preview message headers without actually downloading messages. Much like using cached mode in slow mode, you can download all of your headers and work with only them. You can mark items for download, delete items, and reply to items all without downloading the full text of the message and its attachments. Remote mail can be very useful if you receive a large number of messages when you're away from the office. It can also be helpful if Aunt Irma keeps sending you very large emails with multiple pictures of her cats when you're out of the office and connected over a cellular modem. You can process the headers and decide which messages you want to download, which messages you want to delete, and which messages you want to leave on the server for retrieval when you return to the office and are on a high-speed connection again. NOTE Some of the information contained in the sections that follow pertain to administrators only. If you're unsure of how to follow any of these procedures and you are not a network or systems administrator, be sure to contact the appropriate person within your organization before proceeding. Configure a Remote Connection to ExchangeYou can choose from the following methods to establish a remote connection to your Exchange Server:
RRASConfiguring an RRAS connection to a Windows 2000 or Windows 2003 network is fairly straightforward. To enable and configure RRAS, use the following steps:
NOTE Setting up a RADIUS server is beyond the scope of this book. For more information about setting up a RADIUS server, see a book on Windows 2000 Server or Windows 2003 Server, such as Special Edition Using Windows 2000 Server published by Que. After you've configured the RRAS server, you can manage it through the Routing and Remote Access MMC. You can view connected clients and available ports, configure remote access policies, and view the remote access log files. For more information about configuring RRAS on Windows 2000, see the previous note. VPNConfiguring a VPN connection through Microsoft Virtual Private Networking services is very similar to configuring RRAS on a Windows 2000 Server. In fact, you can use many of the same steps that were used to configure RRAS. If you haven't configured RRAS yet, you can use steps 1 through 4 in the previous section to begin the VPN configuration. Choose Virtual Private Network (VPN) Server from the Common Configurations screen shown in Figure 30.1 and click Next. Confirm that the available protocols have been installed and click Next. You need to choose the Internet connection this server uses. To serve as a VPN server, you must have two available connections available. If you have only one connection available, Windows informs you that you cannot continue. If you have more than one Internet connection available, choose one of the connections and click Next. Continue with steps 7 through 9 in the previous section to complete the setup of your VPN server. RPC over HTTP
First, you can use RPC over HTTP only if your network includes the following setup:
NOTE You can download and install the Windows XP SP1 patch at http://support.microsoft.com/default.aspx?scid=kb;en-us;331320. There are security enhancements with Windows 2003, Exchange Server 2003, and Windows XP SP1 (plus a patch) that make RPC over HTTP possible. Without this configuration, there's no way to ensure adequate security for this protocol. If your network is currently set up this way, you can enable RPC over HTTP on your Exchange Server 2003 with only a few steps. When you deploy RPC over HTTP, you have a couple of options to choose from for the configuration of your Exchange Server and RPC proxy server. You can configure your Exchange Server as an RPC proxy server, or you can use Internet Security and Acceleration (ISA) Server to serve as your RPC proxy server. No matter which choice you make, the RPC proxy server then specifies which ports to use to communicate with the domain controllers, global catalog servers, and all Exchange servers that the RPC client needs to communicate with. NOTE Microsoft's official recommendation for deploying RPC over HTTP is to use ISA Server as your RPC proxy server. This provides even more security than simply using your Exchange server as your RPC proxy server. For more information about configuring an RPC proxy server, see the Exchange 2003 Web site at http://www.microsoft.com/Exchange. To configure your Exchange 2003 Server as an RPC proxy server, use the following steps:
Now you'll need to configure the virtual directory in IIS (Internet Information Services). Use the following steps to configure the virtual directory:
You're now ready to configure ports for the RPC clients (Outlook 2003) to use to access Exchange Server. To configure ports, open the Registry Editor and navigate to the following key: HKEY_LOCAL_MACHINE\Software\Microsoft\Rpc\RpcProxy Right-click the Valid Ports Registry key and choose Modify. In the Edit String window enter the following data: ExchangeServer:593;ExchangeServer:1024-65535; DomainController:593;DomainController:1024-65535 You must replace ExchangeServer with the NetBIOS name of your Exchange 2003 Server and DomainController with the NetBIOS name of your domain controller. Your Edit String dialog box should now look similar to Figure 30.4. Figure 30.4. Use these values to configure valid ports for RPC over HTTP access.
Save your changes and you should be ready to configure Outlook 2003 to access Exchange Server 2003 using RPC over HTTP. In addition to the setup you must perform on the server, you must take several steps on the client in order to use RPC over HTTP. First, you must make sure that you're running Windows XP SP1. After that, you need to install hotfix Q331320, which can be found through the Windows Update site. RPC over HTTP won't run without this hotfix. After you've made sure that your computer meets these requirements, you're ready to configure Outlook 2003. It's best if you first configure an Exchange account on the network and connect to your mailbox at least once. Although it isn't officially required to configure RPC over HTTP, I've found that there are significantly fewer errors this way. Select Tools, Email Accounts, View or Change Existing Email Accounts to display the Email Accounts screen. Choose your Exchange account and click Change to edit its properties. Click More Settings to display the Microsoft Exchange Server dialog box. Click the Connection tab to display Figure 30.5. Figure 30.5. Use the Connection tab to tell Outlook to connect over HTTP.
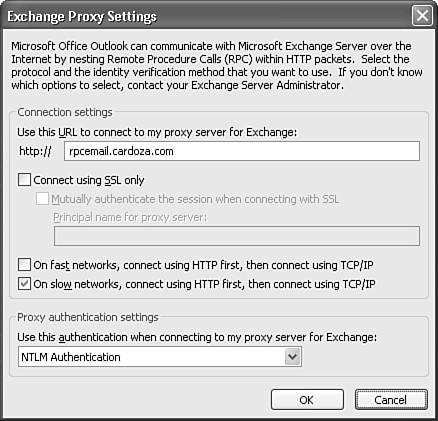
Click the check box marked Connect to My Exchange Mailbox Using HTTP. Click the Exchange Proxy Settings button to display Figure 30.6. Figure 30.6. Use the Exchange Proxy Settings dialog box to configure your server name.
Enter the server name or IP address you use to communicate with your Exchange RPC proxy server from the outside world. If you want to always connect using SSL, check the box marked Connect Using SSL Only and choose whether you would like to Mutually Authenticate the Session When Connecting with SSL. If required, enter the principal name for the proxy server. If you want to connect over the LAN after you authenticate over HTTP, check the box marked Connect Using HTTP First, then Connect Using My Local Area Network (LAN). You need to also choose an authentication method. You can use NTLM authentication or basic authentication. If you use basic authentication, you must use SSL to communicate. Click OK to save your changes and then click OK, Next, and Finish to return to Outlook. You need to restart Outlook to finish the configuration. The next time you start Outlook, you should be able to authenticate and connect using RPC over HTTP. |

EAN: 2147483647
Pages: 426