Special Edition Using Microsoft Office Outlook 2003
Authors: Cardoza P. Staples M.
Published year: 2003
Pages: 267-269/426
Buy this book on amazon.com >>

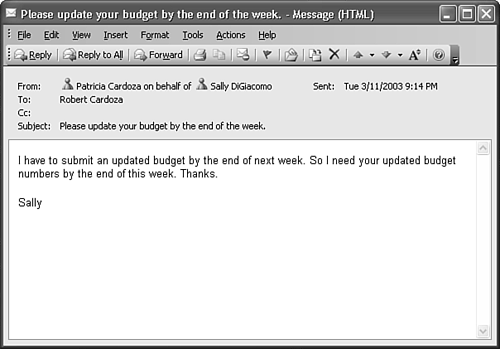
Sending Messages on Behalf of Another User

When you have delegate access to another user's mailbox, you can send messages on behalf of that user. You can also set up these permissions directly on the Exchange Server without configuring Delegate Access. To send a message on behalf of another user, use the following steps:

  1. Open a new email message.

  2. Add the From field to your email message. If you use Word as your email editor, select the small drop-down list next to the word Options on the toolbar and choose From. If you're using the native Outlook editor, select V iew, From to add the From field to your email message.

  3. In the From box, enter the name of the person on behalf of whom you're sending the message.

  4. Compose and send the email. When the intended recipient receives your email, it will look similar to Figure 28.7.

    Figure 28.7. Recipients will see the message was sent on behalf of another user.

    graphics/28fig07.gif

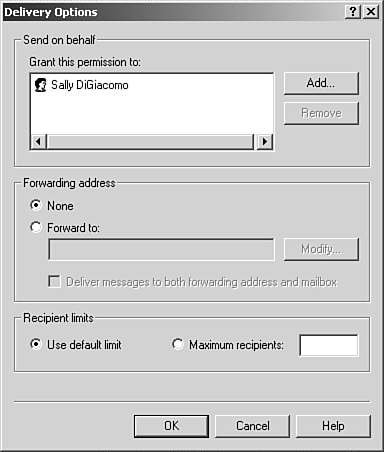
You can also configure Send on Behalf of permissions directly on the Exchange Server. Within Active Directory Users and Computers, select your user object. Open the property pages and click the Exchange General page. Click the Delivery Options button to display Figure 28.8. In the Send on Behalf section, click the Add button. Select the user to whom you want to grant this permission and click Add, and then click OK. Click OK once more to save your delivery options changes.

Figure 28.8. Use the Delivery Options property page to specify Send on Behalf of permissions.

graphics/28fig08.gif

The individual you selected can now use the previously described procedures to send a message on behalf of you.

Send As Permissions

In addition to Send on Behalf of permissions, you can also configure Send As permissions. Send As permissions enable you to send a message and have it appear as if it came directly from another user . Configuring Send As permissions must be done through Active Directory Users and Computers. To configure Send As permissions, use the following steps:

  1. Open Active Directory Users and Computers.

  2. Open the Users container and select the your user object.

  3. Open the property pages and select the Security tab.

  4. Click A d d to select the user to whom you want to grant permissions.

  5. Click A dd to add the user to the permissions and click OK.

  6. Select the newly added user in the top section of the Security tab.

  7. Scroll down in the P ermissions box until you see Send As listed. Check the box for Allow. Your Security tab should now look similar to Figure 28.9.

    Figure 28.9. Use the Security tab to configure Send As permissions.

    graphics/28fig09.jpg

  8. Click OK to save changes.

When Send As permissions are configured on the Exchange Server, the user you selected in step 5 can open a new email message, click the From field, and enter your name in the From field. When the recipient receives the message, it appears to have come from you.

Other Methods of Sharing

There are two other methods of sharing information with Exchange Server. The first method involves using public folders and is discussed in the next chapter. You can also share information using Exchange Server through simple folder permissions. You can give any other Exchange user permission for any of your Outlook folders.

To give another Exchange user permissions for your Tasks folder, use the following steps:

  1. Right-click on your Tasks folder in either the folder list or in the My Tasks section of the Tasks Navigation Pane, and select Propert i es.

  2. Click the Permissions tab to display Figure 28.10.

    Figure 28.10. Use the Permissions tab to allow other users access to your Tasks folder.

    graphics/28fig10.gif

  3. To give another user permission to your Tasks folder, click A d d to display the Add Users dialog box.

  4. Select the user you want to allow access to your Tasks folder and click the A dd button. When you've finished selecting names , click OK to return to the Permissions tab of the options dialog box.

  5. For each user you add to the Permissions dialog box, you must specify an access level. You can choose from the following permission levels using the Pe r mission Level drop-down list:

    • Owner - The user has all permissions on the folder and the items within the folder. The user can edit all items in the folder, including items the user didn't create. The user can also delete all items within the folder.

    • Publishing Editor - The user has full permissions to create, edit, and delete items in the folder, and can create subfolders , but does not own the folder.

    • Editor - Users can create, edit, and delete items within the folder, but cannot create subfolders.

    • Publishing Author - Users can create new items, and edit and delete their own items. They cannot edit or delete items created by others; however, they can create subfolders.

    • Author - An author can do everything a Publishing Author can do except create subfolders.

    • Nonediting Author - Users can create new items and delete their own items. They cannot edit their own items, delete other's items, or create subfolders.

    • Reviewer - Users can view items, but cannot edit or delete any items.

    • Contributor - Users can create items, but they cannot view or modify any existing items.

    • None - The folder is visible to users, but they cannot view, modify, or delete existing items. They cannot create new items.

  6. If none of the predefined permission levels meet your needs, you can edit the permission levels directly using the check boxes and option buttons below the Permission Level drop-down list. For example, if you want users to be able to create items, read items, create subfolders, and delete their own items, but not edit any items, you can select Publishing Author for the permission level and then change the Edit Items permission to None. The permission level will change to Custom.

  7. After you've edited permissions for each added user, click OK or A pply to save your changes.

NOTE

The Permissions tab always has a Default user listed with no permissions to the folder. You can leave that Default user or remove it. If you do leave the Default user, make sure that its permissions are set to None unless you want any user to be able to access your folder. If you do want all users to be able to access your folder, set the Default permission to something other than None.


Special Edition Using Microsoft Office Outlook 2003
Authors: Cardoza P. Staples M.
Published year: 2003
Pages: 267-269/426
Buy this book on amazon.com >>

Similar books on Amazon