Composing Your Email Message
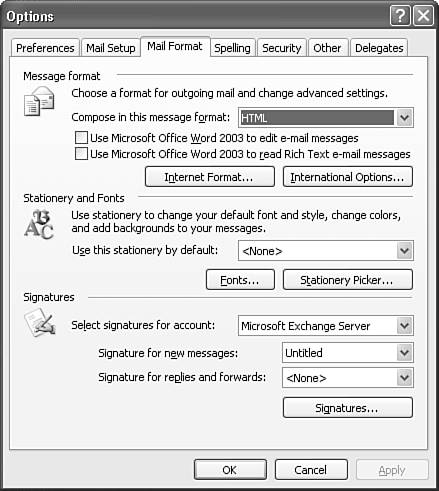
| Now that you've addressed your message, you can use the formatting capabilities of the mail format you've chosen to compose a meaningful email message. In addition to typing and formatting text using tables, bullets, numbering, colors, font sizes, and styles, depending on your mail format, you can control a variety of other message options including signatures, attached files, images, voting options, and delivery options. SignaturesMany people sign every email in the same way. My email messages are always signed with my full name, Patricia Cardoza. On a rare occasion, I sign only my first name, but around 90% of my emails are signed with my full name. If the majority of your email messages require the same signature, or you have a long email signature that includes your name, title, company address, phone number, and email address, consider creating one or more email signatures to use with your email messages. An email signature is nothing more than a block of text containing whatever information you want to appear at the end of your email. Outlook can automatically insert that information depending on which options you select. You can create multiple signatures for different purposes and rotate them depending on the type of email you need to send. Your company might require your signature to conform to a specific format. For instance, many companies require a signature to include a hyperlink to the company's Web site. Ask your system administrator whether there are any requirements for your business signature. Creating a SignatureTo create a new signature, select Options from the Tools menu and then click the Mail Format tab (see Figure 18.7). Figure 18.7. Use the Mail Format tab to configure a new signature.
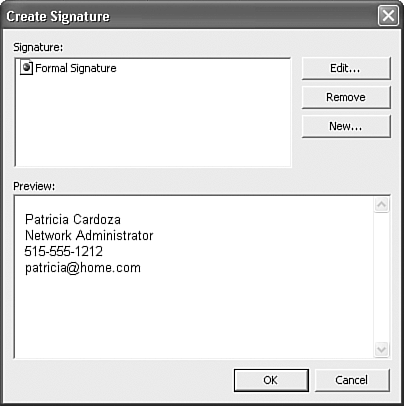
If you haven't defined a signature, both drop-down lists will display <None>. If you have defined a signature, you can use the two drop-down lists to select a signature to use for new messages, and a separate signature to be used for replies or forwards. To create a new signature, click the Signatures button to display the Create Signature dialog box (see Figure 18.8). Figure 18.8. The Create Signature dialog box enables you to create multiple signatures.
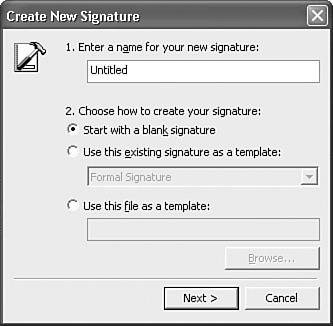
Click the New button to display the Create New Signature Wizard shown in Figure 18.9 and create your signature. Enter a name for your signature. The signature name should be specific enough so that you can identify it. Names such as Signature 1 and Signature 2 aren't very descriptive, and you could apply the wrong signature to your email messages. Name your signatures with meaningful names, such as Holiday Signature, Work, or Personal. After you've named your signature, you can compose it. You can use an existing signature as a starting template or create a new signature from scratch. You can also use a file as a template. A typical example of using a file as a template is using a Word document that contains the signature you use for letters or other correspondence. Figure 18.9. Enter a name for your new signature.
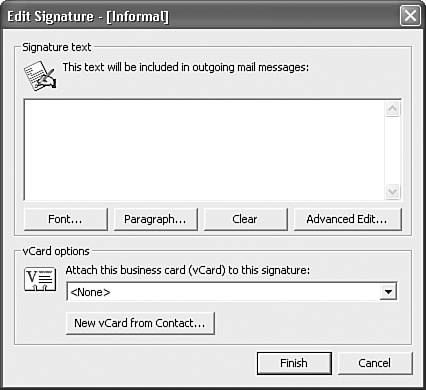
TIP You can use a Word document as a template if you need to implement a corporate signature. Simply create the signature template in the Word document, save the document as an HTML file, and send the file to all users. Each user can use the HTML file to serve as the basis for a signature. Click Next to display Figure 18.10 and create your new signature. Figure 18.10. The Edit Signature dialog box enables you to control font and formatting settings.
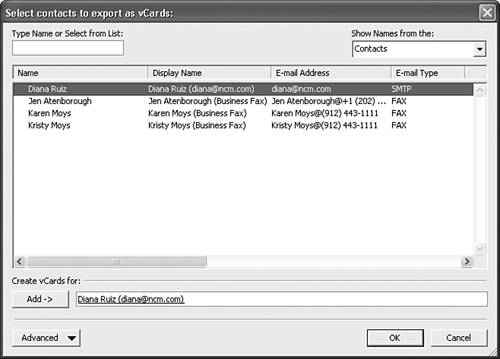
NOTE If your default mail format is plain text, you can't set font or formatting options within your signature. Formatting your signature is possible only when your mail format is HTML or rich text. Type the text of your signature in the box provided. You can highlight certain portions of your text and click the Font button to change the size, color, and font of the highlighted portion of text. You can use the Paragraph button to control the alignment of text and add bullets. You can include text or hyperlinks in your signature block. If you want to include pictures in your signature, click the Advanced Edit button. A message will be displayed informing you that you're about to launch an editor that isn't part of Microsoft Outlook. Click OK and an instance of Word (for rich text or HTML messages) or Notepad (for plain text messages) will open. You can then use all of Word's formatting features to create your signature. Click Insert, Picture to add a picture to your signature. When you're done editing your signature in Word, close Word to return to the Create Signature dialog box. Another feature you can add to your signatures is a vCard. A vCard is a business card that others can read and import into their Contacts folder. It can be helpful to include a vCard when emailing business contacts. If you have an existing vCard, you can use the drop-down box provided in the Edit Signature dialog box to select an existing vCard. If you haven't created a vCard, click the button marked New vCard from Contact to display Figure 18.11. Figure 18.11. Select your contact record to create a vCard.
You can create a vCard from your own contact record or from your company's contact record. Once you select the contact record, click OK to return to the Edit Signature dialog box. Click OK when you have completed editing your signature. Click OK to return to the Mail Format tab of the Options dialog box. From here, you can specify a signature to be used on new messages and a signature to be used on replies and forwards. If you're replying to a message, you might assume that the person you're replying to already has your full business information. You can choose to include an abbreviated signature on replies and forwards or choose to have no signature appear on these messages. After you've selected the appropriate signatures, click OK to save your changes and exit the Options dialog box. Per Account Signature Configuration
Deleting SignaturesYou can delete an existing signature from your available signature list by clicking the Signatures button on the Mail Format tab of the Options dialog box to display the figure shown in Figure 18.8. Select the signature you want to delete and click the Remove button. Outlook will ask you if you're sure that you want to delete this signature. If you delete a signature, all accounts that were previously configured to use this signature default to no signature. Inserting or Deleting a Signature ManuallyYou can delete an instance of an existing signature from an email message when you're composing the message. This is often helpful if you want to dash off a quick note, or are sending a message to a mobile phone or pager and want to minimize the number of lines transmitted. To delete a signature from an email message, highlight the signature and delete it as you would any other text. This affects neither future email messages nor the signature configuration in the Options dialog box. If you don't instruct Outlook to insert a signature automatically, you can manually insert an existing signature in any email message you create as long as you're using Outlook's native editor. If you aren't using Word as your email editor, simply position your cursor where you want the signature to appear and select Insert, Signature to display a list of all available signatures. Click the desired signature to insert. If you're using Word as your email editor, you cannot automatically insert a signature. You can, however, click the drop-down list next to the Options button on the toolbar from within an email message and configure Outlook's signature options. You can create a new signature and specify the signature to be used on new messages and on replies and forwards. Any changes you make here will persist in Outlook's Options dialog box. Unfortunately, your existing message won't be affected. |
EAN: 2147483647
Pages: 426