Addressing Messages
| Addressing messages is a fairly straightforward topic. You select a recipient from your contacts list, your global address list (GAL), or another directory service. Each of the common methods to address an email will be covered briefly here. Using ContactsThe easiest way to address a message is to use your Contacts folder. Every Outlook installation has a Contacts folder. If your Outlook installation went smoothly, your Contacts folder should already be set up as an email address book. To see whether your Contacts folder is an email address book, right-click on the Contacts folder in the Contacts area of the Navigation Pane and select Properties. Click the Outlook Address Book tab and make sure that Show This Folder as an E-mail Address Book is checked. If it isn't checked, you must modify your Outlook installation to add the Outlook Address Book service.
If your Contacts folder is enabled as an Outlook Address Book, you can click the To button on a new message form to display the Select Names dialog box shown in Figure 18.4. Figure 18.4. Select the recipient of your email message from the Contacts folder.
NOTE You might not see the Contacts folder when you first display the Select Names dialog box. It depends on the search order for your various address books. If you don't see your Contacts folder in the Select Names dialog box, use the Show Names drop-down list to select the address book you need. TIP You can click either the To, Cc, or Bcc fields to show the Select Names dialog box. No matter which button you click on your message form, you can add names to any of the three address fields on the message form. You can add recipients to three different address fields from this form. To send the message directly to a recipient, add a name to the To field by selecting a name and clicking the To button, or by double-clicking a name. To carbon copy someone, select a name and click the Cc button. Finally, to blind carbon copy someone, select a name and click the Bcc button. NOTE Carbon copying a message to someone indicates that you want her to know the content of the message, but you don't necessarily need her to take action on the message. Blind carbon copying someone on a message is used to hide the person's address from the other people who receive your message. Sometimes you might need more information about the person before you are sure that you want to send her an email. If you have three contacts entered for Jane Smith, you might want to make sure that you're sending this email to the right Jane Smith. To view the contact record for the selected name, click the Advanced button (or right click on the Contact) and select Properties. This opens the contact's details in a new window. When you've verified that she is the right contact, you can close the contact window and return to addressing your message.
A much-requested feature in every version of Outlook has been the ability not to include fax numbers in the Select Names dialog box. Unfortunately, Microsoft still includes fax numbers as valid electronic addresses. However, now you can at least resize your columns and your Select Names dialog box so that you can see at a glance which rows are fax numbers and which rows are email addresses. In addition to scrolling through the Select Names dialog box, you can also type a person's name in the box provided and your Contacts list will automatically highlight the closest match to the name you typed. You can type the first or last name of the person you're interested in. This can be particularly helpful if you have a large Contacts list. You can select names from any Contacts folder that's enabled as an email address book. Use the drop-down marked Show Names from The to select other Contacts folders within your mailbox or public folders. When you've finished adding recipients to the To, Cc, and Bcc fields, click OK to return to your message. Your message should look something like Figure 18.5. Figure 18.5. A message with To, Cc, and Bcc recipients.
Using LDAPLDAP (Lightweight Directory Access Protocol) is used to query a directory of email addresses. It is commonly used to query directories of addresses on the Internet. You can use LDAP within Outlook to access an alternative address book. For instance, if you aren't using an Exchange Server and want to use a common address book that you share with other members of your organization, you can set up an LDAP server on a machine that's accessible to everyone on your network. LDAP servers can also be configured to be accessible from outside your organization over the Internet.
To use LDAP to address your email message, click the To button to display the Select Names dialog box shown in Figure 18.4. Use the drop-down marked Show Names from The to select your LDAP server. Depending on how your LDAP server is configured, you'll either see a list of users and addresses or a blank screen. If you see a blank screen, you must type in the start of a person's name to search the LDAP directory. You can then choose a contact from the search results. Using the Exchange Global Address ListIf you use an Exchange Server, your Global Address List is probably your default address list. Clicking the To, Cc, or Bcc field displays the Select Names dialog box with the Global Address List already selected in the Show names from the drop-down (see Figure 18.6). The Global Address List view of the Select Names dialog box lists different fields than the Contacts folder. Figure 18.6. Select a name from the Global Address List.
The following fields are displayed in the Select Names dialog box:
You can resize the columns in the Select Names dialog box and resize the dialog box to display all the fields you need. Using Addresses from Excel or AccessYou can import addresses from Excel or Access to address your email addresses. You cannot use addresses stored in Excel or Access directly, but you can import them into a Contacts folder and use that Contacts folder as an email address book.
|
 For more information about adding the Outlook Address Book service,
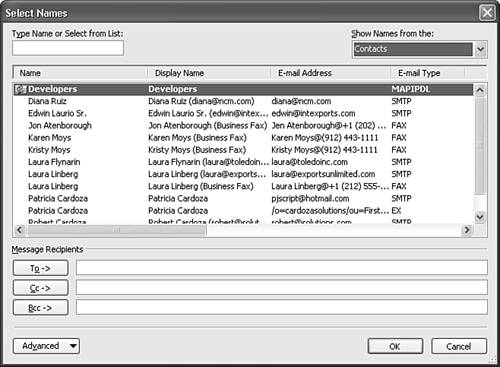
EAN: 2147483647
Pages: 426