Using the TaskPad
To display the TaskPad in your Calendar folder, select View, TaskPad. This moves the Date Navigator to the right side of the screen, displays four months on the Date Navigator, and shows the TaskPad below the Date Navigator. You can increase the size of the TaskPad and reduce the number of months displayed on the Date Navigator by placing your mouse pointer directly between the TaskPad heading and the Date Navigator. Your cursor will change to double bars with arrows. You can then drag the TaskPad to increase its size. A Calendar view with the TaskPad and two months of the Date Navigator is shown in Figure 14.19. Figure 14.19. The TaskPad can be shown at the lower right of the Day/Week/Month Calendar views. By default, the TaskPad displays today's tasks and those tasks with no due date.
The TaskPad displays the task icon, the Completed box, and the task subject. You can choose from six predefined TaskPad views or further customize the view to meet your needs (covered in the next section). The TaskPad offers a quick way to create tasks that contain limited information. To create a new task, click in the New Item row and type the subject of your task. When finished, press Enter to save the task and return your cursor to the New Item row to enter another task, or click anywhere else in the blank area of the TaskPad to save your task and exit the New Item row. By default, all tasks created using the TaskPad have no start date, no due date, normal priority, and no reminder. If you need to customize any of those fields, double-click the task in the TaskPad to open and edit the task. To mark a task complete in the TaskPad, just click the check box next to the subject of the task. In the default TaskPad view, the task is marked complete and disappears from the TaskPad. Customizing TaskPad ViewYou can customize the TaskPad view in several ways. To choose from the six predefined TaskPad views, select View, TaskPad View to show a list of the following views:
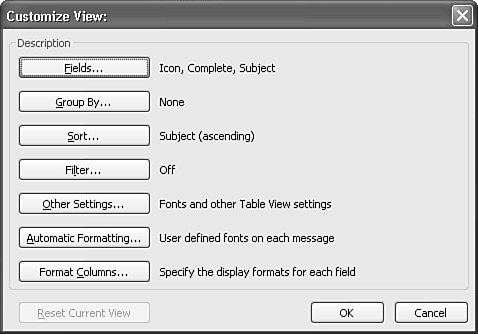
For any of these views, you can choose to display tasks with no due date. If these views don't show you the information you need, you can further customize the TaskPad by right-clicking on the TaskPad header to display the TaskPad context menu. You can select Customize Current View to display the dialog box shown in Figure 14.20. Figure 14.20. The Customize View box enables you to specify fields, sorting, grouping, filtering, and formatting.
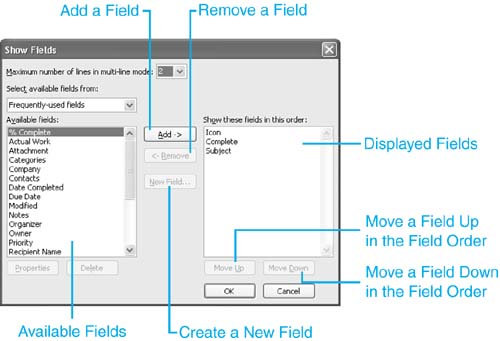
To display fields in addition to Icon, Subject, and Complete, click the Fields button to display the Show Fields dialog box shown in Figure 14.21. After you've added your fields, click OK twice to exit and apply your changes. Figure 14.21. Use the Show Fields dialog box to add or remove fields from your view.
In addition to specifying the fields to display in the TaskPad, you can also use the Customize View dialog box to filter your TaskPad information and display only the information you need. A typical Tasks filter could show all tasks from your direct supervisor or all tasks due within the next seven days. To filter your TaskPad, use the context menu and select the Customize Current View option. Click the Filter button to display the Filter dialog. To filter the TaskPad to display only tasks that are in progress, use the following steps:
The last tab of the Filter dialog box is the SQL tab. This tab displays the full SQL that defines your TaskPad view. SQL is short for Structured Query Language. Typically associated with databases, SQL can be used to display only specific tasks in a view through code. If you want to edit this SQL directly, check the box on the SQL tab. This is recommended only for very advanced users because it can often lead to unpredictable results. Do not use this tab unless you're familiar with advanced MAPI properties.
The Automatic Formatting option of the Customize View dialog box enables you to select fonts and colors for tasks based on predefined criteria. For example, you might want to mark tasks in a particular category in blue to make them stand out. To accomplish this, do the following:
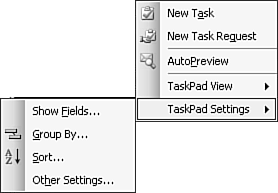
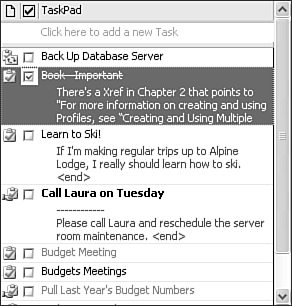
These steps can be used to set up any type of automatic formatting rules for any of your Outlook folders. For a quick way to customize some of the TaskPad settings, right-click in a blank area of the TaskPad and select TaskPad Settings. From this context menu, shown in Figure 14.22, you can choose to display the Field Chooser, edit grouping or sorting options, or display the Other Settings dialog box. These view options are the same for the TaskPad as for any other Outlook folder. However, because the TaskPad isn't a full folder view but merely a reduced functionality view of tasks, many settings in this dialog box do not function as expected. In particular, multiline layout does not produce the same results as in the Tasks folder. If your screen is set to a high resolution, setting AutoPreview for the TaskPad (as seen in Figure 14.23) can give more visibility to the details of a task in the TaskPad. Figure 14.22. You can customize your TaskPad settings and generate a new task or task request from the context menu.
Figure 14.23. Turning on AutoPreview for the TaskPad can show you some task details without having to open the task.
Clicking on the TaskPad heading row above the New Item row sorts your tasks alphabetically by subject as well as groups your items by subject. If you have multiple tasks with the same subject, grouping can consolidate your view for ease of reading.
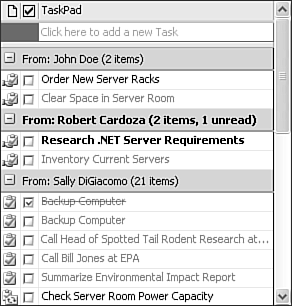
Figure 14.24. Use arrangements to further customize the TaskPad.
|
 For more information about Calendar views,
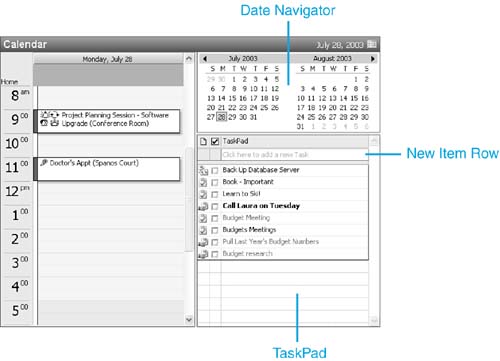
EAN: 2147483647
Pages: 426