Using the Outlining Toolbar


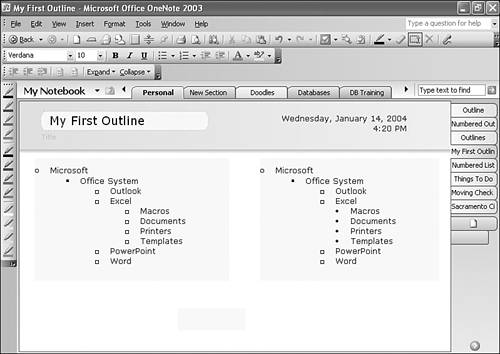
You might never need more functionality than the previous sections described. You can create multilevel outlines easily with both bullets and numbering without ever customizing your outlines. However, if you want to customize your outlines and explore some advanced functionality, you can display the Outlining Toolbar to help. You can display the toolbar by selecting Toolbars from the View menu and clicking on Outlining. The Outlining toolbar is shown in Figure 14.6.

Figure 14.6. The Outlining toolbar can help you control your outlines.

graphics/14fig06.gif

There are several buttons on the Outlining toolbar.

  • Decrease Indent If you're on any level other than the first level of the outline, clicking this button moves the current line one position to the left (so a second level becomes a first level, a third level becomes a second level, and so on). The current line and all lines immediately under the current line are moved.

  • Increase Indent Clicking this button moves the current line one position to the right. This causes a second level to become a third level or a fourth level to become a fifth level. Only the current line is moved.

  • Make Body Text This button allows you to take one or more levels of an outline and make them body text. Body text is the text under a particular section of an outline. For example, in Figure 14.7, the left note container contains a multiple level outline. The right note container contains that same outline after the information directly under the Excel entry was converted to body text.

    Figure 14.7. Body text isn't indented as much as a regular outline level.

    graphics/14fig07.jpg

  • Show Body Text When working with your outline, you can show or hide different outline levels. (This functionality is covered later in this chapter.) If you hide one or more levels of the outline, the Show Body Text button shows the hidden body text for the current level.

  • Hide Body Text Clicking this button hides the body text under the currently selected level.

  • Expand and Collapse You can use these buttons to show or hide different sections of your outline. For example, if you click the Collapse button, a drop-down appears, as shown in Figure 14.8. You can collapse a specific level or collapse the entire outline. If you choose to collapse a specific level, that level is displayed as the top level, and all levels below it will be hidden. If you expand a specific level, all levels above that level are expanded.

    Figure 14.8. You can expand or collapse any level of the outline.

    graphics/14fig08.gif

We'll use these functions more later in this chapter and in Chapter 15, "Creating Outlines from Existing Text."


Absolute Beginner's Guide to Microsoft Office OneNote 2003
Absolute Beginners Guide to Microsoft Office OneNote 2003
ISBN: 0789731487
EAN: 2147483647
Year: 2003
Pages: 182

flylib.com © 2008-2017.
If you may any questions please contact us: flylib@qtcs.net