Using OneNote s AutoCorrect Feature
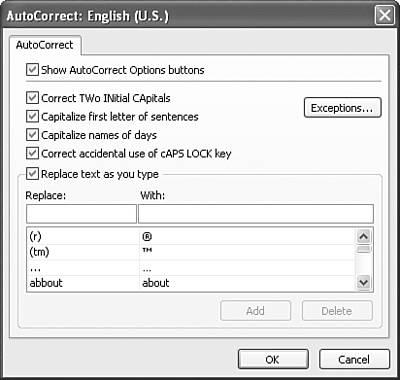
Using OneNote's AutoCorrect FeatureChances are there are spelling mistakes you make all the time. For example, if you're a fast typist, you might often type teh instead of the. If you type teh in Microsoft Word, you'll notice as soon as you hit the space bar, Word changes it to the. This feature is known as AutoCorrect. Word, Excel, Outlook, PowerPoint, and OneNote all have the AutoCorrect feature. This is the same feature that replaces a lowercase i with a capital I when the letter is typed by itself. You can change AutoCorrect's options and add words and phrases to AutoCorrect. Any words or phrases you add to AutoCorrect in OneNote will also appear in Word's AutoCorrect options. To view OneNote's AutoCorrect options, choose AutoCorrect Options from the Tools menu to display Figure 11.5. Figure 11.5. You can add, remove, or examine OneNote's AutoCorrect options through this dialog.
You can change any of the following AutoCorrect options.
You can add, edit, and remove common AutoCorrect options through this dialog. To add an AutoCorrect entry, do the following:
If you want to remove an AutoCorrect entry, use the scroll bar to find the entry you're interested in. Click to select it, then press the Delete key to remove the entry. Using AutoCorrect to Speed TypingYou can use AutoCorrect for more than just fixing misspelled words and inserting symbols. If you repeatedly type a long phrase, such as the name of your company, you can create an abbreviation in AutoCorrect to insert the full phrase automatically. For example, if you work for Pacific Life, Car, and Auto Insurance Incorporated, you probably don't want to type that whole company name every time it's needed. You can add an AutoCorrect entry that replaces the letters plcai with the full name of the company. Anytime you type plcai in OneNote (or any other Office program), AutoCorrect will replace it with Pacific Life, Car, and Auto Insurance Incorporated. |
EAN: 2147483647
Pages: 182