Using Note Flags
| A Note Flag is a tool for following up on a particular note or portion of a note. You can flag a phrase, a line, or an entire note container. You can use the Task pane to view a summary of all of your Note Flags across all OneNote sections and even update the Note Flags from within the Task pane. tip
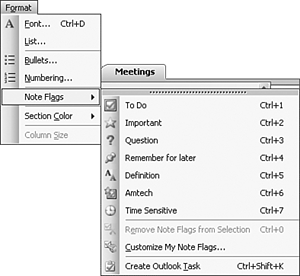
There are nine Note Flags in OneNote. Unfortunately, you cannot add any more Note Flags, but you can customize the existing Note Flags to meet your needs. The first five Note Flags are predefined. They are To Do, Important, Question, Remember for later, and Definition. The remaining four Note Flags are undefined. In order to use one of the undefined Note Flags, you'll need to define it. We'll cover customizing the Note Flags later in this chapter. Flagging a Line of Text in OneNoteTo apply a Note Flag, simply click anywhere in the line of text you want to flag. Select Note Flags from the Format menu to display the pop-out menu shown in Figure 10.8. Figure 10.8. You can choose from a variety of Note Flags.
What happens when you apply a Note Flag depends on the Note Flag. For the five predefined Note Flags, the behavior is summarized in the following list.
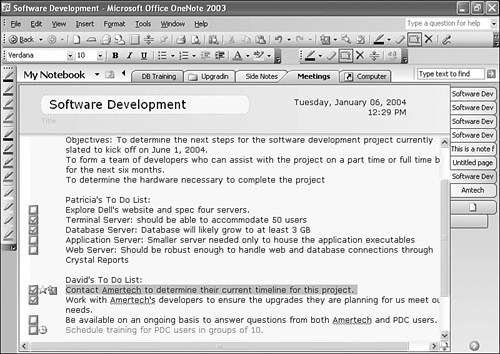
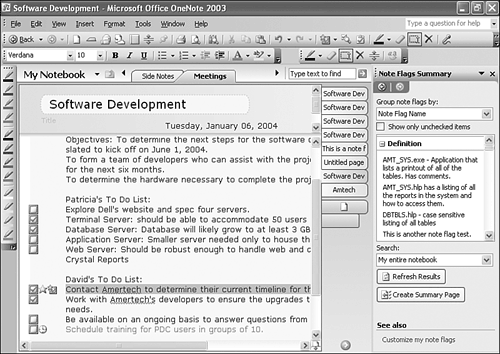
After you've applied Note Flags to your meeting notes, previously shown in Figure 10.2, the notes might look something like Figure 10.9. Figure 10.9. Note Flags can help organize and call attention to your notes.
Removing Note FlagsEven though Note Flags can be quite helpful in organizing your notes, there will always be times you want to remove a Note Flag. You might have accidentally selected the wrong line to flag, or a note you considered important a month ago might not be so important today. To remove a Note Flag, highlight the flagged line and either click the Note Flag toolbar button or select the Note Flag from the menu again. This toggles the Note Flag off. If you want to remove all Note Flags from your page, right-click any flagged line and choose Remove Note Flags from Selection. Your text is retained, but any formatting or icons associated with the Note Flag are removed. tip
Marking Note FlagsThe To Do Note Flag is a special type of Note Flag. It's the only default Note Flag that has an action associated with it. You can use your mouse and put a check mark in the box, as shown in Figure 10.10. Figure 10.10. You can mark the To Do Note Flags as complete.
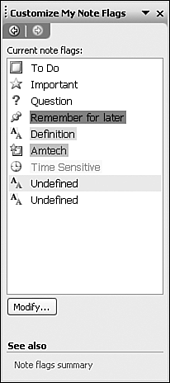
In addition to using the mouse to check the box, you can also right-click the flagged text and choose Mark Note Flags in Selection. Customizing Note FlagsYou can customize any of the nine Note Flags in OneNote. Select Format, Note Flags, Customize My Note Flags to display the Customize My Note Flags task pane as shown in Figure 10.11. Figure 10.11. You can customize any of the nine Note Flags.
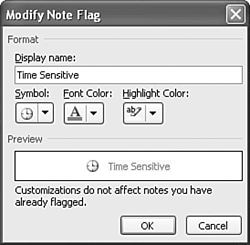
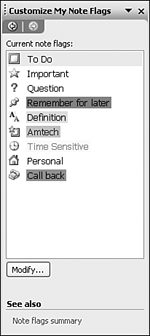
By default, the last four Note Flags are listed as Undefined. You can customize these Note Flags to meet your particular needs. In Figure 10.11, I have customized two Note Flags, naming them Amtech and Time Sensitive. For example, if you need to keep track of notes for three different projects, you can configure a Note Flag for each project. If you're a manager, you could configure a Note Flag for each of your employees. You could then use the Note Flags to mark tasks for each of your employees using their customized Note Flag. To customize a Note Flag, click the Note Flag and then click Modify to display Figure 10.12. Figure 10.12. Use this dialog to customize your Note Flags.
You can customize several different aspects of a Note Flag. First, you need to enter a Display name. This name will appear in the Note Flag Summary task pane, as well as on the Note Flag menu previously seen in Figure 10.8. Next, you can choose a symbol to appear to the left of any flagged line. You can choose from 23 symbols in the Symbol drop-down menu. Use the Font Color drop-down menu to customize the font for your flagged text. Any text you flag will automatically change to the color specified. You can also choose a Highlight Color. All flagged text will be highlighted in this color. As you change settings for your Note Flag, you can see a preview in the Modify Note Flag dialog box. So if you're not happy with your selections, simply start over.
When you've finished customizing your Note Flag, click OK to save your changes. Your Task pane might now look similar to Figure 10.13. Figure 10.13. Once you've customized your Note Flags, you'll see a preview of how they'll appear in the Task pane.
View a Summary of Existing Note FlagsNote Flags make it easy to look at a page of notes and pick out various types of notes. However, they can also help you find information across multiple pages, sections, and folders. Through the use of the Note Flag Summary task pane, you can view a list of all existing note flags. You can even print this summary. To view the summary list, do the following:
caution
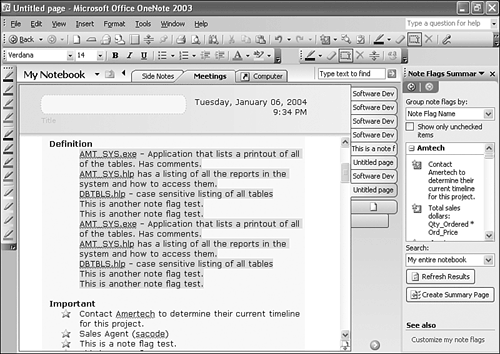
The Note Flags Summary task pane displays all Note Flags in the current section by default. Each Note Flag is displayed in its entirety. There are a variety of options you can choose within the Note Flags Summary task pane to give you the information you need. By default, all flagged text is displayed grouped by Note Flag Name. You can change this grouping to Section, Title, Date, or Note Text. Regardless of the grouping you choose, the groups behave similarly. You can click the minus sign next to the group heading to collapse the entire group. To expand a collapsed group, click the plus sign next to the group name. If you hover your mouse over a flagged note, you'll see a date appear in the ScreenTip. This is the date the note was flagged, not the date the note was written. To jump directly to a particular Note Flag, click the Note Flag. OneNote will navigate directly to the section, page, and note container that contains the flagged note. Changing the Note Flags Summary Search ScopeBy default, the Note Flags Summary task pane searches the current section for Note Flags. You can change that search scope to a wide variety of options. To find all flagged notes in all open sections, choose My Notebook from the Search drop-down. You can choose to search only selected pages, or only the current page group. You can even change your search and limit it to notes created today, yesterday, this week, or last week. As you change the search scope, the results should refresh themselves automatically. If for any reason they don't, you can click the Refresh Results button. Using The Note Flags Summary Task Pane to Create a Summary PageThe Note Flags Summary task pane can display your flagged items in a list; however, if you want to view your flagged items on a larger view, click the Create Summary Page button. This creates a new OneNote page within the current section, as shown in Figure 10.15. This page won't have a title and will display all of your Note Flags grouped by flag type. Figure 10.15. You can create a summary page of all your flagged text.
The advantage to the summary page is that you can see all of your Note Flags on a full-sized page, rather than in the narrow Task pane. There are a couple of disadvantages to keep in mind. First, as you can see in Figure 10.15, several of the flagged items appear twice. That's because I created two summary pages, one for all flagged notes in the current section, and one for all flagged notes in My Notebook. When you create a summary page, it searches all pages in your search criteria, even if those pages are themselves summary pages. The other disadvantage to creating a summary page is that you cannot tell where your flagged notes originated. Unlike the Note Flags Summary task pane that contains a hyperlink to the flagged text, the summary page contains a copy of the flagged text. There is no way to tell where in your original notes the flagged text is located. tip
You can print this summary page for your records, or email this page to others. When you're done with the Note Flag Summary page, you can delete it by right-clicking on the page tab and choosing Delete.
|

EAN: 2147483647
Pages: 182
- Structures, Processes and Relational Mechanisms for IT Governance
- An Emerging Strategy for E-Business IT Governance
- A View on Knowledge Management: Utilizing a Balanced Scorecard Methodology for Analyzing Knowledge Metrics
- Measuring ROI in E-Commerce Applications: Analysis to Action
- Governance in IT Outsourcing Partnerships