Customizing Toolbars


There are a number of customizations you can make to the toolbars in OneNote. We'll cover a few of them in this section. If you have a very high screen resolution, the toolbar buttons might appear quite small. If you want your toolbar buttons to appear larger, you can change your buttons from small icons to large icons using the following steps.

  1. Position your mouse on a blank area of the toolbar or menu.

  2. Right-click and choose Customize from the context menu.

  3. Click the Options tab of the Customize dialog box.

  4. Check the box next to Large icons and click Close.

Your toolbars should now look similar to Figure 19.10.

Figure 19.10. Large icons can make it easier to view your toolbars.
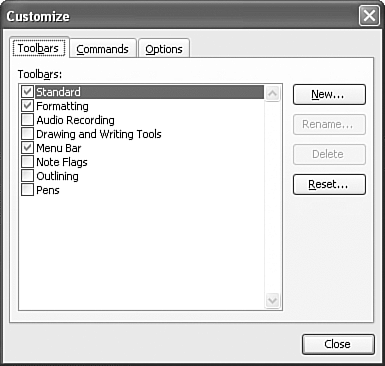
graphics/19fig10.jpg

Creating Your Own Toolbars in OneNote

In addition to customizing the size of your toolbar buttons, you can create your own toolbars or rearrange the buttons on existing toolbars. After you've used OneNote for a while, you might find that you typically use a dozen toolbar buttons on a regular basis. You can create a custom toolbar with only those commands and hide all other toolbars.

caution

graphics/cautionguy_icon.gif

Choosing Large icons within OneNote also causes all of the toolbars in other Office applications (such as Word and Excel) to display large icons. You cannot choose Large icons in one Office program and Small icons in another Office program.


To create a custom toolbar with several key commands, use the following steps.

  1. Position your mouse over a blank area of an existing toolbar or menu.

  2. Right-click and choose Customize from the context menu.

  3. Click the Toolbars tab (see Figure 19.11).

    Figure 19.11. Use this dialog to create a new toolbar or to choose which toolbars to display.

    graphics/19fig11.gif

  4. Click the New button to create a new toolbar.

  5. Type a name for your new toolbar and click OK. Your new toolbar is displayed next to the Customize dialog as shown in Figure 19.12.

    Figure 19.12. Your new toolbar won't have any buttons when you create it.

    graphics/19fig12.jpg

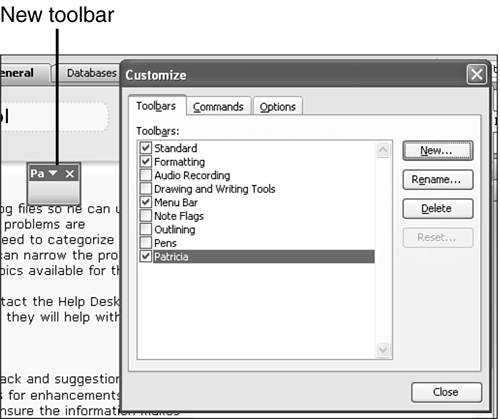
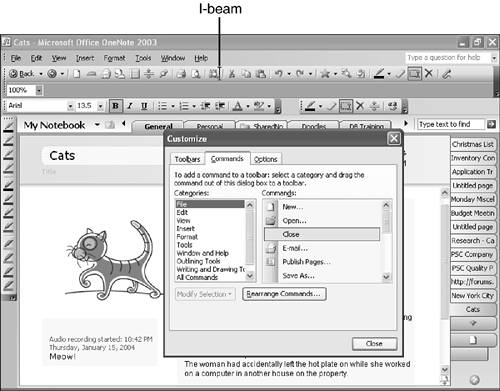
Now that you've created a new toolbar, you can move it around on the screen and add buttons to it.

Adding Toolbar Buttons

The steps for adding toolbar buttons are the same whether you're working with an existing toolbar or a new, empty toolbar. The following steps add some buttons to your newly created toolbar, however you can add buttons to any existing toolbar using the same steps.

  1. Position your mouse over a blank area of an existing toolbar or menu.

  2. Right-click and choose Customize from the context menu.

  3. Click the Commands tab (see Figure 19.13).

    Figure 19.13. You can add a variety of commands to your custom toolbar.

    graphics/19fig13.gif

  4. To choose a command to add to your custom toolbar, select the category from the left list box. When you select a category, a list of commands appears in the Commands list box.

  5. Scroll down the Commands list box until you find the command you want to add to your toolbar.

  6. Click and drag the command onto your new toolbar (or to an existing toolbar). As the command moves to an available position on the new toolbar, a black vertical bar (I-beam) will appear on the toolbar, as shown in Figure 19.14. This bar lets you know where the toolbar button will appear on the toolbar. Release the mouse button to place the command on the toolbar.

    Figure 19.14. You can choose where to put your new toolbar button.

    graphics/19fig14.jpg

graphics/noteguy_icon.gif

Many of the category choices correspond to existing menus. For example, to access the Paste command on the Edit menu in OneNote, choose Edit from the Categories list box and Paste will appear in the Commands list box.


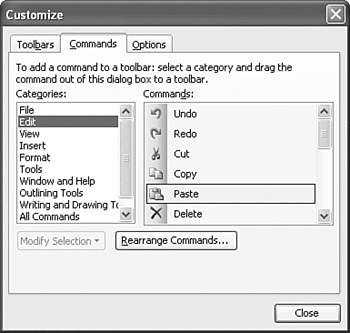
You can use the previous steps to add any number of buttons to your new toolbar. Once you have more than one button on your toolbar, you might want to change the order of buttons on your new toolbar or any existing toolbar as described in the next section.

Moving Toolbar Buttons

To move a toolbar button on a toolbar, display the Customize dialog box by right-clicking on a blank area of the toolbar and choosing Customize from the context menu. Once the Customize dialog is displayed, you can position your mouse button over any existing toolbar button on any toolbar you currently have displayed on your screen. Click and drag the button anywhere on any existing toolbar. A vertical bar appears as you move the toolbar button indicating the current position of the button. Release the mouse button when the vertical bar appears where you want the toolbar button to stay.

Removing Toolbar Buttons

To remove a toolbar button from a toolbar, display the Customize dialog box by right-clicking on a blank area of the toolbar and choosing Customize from the context menu. Position your mouse pointer over the toolbar button you wish to remove. Click and drag the toolbar button away from the toolbar. When you see a black X just below the mouse pointer, you can release the mouse and the toolbar button will be removed from the toolbar.

The Absolute Minimum

In this chapter you learned how to customize OneNote to make it easier for you to find the commands you need. You now know how to

  • Change your toolbars to display full menus instead of the most recently displayed commands

  • Hide and display the seven toolbars available in OneNote

  • Change your toolbar buttons from small to large

  • Create your own custom toolbars

  • Add and remove buttons from toolbars

Next you'll learn about the integration between OneNote and the rest of the Microsoft Office family.


Absolute Beginner's Guide to Microsoft Office OneNote 2003
Absolute Beginners Guide to Microsoft Office OneNote 2003
ISBN: 0789731487
EAN: 2147483647
Year: 2003
Pages: 182

flylib.com © 2008-2017.
If you may any questions please contact us: flylib@qtcs.net