Creating a Web Project
Visual InterDev Web projects are considered applications because they consist of various components, such as pages that can update a database, pages that pull information from a database, multimedia pages, and ActiveX components. As you can see, Visual InterDev applications can be complex. They can also include links to pages across the Internet.
Oftentimes you must manage both the creation of a Web site and its long-term maintenance. Using a source code management system makes it easier to create and maintain a Web site, and it improves the development process. It both reduces the number of interaction problems when developers write over other developers' pages and facilitates the reuse of various project elements.
The first step in creating a Web project is to start Visual InterDev. Then take the following steps:
- Choose New Project from the File menu, or click the New Project icon on the toolbar. The New Project dialog box appears, as shown in Figure 2-9.
- Double-click the New Web Project icon.
- Enter the name for your new site in the Name text box.
- Click either Close Current Solution to start a new solution or Add To Current Solution to add this new project to the current solution.
- Enter the name of the server that will host the site.
- Select either Master or Local mode.
- Click Next.
- If you want to create a new Web site with the same name as your project, click Next or Finish. Clicking Finish will bypass the final dialogs and create the site. If you want to change the site's name, do so before clicking Next or Finish.
If you clicked Next in step 8, you will be presented with two more wizard steps. These final two steps allow you to supply a layout or theme to the project. Layouts and themes supply the look for an application. If you choose them at this step, Visual InterDev will copy the appropriate files into your application but will not assign the layouts or themes to files—you must do that later.
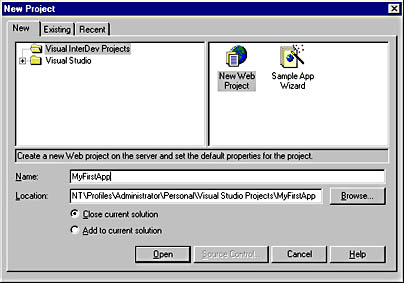
Figure 2-9. The New Project dialog box provides a list of icons and wizards you can use to create a new project.
Each option in the New Project dialog box creates a different type of project and takes you step by step through the project creation process. You can quickly create a site and then begin adding content, such as Web pages or database connections or a combination of these and other items. The content is what matters most, and Visual InterDev is designed to let you spend most of your time on that.
When prompted, you must supply the name of the server that will host the site. After you step through the wizard, Visual InterDev communicates with the Web server and creates the new site on the server under the Web server's root directory. It creates a directory with the name you specify for the site and creates an Images directory under it. A new virtual root with the same name, which points to the new Web directory, is also created on the server. If you want to change the name of the site's parent directory, make your changes and then click Next or Finish. Visual InterDev also sets the permissions on the site so that pages can be read and scripts can be executed.
The New Project Wizard automatically creates a file named global.asa, which is the site's default startup file. If you want users to be able to search your site, select the Enable Full Text Searching For Pages In This Web check box. When this option is selected, the wizard creates a file named search.htm, which provides a full-text search page for your site. The New Project Wizard will also copy the scripting library into the _ScriptLibrary directory.
You can also connect your project to an existing site by selecting the Connect To An Existing Web Application On Name option button during the creation process instead of selecting Create A New Web. This will connect your project to the existing site and build a mirror of the site's structure in your local working directory.
Creating a new Web project can take a lot of time when either the server that is hosting the site or the network connection between the site running Visual InterDev and the server is busy. Visual InterDev will keep you updated. The information appears in the status line at the bottom of the Developer Studio interface and in several informational messages displayed as small forms.
EAN: 2147483647
Pages: 143