Creating a Page to Process Data Sent by a Form
|
| < Day Day Up > |
|
The previous example creates a page to display subscribers before you have created the mechanism to get subscriber data into the database. That's because the previous section introduced you to some concepts you need to know before moving on. You set things right in this section by creating a ColdFusion template that accepts subscriber data from a form, inputs it into a database, sends the subscriber data to a Habitat Alert administrator, and returns a confirmation to the user.
Recall that in Chapter XX you created a basic form page in Dreamweaver MX, saved as the filename XXXXXXXXX. If you take a closer look at the form's source, you'll see that the variable names you used to collect data correspond exactly to the field names used in the subscribers table. This isn't absolutely necessary, but it's good programming practice and it saves lots of time, particularly on larger projects.
When a user fills out and submits this form, it sends the data to an action page, in this case, the ColdFusion template you're about to create.
Inserting a new record into a database table
The ColdFusion tag used to insert database records is <cfinsert>. Follow these steps:
-
Start by creating a new ColdFusion template (File ® New and then choose Dynamic Page and ColdFusion).
-
Using Page Properties, title your page "Subscription Succeeded" and save it as subscribe_action.cfm, the same name you used in the action attribute of your form.
-
To use Dreamweaver's code generator, select Insert ® ColdFusion Basic Objects ® CFINSERT. Your dialog box like the one in Figure 48-6 opens.
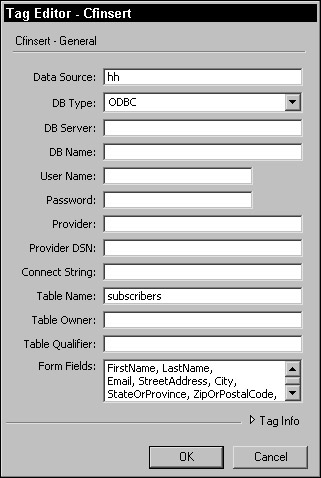
Figure 48-6: Using Dreamweaver MX to Generate a <cfinsert> Block
The <cfinsert> tag offers lots of attributes, but you only need a few of them for a basic form insert. Note in Figure 48-6 I've supplied only the following:
-
A datasource name.
-
The name of the table in which the user information will be inserted.
-
A comma-delimited list of the variables that will be passed by the form. These should correspond exactly to the fieldnames in the database. (If they don't, see the sidebar "Using SQL To Insert and Update Database Information")
When you press OK, Dreamweaver adds the following code to your new template:
<cfinsert datasource="ha" dbtype="ODBC" tablename="subscribers" formfields="FirstName,LastName,Email,StreetAddress,City,StateOrProvince ,ZipOrPostalCode,Country">
| Caution | When you use Dreamweaver's code generator to place a <cfinsert>, it will automatically add the code dbtype="odbc" if you use the default settings in the dialog box. The dbtype attribute is a holdover from previous versions of ColdFusion and isn't used in ColdFusion MX, so you should manually delete that attribute from your <cfinsert> line. |
Note that the <cfinsert> tag is one of many in ColdFusion that doesn't require a closing tag.
| Note | The <cfinsert> tag is used only when you want to insert a new record into a database. If you need to change the data for an existing record, use <cfupdate>, which accepts the same parameters as <cfinsert> with the exception that at least one of the fieldnames supplied must be your table's primary key, a unique identifying field that lets ColdFusion know exactly which record to update. In the subscribers table, the primary key is SubscriberID. |
Before you test your action page, add the other elements.
Sending mail from a ColdFusion template
The second requirement of your action page is that it send an e-mail to a Habitat Alert administrator, advising that someone has subscribed to the newsletter and passing along the subscriber's contact information. ColdFusion makes this a simple task. The tag you use to accomplish the task is <cfmail>
Before you can use <cfmail> in a template, you need to know some things about how mail will be sent from your Web site:
-
The name of a mail server that will accept mail sent from your Web server
-
A valid "from" address on that server
-
The "to" address of the person who should receive the mail
To insert a <cfmail> block into your page, follow these steps:
-
Choose Insert®ColdFusion Advanced Objects®CMAIL. This tag has many possible attributes, but you need to only supply a few.
| Note | In hosted Web environments, system administrators often choose to define the name of the system mail server in ColdFusion Administrator, which means you don't need to supply it as an attribute of the <cfmail> tag. However, it's also common for such mail servers to be picky about the address that appears in the "from" line of your mail, so check with your host's support staff to see whether they have any special requirements. |
The General tab
Under General, you'll need a To address, which is the person who should receive the notification. In this case, it's a Habitat Alert employee using the address subscriptions@ habitatalert.com. The From address must be one belonging to a valid sender on your mail server. It would be nice if you could make the mail appear that it came from the user who's subscribing, but most mail servers won't allow this due to the potential for spam.
Finally, enter a subject line. In this case, "A User Has Subscribed to the Newsletter." See Figure 48-7 for a completed General tab.
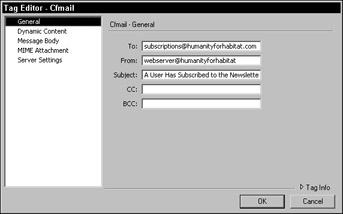
Figure 48-7: The General tab in <cfmail>
The Message Body tab
The body of the message contains the actual text to be sent. You can use ColdFusion variables within the body; just remember to denote them with hash marks. In this case, the user data (FirstName, LastName, and so on) will be sent from the form that calls your action page, so you can use this data in the body of the e-mail. See Figure 48-8 for an example of how the body might be formatted.
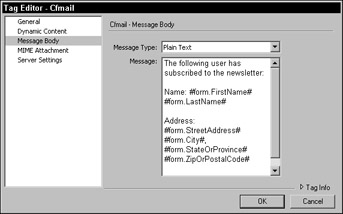
Figure 48-8: The Message Body tab in <cfmail>
The Server Settings tab
The only other tab you need to worry about for this basic mail example is Server Settings, and even that may be optional if you or your system administrator has already supplied the name of a mail server in ColdFusion Administrator.
| Tip | When you're testing ColdFusion templates in a local setting, you can usually use your ISP's mail server to test mail functions (see the "outgoing" or "smtp server" settings in your e-mail program). In this case you can also use your own e-mail address in your mail's from line. |
When you click OK, Dreamweaver inserts the <cfmail> tag into your document.
Dreamweaver MX When Dreamweaver inserts the body of your mail between the opening and closing <cfmail> tags, it omits any carriage returns you may have entered in the Message Body box. You can manually edit the tag in Code view to add returns as required. Except for variables, all text within the tags is treated literally, so a tab in the code equals a tab in the mail sent to the user.
Generating a confirmation message for subscribers
Your template now contains two actions: it inserts the subscriber data into the database, and sends a notification to a Habitat Alert employee. The only other element you need is a confirmation message to show users that their subscription has been successful.
You can add this by inserting some code between your template's <body> tags:
<body> <p>You have been subscribed to the Habitat Alert Newsletter.</p> <p>Your user information has been saved in our database, and your contact information has been forwarded to our newsletter editor.</p> <p>Here's the user data you supplied:</p> <cfoutput> #form.FirstName# #form.LastName#<br> #form.StreetAddress#<br> #form.City#, #form.StateOrProvince# #form.ZipOrPostalCode#<br> #form.Country#<br> #form.Email# </cfoutput> </body>
The confirmation is HTML-formatted text, along with a short <cfoutput> section to display the data entered by the user. In this case, <cfoutput> is used without a query attribute, because you need to display only the values of the form variables, rather than those being returned by a query. Remember that your variables always need to be within a <cfoutput> tagset, otherwise they'll display as literal text. Try removing them from the preceding snippet to see what happens.
The entire code for the ![]() subscription_action.cfm template is shown in Listing 48-2. Remember that the end user doesn't see the <cfmail> or <cfinsert> blocks. Those items execute behind the scenes, and only the confirmation message is displayed.
subscription_action.cfm template is shown in Listing 48-2. Remember that the end user doesn't see the <cfmail> or <cfinsert> blocks. Those items execute behind the scenes, and only the confirmation message is displayed.
Listing 48-2: subscription_action.cfm
Habitat Alert site <cfinsert datasource="ha" tablename="subscribers" f formfields="FirstName,LastName,Email,StreetAddress,City,StateOrProvince, ZipOrPostalCode,Country"> <cfmail to="subscriptions@habitatalert.com" from="website@habitatalert.com" subject="A User Has Subscribed to the Newsletter"> The following user has subscribed to the newsletter: Name: #form.FirstName# #form.LastName# Address: #form.StreetAddress# #form.City#, #form.StateOrProvince# #form.ZipOrPostalCode# E-Mail: #form.Email# </cfmail> <html> <head> <title>Subscription Successful</title> <meta http-equiv="Content-Type" content="text/html; charset=iso- 8859-1"> </head> <body> <p>You have been subscribed to the Habitat Alert Newsletter.</p> <p>Your user information has been saved in our database, and your contact information has been forwarded to our newsletter editor.</p> <p>Here's the user data you supplied:</p> <cfoutput> #form.FirstName# #form.LastName#<br> #form.StreetAddress#<br> #form.City#, #form.StateOrProvince# #form.ZipOrPostalCode#<br> #form.Country#<br> #form.Email# </cfoutput> </body> |
| < Day Day Up > |
|
EAN: 2147483647
Pages: 491