Creating a Page to Display Newsletter Subscribers
|
| < Day Day Up > |
|
You begin by building a simple template that displays the names and addresses of users who've subscribed to the Habitat Alert newsletter. This template uses ColdFusion to pull dynamically the subscriber information from a Microsoft Access database and display it to the user as an HTML page. This type of page might be used by the Habitat Alert Site administrator to monitor the list of current subscribers.
Because you don't yet have any subscribers, you need to start with a sample database populated with some usernames, located on the CD-ROM accompanying this book. The Microsoft Access database ![]() ha.mdb contains a table called subscribers, which in turn contains several fields, or columns, all defined as the text datatype, except for SubscriberID, which is a numeric, "long integer" datatype as shown in Figure 48-1.
ha.mdb contains a table called subscribers, which in turn contains several fields, or columns, all defined as the text datatype, except for SubscriberID, which is a numeric, "long integer" datatype as shown in Figure 48-1.
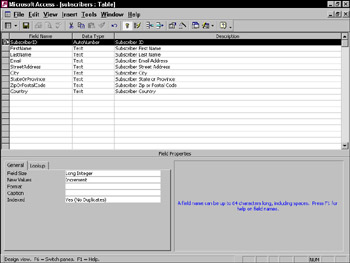
Figure 48-1: The subscriber database table shown in Microsoft Access' design view
When you change Microsoft Access to show the Datasheet view (View ® Datasheet View), you see the sample users currently stored in the table, as shown in Figure 48-2. Each row in the view is called a record and contains the information for a unique subscriber.
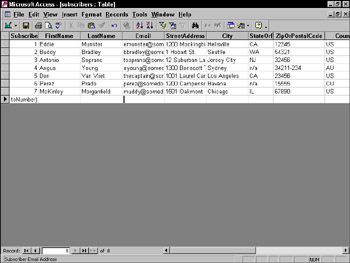
Figure 48-2: The subscriber database table shown in Microsoft Access' Datasheet view
Inside the habitat_alert folder is a database folder. Copy the ![]() ha.mdb database file from the CD-ROM (Chapter 48\database folder) and paste into the database folder of habitat_alert. Next, start Dreamweaver and open your Habitat Alert site.
ha.mdb database file from the CD-ROM (Chapter 48\database folder) and paste into the database folder of habitat_alert. Next, start Dreamweaver and open your Habitat Alert site.
| Tip | It's a good security measure to keep databases that will be used as ColdFusion datasources out of the publicly available folders on your Web site. That's why you placed |
Setting up a testing server and datasource
Before beginning the ColdFusion template, you need to give Dreamweaver a few details about your site:
-
Habitat Alert site With the Habitat Alert site open in Dreamweaver, create a new file. When prompted for a file type, choose the category "Dynamic Page" and the document type "ColdFusion." Using the Page Properties dialog box, title the page Subscribers and save it as show_subscribers.cfm.
Note To preview ColdFusion templates, they must reside within a folder available to your stand-alone Web server or the built-in Web server that comes with ColdFusion (usually c:\cfusionmx\wwwroot).
-
Open the Application panel at the right of the screen. Click the Database tab. The first two items should already be highlighted, assuming you've opened the Habitat Alert site and have specified a new ColdFusion document. Click on the third, Set up the site's testing server.
-
Follow the Setup Wizard, and supply it with your server details. If you installed ColdFusion on your local machine, your home URL is usually http://localhost/. If you're using ColdFusion's built-in Web server rather than a stand-alone server (such as Microsoft IIs), your URL needs to include port 8500, or http://localhost:8500/. If you're unsure about your home URL, use the Test URL button to verify it.
-
When your testing server is set up and verified, return to the Database tab under the Applications panel and choose Specify RDS Login Information. Supply the password you entered for Remote Development Services (RDS) when you installed ColdFusion.
-
Create a ColdFusion datasource by clicking on the "Modify Data Sources" button. Dreamweaver attempts to open your default Web browser and load the ColdFusion datasource setup panel. Remember that if you're using the built-in Web server that comes with ColdFusion, you need to modify the URL to include :8500 after localhost.
-
Log in to the ColdFusion administrator using the password you supplied when you installed ColdFusion. This opens the ColdFusion Administrator's Datasource panel, as shown in Figure 48-3.
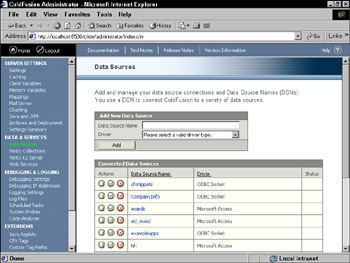
Figure 48-3: ColdFusion MX Administrator's Datasource panel -
In the Datasource Name box enter "ha"; then choose the Microsoft Access driver to signify that you're setting up an Access Database. Click Add to see an expanded dialog box. Click the Browse Server button next to the Database File form box. A selection box opens, allowing you to navigate to the location of your sample database,
 ha.mdb. When the database has been selected, click Apply, and then Submit. You should see your database in the list of datasources, with an "ok" in the right column.
Note If you're working with Windows 98 or ME, the process of setting up a datasource is slightly different. You'll need to first set up a Windows ODBC datasource using the "ODBC Datasources" icon in your Windows control panel. Then return to ColdFusion Administrator's datasource page, supply a datasource name and choose "ODBC Socket" as the driver type. When you submit this information, you'll see a list of all your Windows ODBC datasources, from which you can pick the one you set up in the previous step.
Creating a database query
You set up your database as a ColdFusion datasource and are ready to begin creating a template that draws information from the database in real time and displays it to your users as a Web page. Your template will begin with a query section, which uses Structured Query Language (SQL) to access your datasource and retrieve the names and addresses of newsletter subscribers stored in the database. SQL is a powerful language used by many programs to communicate with databases and select one or more records.
Follow these steps to create a database query:
-
Click the Bindings tab in the Applications panel.
-
Click the plus sign in the upper left and choose Recordset (Query) to add a new recordset.
-
Title your recordset GetSubscribers, select your datasource (ha), and leave all parameters at the default settings. Your completed dialog box should look like the one in Figure 48-4.
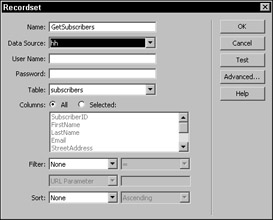
Figure 48-4: Defining a Recordset query in Dreamweaver
A look behind the scenes can give you a better idea of how ColdFusion and Dreamweaver work together. Click OK to add the new recordset; then choose View ® Code and Design to see the code Dreamweaver MX has inserted. At the top of the standard HTML <head> and <body> tags, you should see something like this:
<cfquery name="GetSubscribers" datasource="ha"> SELECT * FROM subscribers </cfquery>
Dreamweaver autogenerated a ColdFusion query tag, <cfquery>. The opening tag includes two tag attributes: name and datasource. In many cases these are the only attributes your queries require. The name is thus far unimportant; you could use any name as long as it's intuitive and you use the same name later in your <cfoutput> code. The datasource is "ha," the name you used when you set up your database as a ColdFusion datasource in the previous section.
The code within the <cfquery> tags is a SQL statement. In this case, you're using a basic query that says "retrieve the contents of all the fields in all the records in the subscribers table." In SQL, an asterisk (*) denotes "everything" or "all fields." You learn more about SQL as you progress through this and later chapters.
Creating dynamic output
After you've added a query to your page, you need to add some code to display the results of the query, or the actual names and addresses that reside in the database. Dreamweaver offers a couple of timesaving, wizard-based solutions for doing so, but start by inserting some code manually to further your understanding of how ColdFusion works.
-
Type the following code snippet between the <body> and </body> tags in the code pane of your template; then choose File ® Preview In Browser to see the results as they'll appear to your users.
<cfoutput query="GetSubscribers"> <p>#FirstName# #LastName#</p> </cfoutput>
-
Save your work as show_subscribers.cfm in the main Habitat Alert Web folder.
You added a <cfoutput> tag to your code. Like <cfquery>, <cfoutput> has many attributes that you can use with it, although you're using only one, "query." In this case, query is defined as "GetSubscribers," the name you gave your query in the previous section.
The code between the <cfoutput> tags consists of a pair of standard HTML tags (<p> and </p>) along with two variables. In ColdFusion, variables are denoted by hash marks (#) on either side of their names. These variable names correspond to field names in your Microsoft Access database.
| Tip | Because ColdFusion variables are denoted by hash marks, any hash mark appearing within a <cfoutput> section on your page is interpreted as the beginning of a variable name. However, if you need to use a hash mark literally — such as when defining a font color — you can escape it by typing two hash marks in succession, <font color = "##ffffff"> |
To get a better idea of how variables work, amend your <cfoutput> section to match the following snippet and then preview the results:
<cfoutput query="GetSubscribers"> <p><a href="mailto:#Email#">#FirstName# #LastName#</a></p> </cfoutput>
You added some more standard HTML tags to your code — mailto link that gets populated with the contents of the Email field in each database record.
| Tip | Standard HTML tags can be used anywhere within <cfoutput> tags to format the results of a query. |
Even though you only have one line of code containing FirstName, LastName, and so on, when you preview the page, you see the names of all subscribers in the database, because when <cfoutput> is used with the query attribute, everything within its tagset repeats until all the query results are exhausted. To get an idea of how this works, open up the Access database ![]() ha.mdb and manually add a few subscriber names by typing them into the Access Datasheet view. Reload the preview page in your Web browser to see how ColdFusion dynamically displays your data.
ha.mdb and manually add a few subscriber names by typing them into the Access Datasheet view. Reload the preview page in your Web browser to see how ColdFusion dynamically displays your data.
Formatting dynamic output
Now that you have a better understanding of the inner workings of <cfquery> and <cfoutput> work together, take a look at one of Dreamweaver's timesaving features for formatting the output of a query:
-
Start by deleting the entire <cfoutput> section you added in the previous section. Your page should retain the <cfquery> section, but should have an empty <body> section.
-
In your page's code view, place your cursor anywhere within the <body> tags and then select Insert ® Application Objects ® Dynamic Table. Select the Get Subscribers recordset; then choose All Records. After clicking OK, preview the page in your browser. You'll see something like Figure 48-5.
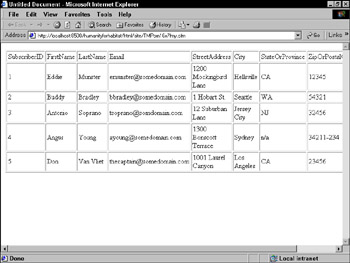
Figure 48-5: The output of Dreamweaver's dynamic table function
As you build ColdFusion templates in Dreamweaver, you'll most likely test them by selecting File ® Preview In Browser, or by pressing F12. This is by far the easiest way to preview your work during development, but what happens if you click a .CFM file from outside Dreamweaver, say from Windows Explorer?
You may have already found that you don't get the response you'd expect. That's because .CFM files can't stand alone as can HTML documents or Flash movies. They require that you view them through your Web browser and a Web server, using the full URL path to the file, usually http://localhost/SomeFolder/SomeFile.cfm.
Error messages
As you work the examples in this section, it's inevitable that you'll encounter some errors as the result of a typo, a misplaced tag, and so on. Fortunately ColdFusion displays a detailed error report in your browser window, showing which tag failed, on which line the error occurred, and where applicable, it provides a suggestion about how to correct the problem.
Debugging
When the standard error messages don't give you enough information to fix a problem, you can turn to ColdFusion's debugging option. Access the Debugging Settings page in ColdFusion Administrator and check Enable Debugging. This causes some additional information to display at the bottom of every ColdFusion page you load. Remember that in a live environment, debugging options should be restricted to your local computer's IP address so that your site's users don't see the extra data.
Now take a closer look at the code the Dynamic Table function inserted into your page, shown in Listing 48-1.
Listing 48-1: A Table Produced by Dreamweaver's Dynamic Table Function
<table border="1" cellpadding="2" cellspacing="2"> <tr> <td>SubscriberID</td> <td>FirstName</td> <td>LastName</td> <td>Email</td> <td>StreetAddress</td> <td>City</td> <td>StateOrProvince</td> <td>ZipOrPostalCode</td> <td>Country</td> </tr> <cfoutput query="GetSubscribers"> <tr> <td>#GetSubscribers.SubscriberID#</td> <td>#GetSubscribers.FirstName#</td> <td>#GetSubscribers.LastName#</td> <td>#GetSubscribers.Email#</td> <td>#GetSubscribers.StreetAddress#</td> <td>#GetSubscribers.City#</td> <td>#GetSubscribers.StateOrProvince#</td> <td>#GetSubscribers.ZipOrPostalCode#</td> <td>#GetSubscribers.Country#</td> </tr> </cfoutput> </table>
Remember that when you use <cfoutput> with its query attribute, everything within the tagset repeats until all records returned by the query have been exhausted. Dreamweaver has placed the table headers outside the <cfoutput> tags, and instead places only the second table row (<tr>) within the tags. This causes the table to gain a row each time a record is processed.
You can manually edit the table and its contents in Dreamweavers Design or Code views. You can move things anywhere, change the table header titles, cell padding, and so on, as long as the variable names remain the same and stay within the <cfoutput> tags.
Note that the query variables Dreamweaver inserted in Listing 48-1 are slightly different than those you manually typed in the previous section. They use a prefix or scope, separated from the variable name by a period. The GetSubscribers. scope identifies that the variables come from the query "GetSubscribers."
For the purposes of this basic sample template, the variable names #LastName# and #GetSubscribers.LastName# are interchangeable as long as they're used within <cfoutput> tags that identify the "GetSubscribers" query. However, as your templates become more complex, providing scopes with your variable names becomes more important. For example, if a variable comes from a form submission, your template might refer to it as #form.FirstName#, which differentiates from other #FirstName# variables, such as those that may have been returned by a query.
Scopes are also important in more complex templates because they can reduce the time it takes ColdFusion to process a page. For example, in a page that has several variables called #FirstName# in play, a scope helps ColdFusion quickly identify which particular instance you mean.
Using SQL to select more-specific recordsets
Now that your template has query and output sections, try experimenting with a few alterations. Remember that the actual SQL statement your template uses to fetch records from the subscribers is currently a basic one that was autogenerated with Dreamweaver's Recordset (Query) function:
SELECT * FROM subscribers
This type of query is used when you simply want to get all the records in a table. If you want to be more selective, you can limit your selection by using SQL's WHERE operator. Alter your query to the following and then preview the template in your browser:
SELECT * FROM subscribers WHERE Country = 'US'
The output section shows only the subscribers who have exactly the letters "US" in their Country field. The phrase after WHERE adds a qualification to your statement. You're still using the asterisk to select of the fields, but you're narrowing your query to only U.S.-based subscribers.
Try another, this time using the value of SubscriberID to limit your query. Continue to preview your work in your browser as you make each of the following query alterations:
SELECT * FROM subscribers WHERE SubscriberID > 3
This query omits subscribers 1-3 by using the greater than operator. When you supply a numeric value, you don't enclose it in single quotes as you do with a text string.
| Caution | Whether SQL considers a field numeric or text is determined by the datatype you gave the field when you created your database. For example, the SubscriberID field in subscribers is set to the numeric datatype Long integer (refer to Figure 48-1), while the ZipOrPostalCode field was set to a text datatype, even though it often contains only numbers. (The reason for this is that many ZIP and postal codes contain dashes, which aren't allowed in fields of the integer datatype.) So if you write a query filtered by zipcode, you still have to enclose the string in single quotes, for example, SELECT * FROM subscribers WHERE ZipOrPostalCode = '12348'. |
Using wildcards to perform partial matches
The preceding queries select records only when something exactly matches the string or number supplied in the WHERE clause. But you can also use SQL to select records based on wildcards. For example, a query like the following selects only subscribers whose last names begins with a "B":
SELECT * FROM subscribers WHERE LastName LIKE 'B%'
LIKE signifies that you want a partial, rather than exact, match. It's used with one or more percent signs (%) to denote characters that don't have to match. In the preceding example, the percent sign follows the B, to signify that you want last names that begin with B, followed by any other characters. You can also use percent signs on either side of a matched letter:
SELECT * FROM subscribers WHERE LastName LIKE '%V%'
This selects only records in which the subscriber's last name contains a V, anywhere in the name. However, note that in real-world applications you would almost never use a LIKE clause with two percent signs, as it would be extremely taxing on your server.
| Caution | Because the subscribers table contains only nine fields, it's okay to use the asterisk to denote that you want to select all of them in your queries. However, when you're working with more complex tables, or in an actual production environment, you should always specify only those you want, separated by commas. For example, if your <cfoutput> section were designed to display only names and e-mail addresses, you could limit your field selection like this: SELECT FirstName, Lastname, Email FROM SUBSCRIBERS. This is good programming practice because it reduces the amount of time and memory required by ColdFusion when your queries execute. It also makes your code self-documenting so that other developers can see what you're up to. |
Using compound SQL statements
SQL also enables you to use the Boolean operators AND an OR to perform more complex record selections. For example, you might want to select only U.S. residents whose last names start with a B:
SELECT * FROM subscribers WHERE Country = 'US' AND LastName LIKE 'B%'
Or just residents of the United States and Australia:
SELECT * FROM subscribers WHERE Country = 'US' OR Country = 'AU'
Sorting the results of an SQL query
So far, all your SQL queries have returned records in the order they were found in the database table. You can customize this behavior by adding an ORDER BY clause and specifying a field on which to sort. For example, to display the U.S.-based subscribers alphabetically by last name, you'd use this query:
SELECT * FROM subscribers WHERE Country = 'US' ORDER BY LastName
You might also want to display the subscribers in reverse order, so that the most recent display at the top of the page. Because the database uses Access' autonumber feature to generate SubscriberID, more recent subscribers have a higher ID.
SELECT * FROM subscribers ORDER BY SubscriberID DESC
DESC specifies that the records should be sorted in descending order, from highest to lowest. It's the opposite of ASC, which is the default sort method.
| Note | When using ORDER BY, numeric fields are sorted numerically, text fields alphabetically, and date fields chronologically. Note that memo fields can't be sorted with ORDER BY. |
You can also sort on more than one field, which is useful if you want to group the subscribers by country and then alphabetize them by last name within each country group:
SELECT * FROM subscribers ORDER BY Country, LastName
|
| < Day Day Up > |
|
EAN: 2147483647
Pages: 491