Snapping Menus
|
| < Day Day Up > |
|
A Snap menu is a thing of beauty. Using the Snap Layer and AutoLayers extensions — freely available from the Project Seven Web site (www.projectseven.com) — you can build menus that appear on demand and hide just as easily. In fact, the functionality of the example you'll see is triggered entirely onMouseOver. The menus use no Timeline and may be relatively positioned. And, you have a lot more control over the positioning of the submenus in each menu you add. Preview chapter44_exercise\snapmenus\ ![]() snaps_done.htm and move your cursor over the rollover buttons. Figure 44-14 shows the Snap menus for the Learn button. Each button has its own submenu.
snaps_done.htm and move your cursor over the rollover buttons. Figure 44-14 shows the Snap menus for the Learn button. Each button has its own submenu.

Figure 44-14: Snappy menus are a "snap" to build!
Understanding the menu
This menu system functions using the onMouseOver event. There are four menu layers (MenuLearn, MenuAct, MenuSupport, and MenuFind) and one layer named MenuCloser. The main menu layers contain an image at the top to create the small down-pointing arrow; each menu uses a different graphic so that the arrow is below the button. Below the graphic, a table is added. The table uses one column and is set to 266px wide. Each menu item has its own row. Below the table another single-celled table (at 266px) is added and a graphic to create the menu bottom is added. All menus use the same bottom graphic. All the menu layers are hidden.
| Tip | Edit your Tag Library (Edit ® Tag Library) and change the settings used for the <table> tag to Line breaks after tag only. The line break before the table tag causes a gap between the menu's top and the table, putting the <img> and <table> tags on the same line fixes the problem. |
There are lots of ways to design your menus. This menu design has all the submenus set at the same width, and they all line up flush to the left edge of the Learn button. You can use a similar method to create menus that line up under different buttons; the design and logic is up to you.
The MenuCloser layer is larger than the largest of the menus. Its width is 300 × 200 and a spacer GIF has been inserted into the layer and its dimensions are also 300 × 200. The MenuCloser will be used to "hide" any open menu. The MenuCloser has a Z-index of 1 and all the menus have a higher Z-index value; this is critical because the MenuCloser must be below any menu. A behavior to hide all menu layers is applied to the spacer. The hide occurs onMouseOver.
The buttons have two behaviors applied to them: Snap Layers positions a menu relative to the Learn button's left and top edge, using offsets to give pixel-perfect placement. The same Snap event also moves the MenuCloser layer to nearly the same position, except the offsets place it just to the left of the button so that a portion of the MenuCloser layer and spacer GIF are exposed to the left, right, and bottom of the snapped menu. Both layers (Menu and MenuCloser) are made visible with the AutoLayers behavior (onMouseOver) applied to the button.
With the button's menu visible and the (invisible) MenuCloser below it, the user can select any item from the menu. But when the user moves to the left, right, or below the menu, the cursor encounters the MenuCloser's spacer with its AutoLayers functions set to hide any open menu (and the MenuCloser itself, as well). The same AutoLayers function is set to spacers that surround the buttons, too, just in case the user escapes the buttons to the left, right, or above.
Building the menu
Habitat Alert site The snapmenus\snaps.htm file contains all the necessary layers. Here's what you do:
-
Open snapmenus\snaps.htm from your
 Chapter44 site folder that you've defined. You must have the Snap Layer and AutoLayers extensions downloaded and installed.
 -
Open the Layers panel to check the layers. All the layers are hidden but if you select a layer, you can temporarily see it in the document without making it visible. All the layers are in different locations. Use the Layers panel to Shift+click all the layers to select them. In the Property inspector (Figure 44-15) set the multiple-layers position to T=0 and L=0, then press the Enter key to update the document.

Figure 44-15: Use the Property inspector to position multiple layers.Select a menu layer in the Layers panel. Note that the layers do not have a height setting; it's often better to avoid setting a height for layers unless you have a good reason to have one. The content of the layer expands the height; setting a height could result in problems if the overflow of content isn't set to be visible.
-
Select the MenuCloser using the Layers panel. When visible, click to select the spacer inside the layer. Click Add (+) to add the behavior StudioVII ® AutoLayers (Figure 44-16). When the dialog box opens, choose Set Two from the Set menu. Don't select anything in the Layers list; it may look like something is selected, but it isn't. Click OK to close the dialog box. Those actions tell the browser that the list of layers is Set Two and to hide all these layers.
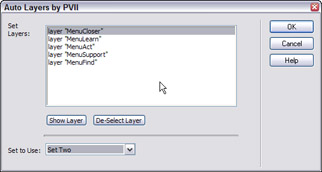
Figure 44-16: By not selecting any layer to show, all layers will be hidden. The Set to Use menu is useful when you have other layers that are not part of the menu.Tip Note the event for the behavior. Chances are that it isn't onMouseOver. Because all functions for this exercise use the onMouseOver event, you can simplify the steps by clicking the event to choose Show Events For ® Version 3.0 and Later Browsers. This doesn't affect the actions but does limit the event to the one you need.
-
Select the Learn button. Click Add (+) to add the behavior StudioVII ® Snap Layers. As shown in Figure 44-17, choose btn_learn from the Anchor Object menu. Choose MenuLearn from the Layer to Snap. Each of the menu buttons are 17px tall. Leave the Left offset at zero, but set the Top offset to 17 so that the menu won't be over the button.
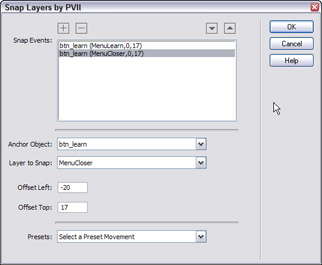
Figure 44-17: The Snap Layers dialog with two Snap actions, one for the button's menu and the other for the MenuCloser -
Add a new snap action by clicking the (+) button at the top, left of the dialog box. Leave the Anchor Object set to btn_learn, but change the Layer to Snap to MenuCloser. Set the Left offset to -20. The menus are 266px wide. The MenuCloser layer is 300px wide. By setting the MenuCloser back about 20px from the left edge of the Learn button, the spacer extends beyond the area of the menu on all sides except the top. Leave the Top offset at 17.
Caution Never offset the MenuCloser so that it covers the button or weird flickering occurs as the button is covered by the MenuCloser.
-
Close the Snap Layers dialog box. Click add (+) to add the behavior AutoLayers (StudioVII ® AutoLayers) and show (Figure 44-18) both the MenuCloser and the MenuLearn layers. Choose Set Two from the Set to Use menu. Click OK. Because you have the Behavior events to use v3.0 events, the event is already set to onMouseOver.
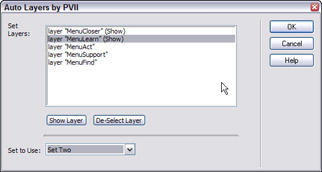
Figure 44-18: Showing the MenuCloser and MenuLearn layers in Set Two -
Repeat Steps 5 and 6 for each button. Because of the design of the menus (aligning with the Learn button) the Anchor object is always btn_learn, although the Layer to Snap changes with each button. And don't forget: Every button snaps the MenuCloser. Use the values in Table 44-2 for each button.
Table 44-2: Snap Layers and AutoLayers Values Button
First Apply Snap Layers
AutoLayers
Event
Learn
Action #1:
Anchor Object=btn_learn
Layer to Snap=MenuLearn
Left=0
Top=17Action #2:
Anchor Object=btn_learn
Layer to Snap=MenuCloser
Left=-20
Top=17Select Set Two
Show MenuCloser
Show MenuLearnonMouseOver
Act
Action #1:
Anchor Object=btn_learn
Layer to Snap=MenuAct
Left=0
Top=17Action #2:
Anchor Object=btn_learn
Layer to Snap=MenuCloser
Left=-20
Top=17Select Set Two
Show MenuCloser
Show MenuActonMouseOver
Support
Action #1:
Anchor Object=btn_learn
Layer to Snap=MenuSupport
Left=0
Top=17Action #2:
Anchor Object=btn_learn
Layer to Snap=MenuCloser
Left=-20
Top=17Select Set Two
Show MenuCloser
Show MenuSupportonMouseOver
Find
Action #1:
Anchor Object=btn_learn
Layer to Snap=MenuFind
Left=0
Top=17Action #2:
Anchor Object=btn_learn
Layer to Snap=MenuCloser
Left=-20
Top=17Select Set Two
Show MenuCloser
Show MenuFindonMouseOver
-
Save and preview your page. Try every menu. Try moving away from a button by moving upward; this leaves the menu displayed and is a problem because there's no MenuCloser to trigger the hiding of the menu layers.
-
To the left of the Learn button, to the right of the Find button, and above all the buttons are spacer GIFs. Apply the AutoLayers behavior (onMouseOver) to each spacer, choosing Set Two and leaving all layers unselected to give these spacers the same functionality as the MenuCloser. Save and preview again to see how this fixes the problem of capturing the user's mouse exits from the buttons.
|
| < Day Day Up > |
|
EAN: 2147483647
Pages: 491