Animating a Sliding Menu Bar
|
| < Day Day Up > |
|
Habitat Alert site Some very cool menus are easy to build when you use the AniMagic by PVII extension, freely available on the Project Seven Web site (www.projectseven.com). You need to install this extension to do the exercise in this section. To build a similar style menu (Figure 44-12) that uses layer animation would involve adding the layer (object) to a Timeline and setting up Keyframes. In the example menu, you'd need to set up two Timelines, one that moves the layer from L=-200 to L=0 and one that moves the same layer object from L=0 to L=-200. While not impossible, it is a rather complex process that involves adding the same layer object to two different Timelines and setting one behavior to occur onMouseOver and the other onClick.
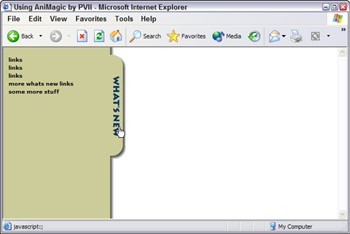
Figure 44-12: A sliding "What's New" menu
| Cross-Reference | Chapter 43 discussed how to download and install extensions. |
With AniMagic by PVII, getting the same results is far easier. You build the layer, add a table and the tab graphic, use a few CSS styles to control the appearance of the layer's and the menu's text links, and add the AniMagic action. We'll be using this menu system for the Habitat Alerts administration pages. Here's how it works:
-
You must have the AniMagic extension installed. Select and preview slidemenu\index_done.htm in the
 chapter44 folder. When you mouse over the What's New tab, a layer animates and moves to the right 200 pixels to display What's New links. Click the What's New tab to close the menu.
 -
Open slidemenu\index.htm. This page contains a layer that is ready to use. It contains a table, the tab graphic, and some applied styles. The menu's background element is created with a Y-repeat of a background image applied to the layer itself. The layer is already in the closed position and the goal is to animate it to open when the users move their cursor over the tab and animate it to close when users click the tab. Using two different events makes this a much easier task.
-
Select the tab graphic and use the Behaviors panel to click Add (+) StudioVII ® AniMagic by PVII.
-
Select the layer to animate (whatsnewLayer) from the Layer Name menu (Figure 44-13). Set the Slide to Target Positions. The layer is currently at L=-200px and T=0px. The negative (-200) value means that the majority of the layer is off-screen to the left. When users move their cursor over the tab, you want the layer to open. Set L=0 (it should already be at zero anyway) and leave T=0. You don't need any vertical movement in this case. All Slide to Target Position settings are measured from the top-left corner of the document.
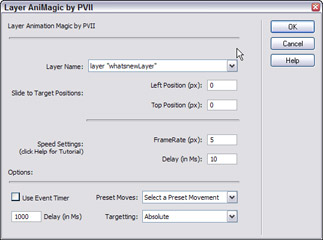
Figure 44-13: Add settings to open the menu in the AniMagic by PVII dialog box.FrameRate and Delay affect the animation of the layer. Lower FrameRates produce slower animations; higher results in faster animations. The FrameRate determines the number of pixels the layer moves per frame. The Delay time affects how many milliseconds elapse between frames. Another way to think about this is you are setting the frames per second for your animation.
-
Set the FrameRate to 5 and the Delay to 10. The remaining settings don't apply for this exercise. Click OK to close the dialog box and set the event to onMouseOver.
-
With the tab still selected, click add (+) to add the same AniMagic behavior again. Select your layer (whatsnewLayer) and this time, set L=-200 and leave Top at zero.
-
Set FrameRate to 5 and the Delay to 10. Click OK. Set the event to onClick.
-
Save your page and preview. Move your mouse over the tab to see the menu and click it to close.
|
| < Day Day Up > |
|
EAN: 2147483647
Pages: 491