Using Set Text of Layer to Create Submenus
|
| < Day Day Up > |
|
Set Text of Layer is a behavior that dynamically writes HTML to an existing layer. The existing layer is visible in the HTML document, but it is empty and therefore appears hidden, because layers are see-through unless a background color or image is set or other visible HTML content is placed within.
| Caution | An empty layer whose <div> code is above other HTML structures may cause the HTML structures (tables, images, text, and so on) to displace in IE5 for Mac OS. To avoid this, place a nonbreaking space < > inside the "empty" layer. |
You can use Set Text of Layer to create submenus for navigation buttons, as shown in Figure 44-10. A single layer is used and the Set Text of Layer behavior writes each submenu's links on demand — onMouseOver. The set text of layer behavior is used to both dynamically write the desired menu items into the layer (onMouseOver the button) and to dynamically write "nothing" (as in no text at all) into the layer (onMouseOut) It is hiding nothing; instead, it is writing back the nonbreaking space, which cannot be seen.
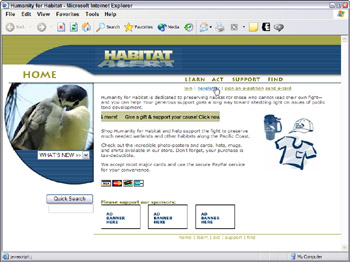
Figure 44-10: Submenus are written dynamically onMouseOver.
-
Select and preview
 set_text_done.htm. Move your mouse over each button to see its submenu. Move your mouse off a button and wait. After 10 seconds, the submenu disappears because the timer writes back the empty layer.
 -
Open
index.htm from the set_text folder and draw a layer that is 300 × 30 and is positioned at L=460 and T=125. Name the layer submenu. -
Open
links.htm from the set_text folder. Select all (Edit ® Select All) and copy. Close the file. -
Select the first button (Learn) and click Add (+) to add the Set Text ® Set Text of Layer behavior. In the dialog box that opens (Figure 44-11), paste.
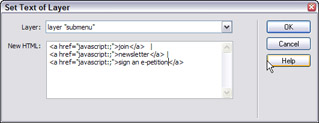
Figure 44-11: The Set Text of Layer dialog boxTip Always create your submenu content in another file and copy its code. Note that the file you copied from had no <head> or <body> tags and therefore was in Code view by default. Always copy the code from Code view when pasting into a Set Text of Layer window.
-
Change the text of the links (and even the null links) to make this button's submenu items. Organizing the links on separate lines makes the code easier to read. To add more links, paste more times. Delete unwanted links.
-
Repeat for each button, changing the link content and paths as needed.
-
Select the (empty) layer. Right-click (Control+click) over the <div> tag using the Tag selector and set its class to .subs. Because your submenus are in paragraphs, a CSS style sets properties to add margin, font-family, and more to style the submenu.
-
Save and preview to see the submenus.
When you need a behavior to occur after a set interval, a Timeline is the perfect answer; add the behavior you need to have occur in a Behavior channel. Which frame you add the behavior to sets the interval. To increase the amount of time, move the behavior to a later frame and vice versa.
-
In
index.htm (set_text folder) (still open from the previous exercise) add a new Timeline and name it hidesubs. -
Click into Frame 10 in the Behavior channel and click Add (+) Set Text ® Set Text of Layer. In the dialog box, type .
-
Close the dialog box. Click into Frame 1 of any of the animation channels. (See previous caution about onFrame events.) Set the frames per second to 1fps. The layer "hides" after 10 seconds.
-
Select the first button (learn) and click Add (+) Timeline ® Go To Timeline Frame. In the dialog box, choose the timer Timeline (hidesubs, leave the Go to Frame: box set at 1 and the Loop: box blank. Then click OK.). All Timelines would be available in the menu if more Timelines were present in the document. Multiple Timelines are allowed.
-
Set the event to onMouseOut.
-
Add the behavior Timeline ® Play Timeline (hidesubs) and click OK. Set the event to onMouseOut.
-
Add the behavior Timeline ® Stop Timelines and choose the hidesubs Timeline from the menu. Click OK and set the event to onMouseOver.
Here's what you get: When the user mouses over a button, Set Text ® Set Text of Layer writes the dynamic submenu. If the user moves to a new button, a new submenu is written. If the user moves off the Learn button but not to another button (onMouseOut), after 10 seconds the layer "hides" as the timer starts from Frame 1 and plays until it gets to Frame 10. But as long as the user remains over the Learn button, the timer does nothing because the time is stopped onMouseOver.
Tip Be sure to allow users enough time to find the link they want in the submenu. The timer is only needed here because it's a way to get back to the "hidden" submenu without using Show-Hide Layers.
-
Repeat the three Timelines behaviors for each button:
-
onMouseOut | Timeline®Go To Frame 1(hidesubs)
-
onMouseOut | Timeline®Play Timeline (hidesubs)
-
onMouseOver | Timeline®Stop Timeline (hidesubs)
-
-
Save the page and preview to test.
|
| < Day Day Up > |
|
EAN: 2147483647
Pages: 491