Dealing with Inconsistent Region Names
|
| < Day Day Up > |
|
The difficulty of applying a template to a page lies in resolving inconsistent region names. The template contains region names; the page may not have any regions or may be based on earlier templates. In any case, inconsistencies exist, and Dreamweaver wants you to tell it what to do about them. Where should the current content go?
Figure 37-12 shows the dialog box that offers a means of placing the current content of the page within the structure of the regions created in the template. If the page is based on a different (perhaps earlier) template, Dreamweaver attempts to correlate the regions. Where it cannot, you have to select the content and choose a region from the Move Content to New Region menu.
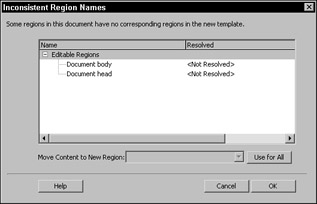
Figure 37-12: Resolving inconsistent regions
It is sometimes difficult to get this to work perfectly. It may be better to simply build a new template-based page and page in the proper content.
When the page is the document used to build the template and you opt to apply the template to the page, choose the first item listed, and choose Nowhere from the menu. Click the Use for All button to set the second item to use Nowhere (Figure 37-13), too. Save the page and you are good to go.
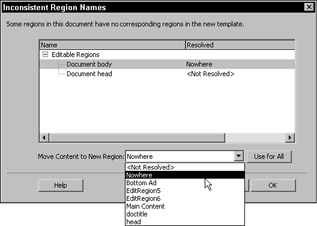
Figure 37-13: Selecting the Nowhere option
Habitat Alert site Use the easiest method to link the template to the homepage: Make a new page from the template and save as ![]() index.htm into the site folder. This overwrites the old version.
index.htm into the site folder. This overwrites the old version.
Converting Templates in Dreamweaver, by Brad Halstead and Murray R. Summers
So, you've purchased Macromedia Dreamweaver MX or Studio MX ), installed it on your machine, and started to play with Dreamweaver MX templates. One of the first tasks on your mind is to enhance your Dreamweaver/UltraDev 4 (Dreamweaver 4) templates to incorporate some of the advanced new template features found in Dreamweaver MX. You may be thinking that Dreamweaver/UltraDev 4 template markup is different from Dreamweaver MX template markup. You may be wondering how those differences will impact you while you are modifying the template in Dreamweaver MX.
The official line says Dreamweaver MX can read and use Dreamweaver 4 template markup without issue. However, during testing, we found that Dreamweaver 4 template markup does not always play well with the improved Dreamweaver MX template engine. For example, Dreamweaver 4 doesn't enable you to position editable regions inside block-level elements of your page, such as <p>. Dreamweaver MX advises against this practice because you could end up with possible errors when using Dreamweaver MX to manage and modify your existing Dreamweaver 4 site. Your experience may differ depending on how your Dreamweaver 4 template markup wraps your HTML code. The only thing that we can say with certainty is that the new template engine in Dreamweaver MX is much stricter than its predecessor in Dreamweaver 4.
| Note | Although Dreamweaver MX does enable you to place an editable region inside block-level elements (with a warning popping up), it is advisable to not do this for one very good reason. It may be that the person entering content into the editable region presses the Return key, thereby creating another block-level element. If that happens, Dreamweaver MX will complain. |
For maximum performance and minimum difficulty with Dreamweaver MX, we recommend that you convert the document from Dreamweaver 4 template markup to Dreamweaver MX template markup, update your pages, upload the changes to the server, and enjoy Dreamweaver MX templates.
This tutorial details the manual conversion of Dreamweaver 4 templates to the new Dreamweaver MX template format. There is no automated tool currently available to do the job for you. We've listed the do's, the don'ts, and the process to follow in its entirety providing working source files, code listings, and screnshots for you to be able to follow along.
The code differences
As is the case with many development software packages, the code generated and recognized is typically different from version to version, and although backwards compatibility is almost always a concern for the software vendor, it typically is the case that the older version's code is recognized and used by the newer version of the software. However, the newer generation code is not backwards compatible with the older version of the software.
Dreamweaver MX is no different in this regard. It attempts optimal recognition of Dreamweaver 4 template markup but is not always 100 percent successful. Conversely, the code that Dreamweaver MX generates for template markup is not recognized at all by Dreamweaver 4 (including UltraDev 4 and previous versions). Dreamweaver MX introduces a whole new syntax and methodology for template markup and the template engine (the template markup interpreter) is much more advanced and strict with respect to the markup on the page.
As you may already know, Dreamweaver 4 allowed two template markup types: editable and noneditable regions. DMX allows the aforementioned regions as well as a host of new region types (Optional regions, MultipleIf Conditional regions, Repeating regions, Repeating Table regions, and Editable Tag attributes). It offers additional template markup (Parameters, Expressions) that enables some dynamic manipulation of these regions. Dreamweaver MX also introduces a much stricter and more robust template engine (template markup interpreter) as well as the power to create Nested Templates and it gives you the ability to lock dynamic server code that you position above/below the opening/closing <html>, </html> tag, respectively.
This tutorial deals with the differences between the common template markup of Dreamweaver 4 and Dreamweaver MX, specifically the base template markup as well as Editable region markup.
The following code shows the markup for a base Dreamweaver 4 generated template. This code is recognized and usable by Dreamweaver MX.
<html> <head> <!-- #BeginEditable "doctitle" --> <title>Untitled Document</title> <!-- #EndEditable --> <meta http-equiv="Content-Type" content="text/html; charset=iso-8859-1"> </head> <body bgcolor="#FFFFFF" text="#000000"> </body> </html> Markup (Opening): <!-- #BeginEditable "doctitle" --> Markup (Closing): <!-- #EndEditable -->
The following code shows the markup for a base Dreamweaver MX generated template. Dreamweaver 4 doesn't recognize any of the editable regions and considers them standard HTML comments.
<!DOCTYPE HTML PUBLIC "-//W3C//DTD HTML 4.01 Transitional//EN"> <html> <head> <!-- TemplateBeginEditable name="doctitle" --> <title>Untitled Document</title> <!-- TemplateEndEditable --> <meta http-equiv="Content-Type" content="text/html; charset=iso-8859-1"> <!-- TemplateBeginEditable name="head" --> <!-- TemplateEndEditable --> </head> <body> </body> </html> Markup (Opening): <!-- TemplateBeginEditable name="doctitle" --> Markup (Closing): <!-- TemplateEndEditable -->
You might ask, "What's the differences between these two listings?"
You've already seen the opening and closing markup as related to each version of Dreamweaver, as shown in the first listing and and the second one.
For ease of explanation, look at the region ending code (Editable region closing tag).
-
Dreamweaver 4 version: <!-- #EndEditable -->
-
Dreamweaver MX version: <!-- TemplateEndEditable -->
The difference here is the syntax of the template markup (proprietary HTML comment). Simply stated, the # in the Dreamweaver 4 markup has been replaced with the word Template in the Dreamweaver MX markup (this replacement is more than cosmetic, as it enables you to easily determine whether the code is in a template or a child page).
The differences between the region opening code (Editable region opening tag) are more robust!
-
Dreamweaver 4 version: <!-- #BeginEditable "doctitle" -->
-
Dreamweaver MX version: <!-- TemplateBeginEditable name="doctitle" -->
As with the ending code (shown previously), the # has been replaced by Template. In addition, Dreamweaver MX gives the region a labeled and valued attribute (name="regionname"); whereas Dreamweaver 4 only uses the defined attribute value ("regionname").
Unlike Dreamweaver 4, Dreamweaver MX automatically inserts a region named head on saving a page as a template. This region is useful, because when you have custom scripts in a child page, they are automatically added to the child page's head region and aren't updated when you update the template. Along with scripts, custom CSS and meta tags can be added to give each child page some unique quality. If you wanted this region in Dreamweaver 4, you had to add it manually.
| Caution | After you modify a Dreamweaver 4 template by adding any new Dreamweaver MX region type, the template no longer functions properly in Dreamweaver 4. You can, however, freely insert Dreamweaver MX standard editable regions and the template will continue to function as expected in Dreamweaver 4 as long as you do not perform this conversion process. With this in mind, ensure that you and your coworkers are absolutely finished with this site in Dreamweaver 4 prior to performing the template conversion. |
The conversion process
Now that you know what the differences in template markup are, it's time to start the conversion process from a Dreamweaver 4 template to a Dreamweaver MX template. The information from the "The code differences" section appears here in table format (see the following table) for easy reference. What you need to do is convert all the editable region's start and end code to the new format. You also want to add the default editable region named head into the Dreamweaver 4 template document during the conversion process.
| Markup Type | DW4 | DMX |
|---|---|---|
| Editable region start code | #BeginEditable | TemplateBeginEditable name= |
| Editable region end code | #EndEditable | TemplateEndEditable |
| New editable region | <!-- TemplateBeginEditable name="head" --> <!-- TemplateEndEditable --> |
To make it easier on you, we have made three Dreamweaver MX find-and-replace (F/R) query files that you can find in the chapter37_exercise folder. This archive is named ConvertQueries .zip and contains three files (which, when extracted retaining folder information, will be housed in a folder named Queries). These files are associated with the three operations you need to perform (see the following table). Don't worry about how to reference them; that will be covered in the exercise 1.4. All you have to remember is where you have saved these three files on your hard drive (C:\ so the extracted location would convert to C:\Queries).
| Script | Function |
|---|---|
| | Converts ALL Dreamweaver 4 editable region start code to Dreamweaver MX start code |
| | Converts ALL Dreamweaver 4 editable region end code to Dreamweaver MX end code |
| | Adds the head editable region into the template document, but doesn't check whether it already exists on the page |
| Caution | These queries must be run on only Dreamweaver 4 template files from within the Dreamweaver MX find and replace interface. Running them on child pages, Dreamweaver MX generated templates, or from within the Dreamweaver 4 find and replace interface may produce undesirable results. |
Setting up the site
To begin, download the sample files and create a DMX site definition. Start by downloading the sample files from the chapter37_exercise folder. This archive is named ConvertSource and contains the sample site source files.
Exercise 1.1: Setting up your site definition
Before you can do anything to the Dreamweaver 4 generated template and site, you have to define the site in Dreamweaver MX. (This applies only if this was a site that did not exist any longer in Dreamweaver 4 or if when you installed Dreamweaver MX it did not pick up the site definitions from Dreamweaver 4 properly.)
-
Start Dreamweaver MX.
-
Select Site ® New Site... in the dialog box that opens, select the Advanced tab.
-
Select Local Info Category, and in the textbox beside Site Name type Convert Source, in the textbox beside Local Root Folder: Click the Browse button to locate the folder ConvertSource. Your site definition should look similar to the following figure.
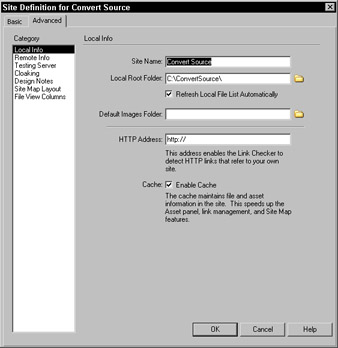
Completed Local Info category -
Select Testing Server in the Category pane. Make sure to select None from the choices presented in the Server Model drop-down list, as shown in the following figure.
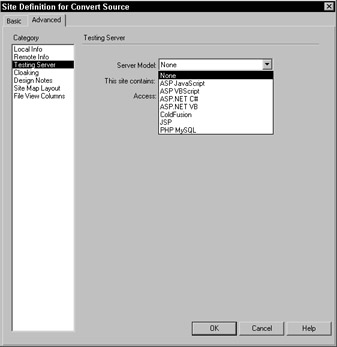
Completed Testing Server Category -
Click OK to close the dialog box, create the site, and open the site in the Site panel.
-
If the site is collapsed, expand the site so that you see all folders expanded as shown in the following figure.
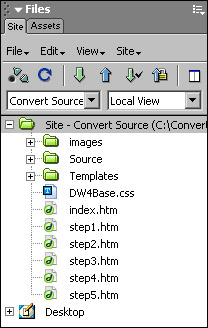
Expanded Site tab -
Leave Dreamweaver MX open for the next exercise.
That's all there is to setting up the site definition. No additional items need to be configured for this demonstration. However, before you can actually complete the conversion, you must tackle a couple more preliminary steps.
Backing up
Before you start changing any code, you should perform a preventative maintenance backup. (This step could save your bacon and should be part of your normal routine prior to modifying any site.) You should perform two kinds of backups: first, make a duplicate copy of your site file and folder structure somewhere on your hard drive outside of the currently defined site structure; second, make a duplicate copy of your template file.
"What I do for my site backup is use my file manager software (Windows Explorer), navigate to my site root folder, select the folder, and make a zip of the entire tree (saving folder structure) using WinZip." – Brad Halstead
You may opt to perform your backup differently.
Perform the steps outlined in the Exercise 1.2 to make a pseudo-backup of the template file prior to any conversion processes.
Exercise 1.2: Backing up the template file
Performing these steps ensures that your template file is backed up in the same defined site so that it can be restored with ease:
-
Start Dreamweaver MX (if it isn't already running).
-
Open the defined site that you want to modify. In this case, open the site defined as Convert Source in Exercise 1.1 (if it isn't already selected).
-
Expand the Templates folder (if it isn't already).
-
Open the
 DW4Base.dwt template by double-clicking it.
 -
Select File ® Save As...; in the dialog box that opens, type the same template name but add a –bu preceding the .dwt. Your name should look like this: DW4Base-bu.dwt.
-
Close the renamed template. Your Templates folder should have two templates now (see the following figure), and no documents should be open at this point.
-
Leave Dreamweaver MX open for the next exercise.
Because you have made this backup, the template, links, and image references all stay intact and if you accidently changed the original template. You can easily overwrite the changed one with your backed up copy by renaming the backup template to the original filename.
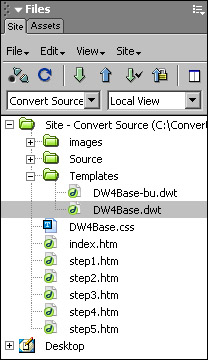
The Site tab after template backup
Check template syntax
Dreamweaver 4 does not include any method of manually initiating a template syntax check. You can happily go about editing your template in Dreamweaver 4 without having to worry about anything until you save the template. At that point, the template engine performs its duties by updating the pages associated with it or tells you that there is an error and roughly where the error occurred. You must find and clean up the problem manually.
Dreamweaver MX includes a handy tool for manually verifying that your template syntax is correct prior to saving it or updating the associated files. Exercise 1.3 takes you through the steps required to verify that your Dreamweaver 4 template syntax is correct. Although, as in Dreamweaver 4, you are required to manually fix any errors that are encountered until the template passes the syntax check.
Exercise 1.3: Verify the DW4 template is syntactically correct
This step must not be skipped and should be performed on your Dreamweaver 4 created template prior to performing any additional steps. If errors are detected, they must be repaired prior to performing the conversion or data loss might occur:
-
Start Dreamweaver MX (if it isn't already running).
-
Open the defined site you want to modify. In this case, open the site you defined as Convert Source in Exercise 1.1 (if it isn't already selected).
-
Expand the Templates folder (if it isn't already).
-
Open the
DW4Base.dwt template by double-clicking it. -
Select Modify ® Templates ® Check Template Syntax.
One of two dialog boxes opens. the Template Syntax is Correct. dialog box or the Error dialog box, shown in the following figure.
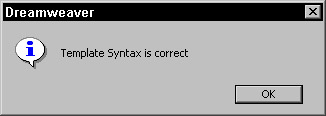
Syntax Check OK dialog box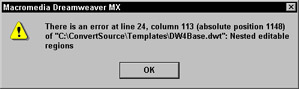
Syntax Check showing an error dialog boxIf you see the Template Syntax is Correct dialog box, move onto the next step. If you get an error message, it's time for some troubleshooting. You should see the Template Syntax is correct dialog box with this template.
-
Click OK to close the dialog box.
-
Leave the template and Dreamweaver MX open for the next exercise.
Perform the conversion
As you've seen so far, a lot of preliminary work that must be done to avoid poor results. If you work through this tutorial step by step, you will get reliable results each and every time with your template conversion.
Exercise 1.4: Running the F/R Queries to convert the template.
It's time to perform the base conversion of the Dreamweaver 4 template into a Dreamweaver MX template. The easiest way to do this is to use Dreamweaver MX's built in Find and Replace command. Thanks to the forward thinking of the Macromedia engineers, you can save find-and-replace queries to a file and recall them later using the Load option in the find and Replace dialog box:
-
Start Dreamweaver MX (if it isn't already running).
-
Open the defined site you want to modify. In this case, use the site you defined as Convert Source in Exercise 1.1 (if it isn't already selected).
-
Expand the Templates folder (if it isn't already).
-
Open the
DW4Base.dwt template by double-clicking it (if it isn't open already). -
Select Edit ® Find and Replace to open Find and Replace dialog box shown in the following figure.
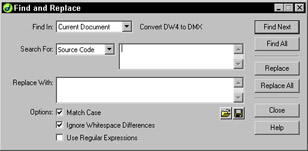
Blank Find and Replace dialog box -
Click the Load Query button (the small folder icon near the Close button) and navigate to the chapter37_exersize\queries folder and select the saved query named
ERStart.dwr. All the fields should populate as shown in the following figure.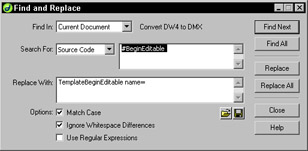
Competed Find and Replace Dialog box source code -
Be sure the Find In field of the Find and Replace dialog box is set to Current Document. If it is not set to Current Document, change it using the drop-down list beside the field.
-
Click the Replace All button to perform the document find and replace. After the command performs its magic, a report dialog box should provide you with the results or the query as shown in the following figure.
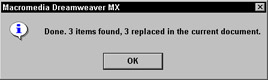
Query Results for Start code F/R -
Click OK to close the results.
-
Repeat Steps 5 through 9 twice more (prior to saving the changes made!), first selecting the saved query named EREnd.dwt and again selecting the saved query named
ERHead.dwr. Be aware that what you see in the two previous figures will differ depending on the saved query you are accessing. -
Choose File ® Save. When prompted with the Update Template Files dialog box (see the following figure), click the Don't Update button.
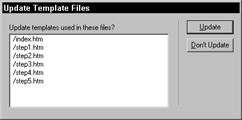
Update Template Files dialog boxYou don't update the child pages, because the template code conversion doesn't affect child pages built from the Dreamweaver 4 version of the template unless you are adding/removing regions or updating uneditable content of the DMX converted template. The converted template will work as expected for all new pages created from it. With this in mind, make sure the existing child pages are updated to use the new template markup.
-
Select any uneditable area (position your cursor just before the closing </body> tag) and select Insert ® Template Objects ® Optional Region. In the dialog box that opens, click the Basic tab, leave the Name field at its default, and ensure that the Show by Default: check box is cleared (as seen in the following figure). Click OK to close the dialog box and add the region to your page.
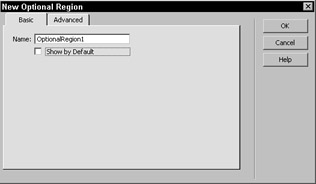
Optional Region dialog boxWhen you insert an optional region you force the child pages to update to the new template format.
-
Choose File ® Save. When prompted to update the site by the Update Template Files dialog box, click the Update button.
The Update Pages dialog box shows a report of the files updated by the modified template. Click Close.
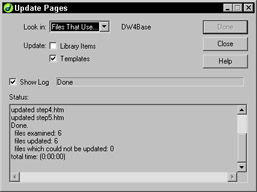
Update Pages dialog — completed -
Open any of the .htm pages to verify that the changes discussed above indeed took effect.
-
Close all open files and close Dreamweaver. You're done with the conversion.
When you are satisfied that your local copy of the converted site is functioning as expected, the last thing you must do is upload the changed files to the server that hosts you site. You can do this using the Dreamweaver MX FTP engine or you can use your favorite FTP program. Remember to update the whole site, not only the root documents or you may run into problems.
Server language template considerations
The instructions provided previously apply to templates made for child pages based on static (HTML) or server-oriented languages (CFML, ASP, JSP, .NET, or PHP). However, if your pages are for server-oreinted language site, you must perfom one additional step.
Suppose that your template so it contains your Web site's login information so that a database can be accessed. This, in itself, is good coding practice and minimizes the number of keystrokes and mouse clicks required to build the site. Suppose also that you upload the template(s) to the server because you build the site collaboratively with a remote designer. Suppose someone accesses your site's Template folder and views your template file.
.DWT files can be opened by IE without issues in most cases. Because the file is not recognized by the server, it is not parsed and served to the browser, but instead it is delivered as is to the browser.
This means that anyone who knows how Dreamweaver templates work can hack your site, grab your database, or do a multitude of things that you won't even know about.
There is one very simple thing that you can do to protect your data: use Dreamweaver's Site Manager or Site panel to rename the template.
For example, say you have a template that contains all the ColdFusion database connection data and the filename is cfsample.dwt. If you rename this template, using the Site panel or Site Manager, to cfsample.dwt.cfm and update the child pages when prompted, in effect you have told the server that this template file must be processed and served to the browser, thereby hiding your connectivity information. The following table provides a complete breakdown of recognized template extensions that Dreamweaver MX can use.
| Language | Template Extension |
|---|---|
| CFML | .dwt.cfm |
| ASP | .dwt.asp |
| JSP | .dwt.jsp |
| .NET | .dwt.aspx |
| PHP | .dwt.php |
| HTML | .dwt |
This security issue is present only if you are updating a dynamic template from Dreamweaver 4 or UltraDev 4. If you check your site definition and ensure that your server model is selected, future templates will not require this to be manually configured for this site definition. The Server Model can be configured through Site ® Edit Sites. Select the desired site and click the Edit button. Choose the Advanced tab and then Testing Server category. Choose your Server Model by selecting it in the Server Model drop-down list.
| Caution | The server model is a little strange: for Studio MX, ColdFusion is automatically used but for the stand-alone version of Dreamweaver MX, None is the default. Ensure that you set the desired Server Model at the same time that you originally define the site or you will have issues with server-side includes (if you use them). |
Don't forget to delete the .dwt file from the server Templates folder.
Conclusion
Congratulations! You just completed your first Dreamweaver 4-to-Dreamweaver MX template conversion. Remember the steps, because they are important. To recap: Backup the site. Backup the template. Check your template syntax. Use the three provided find-and-replace queries. Add an optional region. Save the template and update the site. Along with the exercises, this chapter provided some common cautions and notes as they apply to the template conversion process.
|
| < Day Day Up > |
|
EAN: 2147483647
Pages: 491