Shape Tweening
|
| < Day Day Up > |
|
Shape tweening follows the same steps as motion tweening with a few exceptions. You can't shape tween a bitmap, a grouped object, movie clips, or text blocks unless you break them apart first. If you are going to tween more than two objects, they all have to be on the same layer. If the shapes are complex, you can control the resulting tween by using shape hints.
-
Open
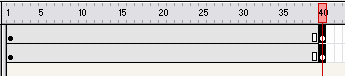
 shape.fla. Select Frame 20 and add a keyframe (F6).
 -
Add a new layer.
-
Select the Pen tool and in the Property inspector change the fill color to black and the size to 4.
-
Click the head image, where the center of a smile would be, and draw a short line. If you press Shift while you click the second point, you get a straight line, as shown in Figure 27-17.
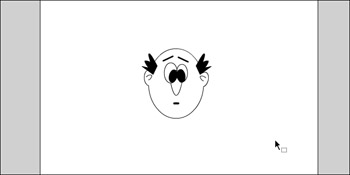
Figure 27-17: A dot added to Frame 1 for the beginning of a shape tween -
Select Frame 20 and add a keyframe. Select View ® Rulers and pull a guide down on top of the line you drew for the mouth. You can use this to position the full smile. Delete the short line.
-
Draw a full smile. The easiest way to draw a smile is to click the first point for the top of the left side of the smile, click the top-right side, and drag to form the mouth curve as shown in Figure 27-18. Be sure the smile is on top of the guide.
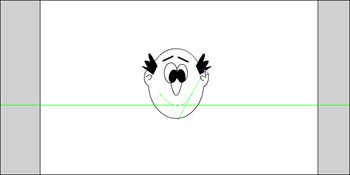
Figure 27-18: The mouth drawn using the Pen tool -
To add the shape tween, select Frame 1 and go to the Property inspector and choose Shape from the Tween drop-down menu. For this exercise, you don't need any other options, but take note of the following options available for a shape tween:
-
Easing — Positive values of 1 to 100 ease out the tween. Changes occur quickly at the beginning and ease out toward the end. To ease in, you choose a negative value.
-
Distributive mode — This is an option in Blend drop-down menu. Use this option when you don't want to preserve any of the straight lines or curves.
-
Angular — This is an option in Blend drop-down menu. Angular mode preserves the corners and straight lines in the in-between shapes.
-
-
Press Enter/Return to play the animation.
Flash MX Masking Effects, by Charles E. Brown
This section presents an interesting project employing techniques I use to introduce a Flash site. You use some text and masking effects. I have purposely set this up using only basic techniques. There are, of course, more sophisticated ways to do some of what you do here. You learn some fundamental principles using the techniques I show in this exercise.
Setup
We are going to start by laying out some ground work for our small project. I think you will find these steps useful for other projects.
-
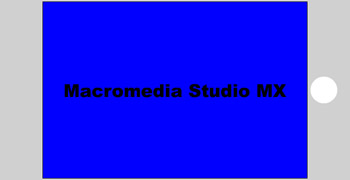
Create a new movie and use the Property inspector, or choose Modify ® Document (see the following figure). For this example, I use the following settings:
-
Canvas Size: 600 pixels wide and 400 pixels
-
Background Color: #0000FF

-
-
Select the Text tool and use the Property inspector to set the text characteristics. As an example:
-
Font: Arial Black Font
-
Size: 40 points
-
Color: Black
-
-
Type the text, Macromedia Studio MX (or any text you choose).
Press esc.
-
Using the Align panel, center the text on the stage.
Flash animations can become pretty complex. You should properly label all layers and objects.
-
Double-click the Layer 1 label at the beginning of the timeline. Name it Introduction Text.
-
Using the Align panel, center the text object on the canvas.
Creating the mask
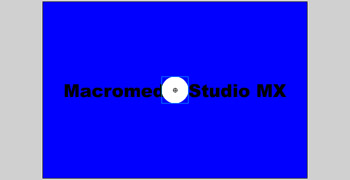
Creating a mask is like taking a piece of cardboard, cutting a hole in it, and putting it in front of your text. The hole can be any shape and size. Flash gives you the ability to move the cutout. The example used here to illustrate this principle is simple. Use a circle:
-
Create a new layer above the text and call it Mask (see figure).

-
Draw a white circle, with no stroke, and make it 60 pixels high and 60 pixels wide. Make sure it is off the left side of the stage and that its center point is approximately centered with the text.
-
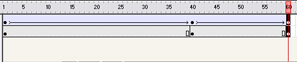
Create a keyframe for both layers at Frame 40 (see figure).
-
Make sure you are in Frame 40. Shift + click to keep the movement straight, while you drag the circle to stage right (see figure).
-
Create a Motion Tween in the Mask layer. When you test it, it will look like a white circle going across the text.
-
Right-click the Mask layer and select Mask. Several things should happen: the text and circle looks like it has disappeared, and the Text layer indents under the Mask layer. The indented layer is the Masked layer. In addition, the layers are locked. Locking the layer is essential for the mask to work properly.
-
Try running the animation. You should see the text appear in the circle cutout as it moves across the Stage.
Edit the mask
Now that we have the basics set up, let's do a little editing to make more happen.
-
To edit your mask, unlock the layers.
-
Place a keyframe in Frame 60 for both layers (see the following figure).
-
Create a second motion tween (discussed earlier in this chapter), if necessary, and back track the circle mask to have it stop halfway over the text (see figure).
-
Lock your layers, and test the animation again.
-
If all is working well, unlock the layers again.
-
Place keyframes in Frame 80.
-
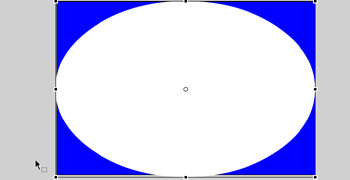
Select the circle graphic and the Right click to select the Free Transform tool.
-
Using the graphic handles, enlarge the circle so that the dimensions are approximately 600 pixels wide by about 400 pixels high. This size fills most of the Stage, leaving rounded corners (see figure).
-
If necessary, create a motion tween between Frames 60 and 80.
-
Lock your layers and test your movie again. You should see the mask move from left to right, back to the center, and then enlarge to reveal the entire text.
More text animations
Now that the text is introduced, you are going to create some additional text animations. First, move the existing text up:
-
Unlock the layers and hide the Mask layer (click the eye icon column to hide the layers visibility) so you can get to the text easily.
-
On the introductory text's layer, create a keyframe at Frame 90. I am not going to extend the Mask layer any longer because you will not be using it again. If, later on, you want to use the mask again, you need to expand that also.
-
Select the text box, and press the Shift and the up-arrow key to move your text up 10 pixels.
-
Create a motion tween.
-
Before you test your movie, make sure you relock your layers and unhide the mask. Bring additional text into play.
-
Create a new layer called Dreamweaver MX and place it below the introductory text layer by dragging it down. Notice that it is indented below the masked layer. This will not hurt anything, but if you want to create a normal indentation, choose Modify ® Layer. Select Normal. Notice that you can change several Layer properties using this dialog box. Click OK.
-
Make sure the new Dreamweaver MX layer is selected. Press F6 to make Frame 90 a keyframe.
-
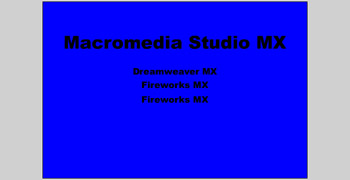
Select the Text tool,.type Dreamweaver MX below the Macromedia studio MX text and center it. Make the text size 20 points. You can use the Align panel to center the new text against the original text.
-
To create a fade in effect, convert your new text into a graphic symbol. Call your new symbol Dreamweaver.
-
Making sure the Dreamweaver symbol is selected, open the Color drop-down list in the Property inspector, and select Alpha.
-
Select the two text layers, and place a keyframe at Frame 110.
-
Return to the Frame 90 in the Dreamweaver layer and select the text symbol. Open the Color drop-down list in the Property inspector, and select Alpha.
-
Set the Alpha to 0%.
-
Go to Frame 110, select the symbol, and set the Alpha to 100%.
-
Create a Motion Tween in the new Layer between frames 90 and 110.
-
Make sure all layers are locked and turned on. Play your movie. You should see the words Dreamweaver MX fade in.
-
Unlock the layers and create a new layer called Fireworks MX. Place it below the Dreamweaver MX layer.
-
Insert a keyframe at Frame 110. Type the words Fireworks MX below the Dreamweaver text. Use the Align panel to center the new text with the Dreamweaver text.
-
Extend the three text layers by putting keyframes in Frame 130.
-
Create a motion tween in the new layer.
-
In the Property inspector, select the Rotate Property. Select CW for clockwise rotation, and set the number of rotations to 3.
-
Just setting a rotation is interesting. However, it is not a very graceful way to bring in the text. Make certain you are still on the keyframe of Frame 110 of the new layer.
-
Open the Transform panel. Set the dimensions to 0.0%. If you have Constrain checked, both settings should be set to near 0; 1.0 is fine.
-
Click Frame 130. The Transform panel should show 100%. Leave it at that.
-
Test your movie again. You should see the last text rotate in.
-
Create a new layer at the bottom and call it Flash MX.
-
Insert a keyframe at Frame 130.
-
Select the Fireworks MX text box, and click Copy.
-
Select the new keyFrame at Frame 130.
-
Select Edit ® Paste in Place. Theoretically, you have the same text on two locations in the exact spot.
-
Extend each of the 4 text layers by extending the timeline to 150. Add a keyframe at 150.
-
Select Frame 150 on the new Flash layer and press the Shift and press the down-arrow key 3 times to move the text down 30 pixels.
-
Create a motion tween on the new layer. You should now have Fireworks MX in two places (see figure).
-
Create keyframes for the text layers at Frame 170.
-
Select Frame 150 in the Flash layer. To create some text effects, you sometimes need to break the text to its root level.
-
Place another keyframe at Frame 151 to distinguish animations.
-
Go to Frame 170 in the Flash layer. Doulble-click the text and change it to Flash MX.
-
Choose Modify ® Break Apart twice.
-
Return to frame 151 andChoose Modify ® Break Apart twice to break this text apart also.
-
Using the Property inspector, create a shape tween between Frames 151 and 170. Shape tweens should be used when changing a shape, color, or shape while moving. Shape tweens do require a bit more computing power and should be used sparingly.
-
You may want to move the text slightly to the right while morphing the shape.
-
Test your new movie now.
Finishing touches
We now need to add one finishing touch to our movie. You have one problem yet. Your movie will just continue moving. Here is a quick technique for stopping the movie. Here is a quick ActionScript to stop the movie.
-
Create a new layer and call it ActionScript.
-
Select Frame 170 and place a keyframe there.
-
Choose Window ® Actions, or Press F9.
-
Your panel should say Actions for Frame 170 of Layer Name ActionScript.
-
Click the plus sign in the Actions panel; then click Actions ® Movie Control ® Stop. Close the Actions panel. Notice that a lowercase "a" appears in the keyframe.
-
Now export the movie using File ® Export Movie. Choose a name and a location and click Save. You can now play your movie using the Flash Player.
You just learned some simple techniques for creating stunning effects. And you barely used any programming whatsoever. Try experimenting with some variations of these techniques.
| On the CD-ROM | A copy of the finished file is in the chapter27_exercise folder and is named mask.fla. |
|
| < Day Day Up > |
|
EAN: 2147483647
Pages: 491