Tween Along a Path
|
| < Day Day Up > |
|
Flash has a special layer called Motion Guide. This layer is used as a guide path for your animation to follow and is not exported with your animation. You can make the path using any of the drawing tools, or you can import an EPS or AI file format to use. If you choose to import a file, you'll need to ungroup the object first.
To add a Motion Guide layer that contains a path for your symbol to move along, follow these steps:
-
Make a simple motion tweened animation. In Frame 1, draw a circle and choose Insert ® Convert to symbol. Add a keyframe to Frame 10. Select Frame 1 and choose Insert ® Motion tween.
-
Click the Add Motion Guide icon in the Layers area. This action places a guide layer above the animation layer. The name is Guide Layer (plus the layer named it is above).
-
Select Frame 1 of the Motion-Guide layer, and use any drawing tool to draw a path. Figure 27-15 shows the animation so far.
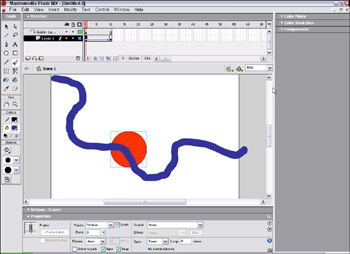
Figure 27-15: A Motion-Guide layer added above the tweened animation and a guide drawn -
To attach the animation to the path, select Frame 1 of the animation. Look in the Property inspector and be sure the Snap option is checked.
-
Select your object and drag, placing the registration point (circle) at the beginning of your path, as shown in Figure 27-16.
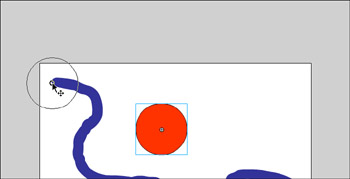
Figure 27-16: The object placed with its registration point at the beginning of the Motion Guide -
Select the last keyframe. Click and drag to place the registration on the end of the path.
Note If the registration point doesn't appear, click the circle with cross hairs and click and hold for a second or two, then drag it to position.
-
Press Enter/Return to play the animation.
|
| < Day Day Up > |
|
EAN: 2147483647
Pages: 491