Using a Batch Process
|
| < Day Day Up > |
|
A lot of tasks required to develop a Web site are repetitious and tedious. You can automate some of those tasks using a batch process. You can use a batch process for setting optimization settings, for sizing or resizing images, and even for running commands in conjunction with other batch functions.
To run a batch process, follow these steps:
-
Select File ® Batch Process. You do not need to have a document open to use batch process.
-
The Batch dialog box opens. Navigate to the batch folder inside the Chapter 21 folder. You won't see any files listed because they aren't PNGs.
-
In the Files of Type field, choose All Files. The list of files appears.
-
Figure 21-3 shows the Batch Process dialog box with All Files selected. You can select an image and click Add. You want all the images, so click Add All. Notice the filenames are all in the blank white area under the file types. You can also choose to add files from a project log or ones that are open as well.
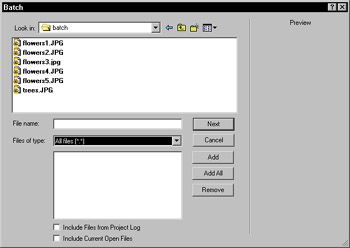
Figure 21-3: The Batch process dialog box with All Files showing -
Click the Next button. Figure 21-4 shows the Batch options available.
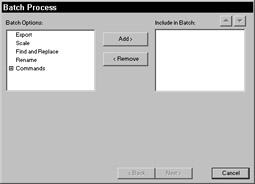
Figure 21-4: The Batch options that are available -
Select Export and click the Add button. The Export settings field becomes available. Choose JPEG smaller file. If you wanted to customize the settings, click the Edit button.
-
You aren't going to scale, but click the drop-down menu and check the options. You can scale to a specific size, area, or percentage.
-
To run the 2px border command in the batch process, click the plus sign next to commands and select 2pxborder. (It's available only if you made it in the exercise earlier in this chapter.)
-
Click the Add button.
-
After you finish setting the batch options, click Next.
-
This dialog box lets you pick how and where to save the processed files. The options are as follows:
-
Save in the same location as the originals. (If you do, a new folder is generated.)
-
Choose Custom location, which you can then browse to select.
-
Backups, if selected, give you the options of overwriting existing or making incremental backups.
-
Save Script enables you to save the batch configuration you just set up.
-
-
If you copied the files from the CD to your hard drive, you can choose same location; otherwise browse to a new folder. When your selections are made, click Batch. You'll see a progress window. When it's complete, click OK.
-
Open the flower1.jpg from the location in which you saved it to check out the changes. It is now a JPEG image with a black border.
Creating Commands in Fireworks, by Stephen Grosvenor
With the release of Fireworks MX and with the plethora of new features within Flash MX, extensibility is about to become a hot topic within the Fireworks community.
Because of the ability to write commands in Fireworks, users of all skill levels can share time-saving scripts, interesting effects, and tricks with the rest of the community . This tutorial will show you how to get your ideas in motion, how to plan the process flow of your command, how to design, and how to create Fireworks MX commands.
What's the main work involved in designing interface, layouts, Web sites, or just interesting designs? Repetition, pure and simple repetition of mundane or step-orientated tasks. These tasks suppress creative flow and take a lot of the time away from the design process. Many tasks in Fireworks MX consist of three or more steps. These tasks can be easily converted to commands that help relieve the monotony of those procedures, and free up more of your time for creative design. Fireworks MX, with the help of Macromedia Flash MX, makes this possible.
This tutorial guides you through the basic process of creating a user-based command. The command created here is an SWF file, exported from Macromedia Flash MX. The steps to design a command - create the script, design the interface in Macromedia Flash MX, test for bugs, install in Fireworks MX - may involve some investment of time, but the long-term rewards will make the effort worthwhile.
Understanding Fireworks MX commands
A command in Fireworks MX is essentially a script. A script tells Fireworks MX to carry out a particular action or series of actions. Flash-based Fireworks MX commands are essentially these scripts wrapped in a Flash file for ease of use or when user input is required.
Nearly every action you take in Fireworks MX - from moving an object on the canvas to creating button symbols - is powered by Fireworks MX scripting. You have access to this script and it can be manipulated in Macromedia Flash MX to design forms for receiving user input and creating instructions for Fireworks MX to carry out. While creating the architecture and designing the commands, you are simply harnessing the scripting capabilities of Fireworks MX and the scripts that it produces as you work.
The ability to create these kinds of commands comes under the general heading of extensibility. More background information about extensibility in Fireworks MX can be found in Extending Fireworks MX, available in PDF format from Macromedia (www.macromedia.com/support/ fireworks/extensibility.html). This documentation can help you understand the scripting concept and the Fireworks MX Application Program Interface (API) routines, as well as guide you in the development of more complex commands.
Creating the command: Back to basics
Now you can turn to the basic steps involved in the command-creation process. Like most process-based activities, creating a Fireworks MX SWF file command requires careful planning and investigation prior to starting to draft the command, interface, and code requirement.
Define the purpose of the command
All user-input commands start with a goal and then go through an initial planning stage. This is actually the most important part of the process, and after you finish with that, you're practically finished.
One of the most important parts of creating a user-input command for Fireworks MX is to distill in your mind the purpose of the command. Most of the goals for commands I create are usually spawned from a direct requirement to carry out a task, which would fall into the following categories:
-
The process takes a long time to complete manually.
-
The process consists of many tedious steps.
More often than not, you can consolidate several laborious steps into one simple command; if those steps are actions you perform on a daily basis, you end up saving a considerable amount of time.
In this tutorial, the command's goal is to take a single object on the canvas, and duplicate it many times in a random fashion within your active canvas. This command would be useful if you needed to bring an unordered and random factor into your design. Having to place copies 20 or 30 times manually into the canvas by copying, pasting and creating a random placement of your objects would take a long time. Therefore this command fits into the "tedious" category: It carries out a mundane task quickly and effectively enabling you to get on with other parts of the design
The following figure shows a glimpse of the command and what you end up with after you have created it.
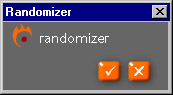
The interface of the command that you will create with this tutorial
| Note | For a sneak preview, locate the randomizer.mxp file in the chapter21_exercise folder on the CD-ROM. Double-click the file to launch the Extension Manager and follow the instructions for Fireworks MX installation. To test it, open a document in Fireworks, place and select an object on the canvas, and choose Commands ® Randomizer. Click the button with a check mark. You see the object that you selected on the canvas duplicated many times within the canvas. Reapplying the command a subsequent time on the same object yields differing results, as the command is set to use random values. |
Process flow for developing your first command
After you know specifically what you want your command to accomplish, you create a "process-flow" or requirements list. You'll want to identify the goal, the interface components within the command (such as menus, buttons, sliders, dials, text areas and so forth), and the scripts that the command needs to communicate with Fireworks MX. Because a picture is worth a thousand words, the following figure shows a process diagram for the implementation of this command:
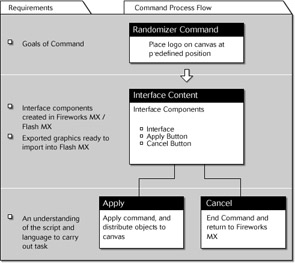
Process Flow for creating the Randomizer command
The following table shows the steps involved for a command and then the implementation.
| Steps for command | Implementation for this command |
|---|---|
| Set goal | Place a selected object onto the canvas multiple times in random positions Determine user interface components needed (some may be created in Flash MX, others in Fireworks MX and imported into Flash MX) General background |
| Apply button | |
| Cancel button | |
| Identify script and language needed to carry out task in Fireworks MX | Apply command to execute code and duplicate selected object multiple times within the active document |
| Cancel to end command and return to Fireworks MX |
Following the review of the process flow for your command, you may need to reconsider certain aspects of the command, such as the interface, number of controls required, code requirements, or other facets required for a successful and usable command.
Important points for Fireworks MX command creation
Never underestimate the power of the interface and how it can affect the users experience when using your command. The larger the group of people you intend to distribute the command to, the greater the degree of usability testing required, and more thought required in the planning phases of the command's life cycle. On the other hand, if you are distributing to a small team of internal graphic designers, and the command doesn't go outside of the company, less stringent usability testing is required.
The following simple rules will help you when creating commands for distribution to groups of users:
-
Keep it simple - Don't confuse users with a barrage of hidden or cryptic menus. Present them with the options they will need to execute the command. successfully.
-
Keep it clean - Don't over clutter the interface with several complicated menus. This will confuse users. If you have suboptions that can be used for your command, place them in an options-type menu that can be accessed when and if the optional items are needed. A clean interface invites the users' curiosity and they'll be more likely to explore its possibilities and have a better user experience.
-
Keep it focused - Make the command easy to use, as well as useful.
Prior to embarking on getting your hands dirty with the code, and testing functionality within Fireworks MX, you should create a composition of how the interface will look. Include all the options that you need displayed and available to the user. If you place too many options on the screen, and it looks too busy, attempt to tuck these options away in quick and easily accessible option menus.
The Fireworks MX History panel
While you are actively carrying out functions in Fireworks MX, Fireworks MX is tracking your actions and recording them in the History panel.
These actions that are recorded in the History panel are scripts or series of nested scripts telling Fireworks MX what it is supposed to be doing. You can use these recorded actions as the building blocks for creating your commands.
Effective use of the History panel
If you're wondering where you will get ideas for your command's scripts, the History panel is a best place to start.
Whilst you are carrying out actions within Fireworks MX, try to watch the History Panel. We will be using the History Panel within this tutorial to review scripts involved in placing objects into the canvas and moving them around.
Follow these steps to access the scripts within the History panel for the actions you are about to carry out:
-
Create a new document.
-
Create a vector object (either rectangle or circle) within your active canvas. Move the object to another point on the canvas.
Examining the History panel, you can see that the History panel has two entries: the Rectangle tool and Move entry will form the building blocks for the command you create (see the following figure).
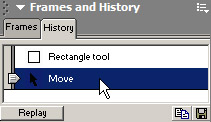
Examining the History panel for building blocks for your commandEven though you have just created a vector object on the canvas, you are not interested in this entry within the History panel, because the command you will create is involved in moving objects around the canvas in a random fashion.
-
Select the Move entry on the History panel. Then click the Options pop-up menu at the top of the panel. In the pop-up menu, select Copy Steps (see the following figure).
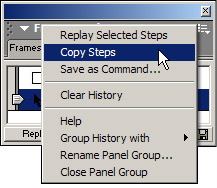
Copying steps from the History panel -
Now you can paste the Fireworks scripts and API calls into a text editor. After pasting the step into NotePad (Windows) or BBEdit (Macintosh), you see the nude script that is used to interface with Fireworks MX.
-
Save this file and name it randomizer_basic.txt.
Tip Keep an eye on the History panel for potential useful commands. Copy the steps and keep the text files in a library or series of libraries. You'll always be able to see the complete steps traced out in Fireworks MX.
Getting down and dirty with the exported scripts
Examining the script yields important information about its function, and how it can be modified to create a useful command within Flash MX.
For example, the following script is moving your selection by specific x and y coordinates across the canvas. If you were to just use this script on an object on your canvas, it would move it to X:32 and y:1. You obviously don't want to do this, because you want to introduce a random factor into the equation.
fw.getDocumentDOM().moveSelectionBy({x:32, y:1}, false, false); Also, you need to be able to copy the selection, paste it, and apply random movement to it. With this in mind, you need to return to Fireworks MX, and the vector object you just created and moved on the canvas in previous steps. then you need another snippet of script:
-
Select the vector object previously created within the active document
-
Press Control+X (Option+X) to cut the object from the canvas. Press Control+V (Option+V) to paste it back to the canvas.
-
Within the History panel, select the cut and paste steps, and repeat Steps 3 and 4 from the previous exercise (see the following figure).
-
Save the file as randomizer_additional.txt.

Copying additional copy and paste steps from the history panel
This may seem like a pointless exercise, but what it is actually doing is cutting and pasting the object and propagating the History panel with the necessary scripts to aid in your command-creation process.
Armed with this script analysis, you can move on to the next stage in the design of your SWF command: Macromedia Flash MX. There you create the interface and assign the scripts.
What you now have are the building blocks to your command: the scripts exported from the Fireworks MX History panel. You need to create a functional script that will run from within a Flash MX command.
| Cross-Reference | Chapter 24 begins the Flash portion of this book. If you are unfamiliar with using Flash you may want to get comfortable with it before continuing the next portion of this tutorial. |
Stitching the command together in Flash MX
You assembled the necessary scripts from Fireworks MX and created a process flow for the command. Now you need to create the Flash MX command using your building blocks.
Create the interface within Flash MX
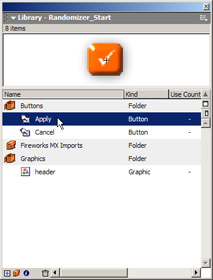
To start, launch Macromedia Flash MX. Then open the Randomizer_Start.fla file (located in the FLA folder in the downloadable tutorial files).
The premade items in this tutorial file act as the basics for creating the command. Of course, when you create your own custom commands, you will have your own images, buttons, and resources already created for the command.
Setting the scene in Flash MX
Within the file you just opened, you will see a blank canvas with only the non-interactive elements of the command (the logo). You need to build the interface, adding design and functional elements. after the user interaction elements are added, you can assign the scripts to those elements (see the following figure).
The empty interface of randomizer_start.fla within Flash MX
Setting up the Apply button
At this point in the creation process, the only things that you need to add to the interface are the Apply and Cancel buttons. To further enhance the command, you could add sliders, dials, and other interface components:
-
In the main Timeline, select the Elements layer.
-
The Apply and Cancel buttons are within the Library, choose Window ® Library to open the Library panel.
-
Double-click the Buttons folder in the Library to open it. Drag the button named Apply onto the Stage, and place to your liking (see the following figure).
Adding the Apply button from the Library panel in Flash MX to the active Stage -
Click the Apply button to select it.
-
In the Instance Name text box on the Property inspector, name the instance of the button apply.
Note To preserve the original tutorial file, rename this FLA file as your working copy and save your file to another folder.
-
Press F9 to open the Actions panel.
-
As you are using a button you need to add triggers to capture the execution of the command. The event handler in this instance is the release of the mouse button. On the Actions panel, click the View options button, and select Expert Mode. Add the following code in the Actions panel:
on (release) { }
This code forms the basis for the button trigger, and your specific code goes in between the two curly brackets to create the behaviour for the command (see the following figure). You carry out the same function later in the tutorial for the Cancel button.
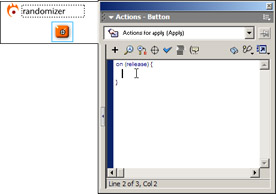
Adding the ActionScript to the Apply button
Adding Fireworks MX functionality to the button
To add functionality to the button, you need to add Fireworks MX API routines into the ActionScript, including all necessary parameters. As an example of this, the Fireworks MX API call is the following:
moveSelectionBy({x:100, y:100}, false, false); This script tells Fireworks to move the currently selected item by 100 pixels along the x axis and 100 pixels along the y axis. You can replace these numbers with parameters to suit your needs. To produce a truly random effect, these need to be replaced by random values. What you are now going to do is to add certain API calls to your Flash MX movie.
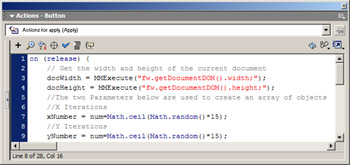
To make this a dynamic effect, you need to be able to apply the effect across the whole of the canvas, whatever the width and height of the canvas. To do this, you need to retrieve the width and height of the current document. In the Actions panel, you can add a Fireworks MX API call to retrieve that information. This particular API call cannot be retrieved via the History panel, but is available from the Extending Fireworks MX documentation available from the Macromedia Web site. The first line of the following code is a JavaScript-compliant comment that contains information about what the line(s) of code below it are created to do. Always try to comment your code, so you can quickly understand what its doing when you may come back to it.
// Get the width and height of the current document docWidth = MMExecute("fw.getDocumentDOM().width;"); docHeight = MMExecute("fw.getDocumentDOM().height;"); The second and third lines are Fireworks MX API calls, which are nested within a container which is then passed to Fireworks MX for execution.
You could translate this code to read like this:
MMExecute("...Fireworks MX API routine and parameters..."); The nested API call is as follows:
fw.getDocumentDOM().height;
This retrieves the height (in this example) of the current document, whereas the previous line retrieves the width of the document. Both are assigned to variables within the Apply button for later use.
You now need to create a number of iterations of the selected object on the canvas that you want to apply the effect. The following code snippet sits below the code you just entered within the Actions panel.
//The two Parameters below are used to create an array of objects //X Iterations xNumber = num=Math.ceil(Math.random()*15); //Y Iterations yNumber = num=Math.ceil(Math.random()*15);
This produces a random number (rounded up) between 1 and 15 for both variables xNumber and yNumber, so it will produce a random number of duplicates across and down within the active canvas. Using the hard-coded value of 15 here produces between 2 and 225 random objects on the canvas later in the tutorial. The number here does not have to be 15, it is used to illustrate the command within Fireworks MX. The following figure shows the code in the Actions panel.
| Note | You have hard coded the values here to produce a random number of objects. You could also have user input controls, such as text boxes, dials, or sliders, to control these values. |
Adding the ActionScript to the Apply button to get the document height and width, and to assign random values to variables
So far you have retrieved the active document's width and height, assigned these to variables, and assigned two random numbers between 1 and 15 for the number of times the command is to be repeated.
You now need to begin the process of duplicating the selected object on the canvas and moving to a new position. This can be simplified in the following steps.
-
Cut selected object from canvas.
-
Start a loop based on number of Y iterations and create random values for X and Y placement of objects based on document width and height.
-
Start a loop based on number of X Iterations. Create random values for X and Y placement of objects based on document width and height.
-
Paste your selection.
-
Moveyour selection to random position.
-
Close the X loop.
-
Close the Y loop.
-
Write an End command and return focus to Fireworks MX.
-
With the Apply button still selected, paste the following line of code that you exported earlier from the History panel below your last line of code within the on (release) event trigger to cut the selected object from the canvas, noting how you encapsulate it within the container MMExecute(""); to pass the information to the Fireworks API.
//Cut the selected object MMExecute("fw.getDocumentDOM().clipCut();"); Next you need to create a nested loop that takes the variables assigned earlier and creates between 1 and 15 objects on the x axis and between 1 and 15 objects on the y axis.
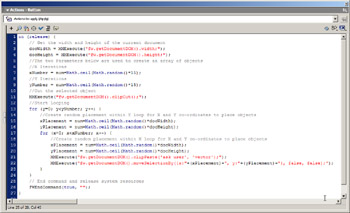
First create the y loop. With the Apply button selected, and beneath the last line of code added in Step 4 within the Actions panel, add the following code:
for (y=0; y<yNumber; y++) { } This code tells what is encapsulated between the curly brackets {} to be executed while y is less than yNumber (the random number you created earlier). Every time you step through the loop, the variable y is incremented by 1 by the command y++.
Now add the following code into the mix, to create the x loop within the existing y loop (see the following figure):
for (x=0; x<xNumber; x++) { } You should end up with the following nested loop:
for (y=0; y<yNumber; y++) { for (x=0; x<xNumber; x++) { } } 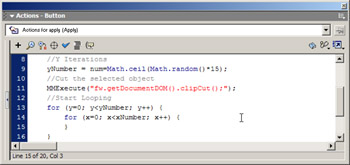
Adding the ActionScript to the Apply button to create a nested loop based on random variables
The reason for creating a nested loop, is that the number of x and y iterations of duplication will usually be and both loops will need to be able to carry out the actions and FW API calls contained within.
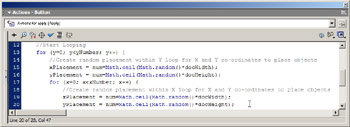
Now that the basics of the loop are constructed, you need to create variables to hold the position of the object and deine where to place it on the canvas. To do this, you will assign a random value based on the document width and height to work out the relative x and y positions for the object. The setting of these random values needs to be recreated every time the loop is parsed so that they are unique values.
Within the first curly bracket of the y loop, add the following code:
//Create random placement within Y loop for X and Y co-ordinates to place objects xPlacement = num=Math.ceil(Math.random()*docWidth); yPlacement = num=Math.ceil(Math.random()*docHeight);
This code creates a value from 1 to your maximum document height or width for x and y values. Later you use these new variables (xPlacement, yPlacement) to randomly move your object on the canvas.
Repeat adding this code within the opening curly bracket of the x loop, renaming the comment accordingly to reflect which loop it is for (see the following figure).
Adding the ActionScript to the Apply button to dynamically assign random values to the variables xPlacement and yPlacement
Add the following line to the Actions panel just below the code you added earlier for the x loop. This code pastes your object to the active canvas:
MMExecute("fw.getDocumentDOM().clipPaste('ask user', 'vector');"); Now that you have pasted the object to the canvas, you need to move it based on the random x and y parameters you create within the x and y loops. Add the following code below the line you added above.
MMExecute("fw.getDocumentDOM().moveSelectionBy({x:"+(xPlacement)+", y:"+(yPlacement)+"}, false, false);"); This is essentially the script that you exported from the History panel earlier, but with the random values from the x and y loops.
Your command is nearly complete. All that remains for the Apply button is to insert the close the command, as follows:
// End command and release system resources FWEndCommand(true, "");
This line of code occurs at the end of the code stream and returns the user to the active document after executing the command. The following figure shows the final ActionScript for the Randomizer command.
| Note | There is an alternative option for this code, which is changing the true value to false. This option means that the user stays within the command. The double quotes that you see at the end can contain a string of text, or a variable and are useful for feeding alerts to the user. |
Creating the Cancel button
Finally you add the Cancel button. After establishing the event handler, you need to add only a single line of code. This API call carries out the task of exiting the command and returning focus to the main Fireworks MX environment.:
-
Select the elements layer.
-
Open the Buttons folder in the Library and drag an instance of the Cancel button onto the Stage. Give this Cancel button an instance name of cancel in the Instance Name text box on the Property inspector.
-
Select the Cancel button on the Stage. Press F9 to open the Actions panel. Switch to Expert mode.
-
Add the on (release) code as you did in step 7 of the Apply button section.
Final ActionScript for the Randomizer command within the Actions panel of Flash MX -
Add the following code to the Actions panel:
// End command and release system resources FWEndCommand(true, "");
Now that you have isolated the requirements for the command, isolated code from the History Panel, and created a hybrid ActionScript / Fireworks MX API code routine within Flash MX, its time to test your command.
Adding error checking
Not every command you create will need error checking within it. However for this particular command, you need to check that two conditions exist for the interface to appear. These are as follows:
-
There is an open document within Fireworks MX.
-
There is an active selection within that document.
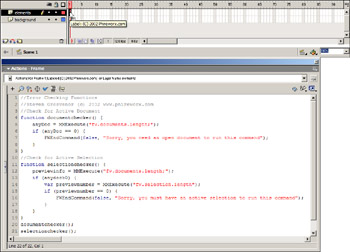
With the first frame of the movie selected, press F9 to open the Actions panel and switch to Expert mode. Add the following code:
//Error Checking Functions //Steven Grosvenor (c) 2002 www.phireworx.com //Check for Active Document function documentchecker() { anyDoc = MMExecute("fw.documents.length;"); if (anyDoc == 0) { FWEndCommand(false, "Sorry, you need an open document to run this command"); } } //Check for Active Selection function selectionchecker() { previewinfo = MMExecute("fw.documents.length;"); if (anydoc>0) { var previewnumber = MMExecute("fw.selection.length"); if (previewnumber == 0) { FWEndCommand(false, "Sorry, you must have an active selection to run this command"); } } } documentchecker(); selectionchecker(); These two functions (documentchecker and selectionchecker) check for an active document and an active selection within that document and are called when the command is selected from the Commands menu within Fireworks MX. These two functions use the following built-in Fireworks API routines:
fw.documents.length; fw.selection.length
The results of these API routines are fed back into the function to create conditional checks for the correct conditions to carry on and present the interface to the user. If the conditions are not met, the user is presented with an alert created by the the FWEndCommand within Fireworks MX. The alert informs users that they need an active document or an active selection. The following figure shows the final Error Checking added to the command.
Final Error Checking added to the command for completion of user experience
Exporting your command and testing in Fireworks MX
After creating the code for the command, it's time to test your creation by exporting the command as an SWF file directly to Fireworks MX's command folder:
-
In Macromedia Flash MX, save your working copy FLA file. Then choose File ® Export Movie.
-
In the Export Movie dialog box, navigate to and select the Configuration ® Commands folder in the Fireworks MX application folder.
-
Name the file Randomizer.swf. Click Save.
-
In the Export Flash Player dialog box, use the default settings, making sure to select Flash 6 for the version (see the following figure).
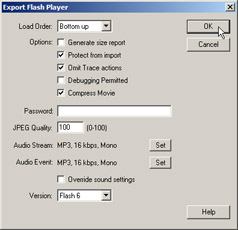
Exporting your Flash MX command into the Fireworks MX command folder -
Click OK. The SWF file is now located in within the Fireworks MX application.
Testing your command
You are now ready to take you newly created Randomizer command for a test run within Fireworks MX.
-
Launch Fireworks MX. Create a new 400 × 400 pixel document (with default settings).
-
Create a new vector object on the canvas, and with the object selected choose Commands ® Randomizer. The Randomizer interface should now appear.
-
Click the Apply button. Your selected object is duplicated and thrown around the canvas in a truly random manner (see the following figure).
If you appear to be having problems, or your command isn't working, check your code and the settings for the text input boxes against the code and settings in the Randomizer_final.fla file (located in the source file's FLA folder).
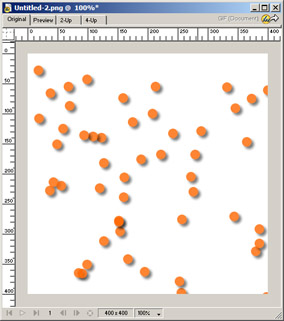
The Randomizer command in action within Fireworks MX
Resources
You should become familiar with the Extending Fireworks MX documentation before creating commands for public distribution. A good solid understanding of JavaScript and Flash MX ActionScript will stand you in good stead for creating appealing and useful commands.
For help with packaging a command as an MXP file for the Macromedia Extension Manager, see, "Creating and Submitting New Extension" (in the Extension Manager's Help menu) and the "Macromedia Extension File Format" document (PDF).
Enhancements to this command
Using the following ideas, the History panel, and a little perseverance, you can create exciting and useful commands within Fireworks MX:
-
Input for x and y iterations (text input, dials, sliders, and so on)
-
Random scaling
-
Random rotation
|
| < Day Day Up > |
|
EAN: 2147483647
Pages: 491