Altering Paths
|
| < Day Day Up > |
|
Here are two techniques you can use to achieve effects that you can only achieve with bitmap objects in other image editing programs.
This exercise shows you how to use the Alter Paths functions:
-
Open a new document that is 450px wide by 150px tall. Set the canvas color to blue.
-
Add some large-sized text and style it. This example uses size 88pt Futura Book, filled and with a linear Spectrum gradient.
-
Make a copy of the text object. Use the Layers panel eye icon to hide one of the text objects. Figure 18-10 shows the text and the Layers panel with the two objects.
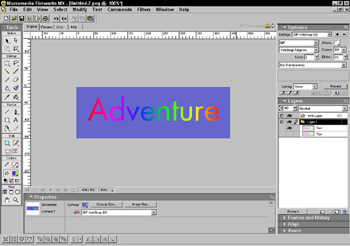
Figure 18-10: The text has a linear gradient fill. The copied text object is hidden in the Layers panel. -
Select the text and choose Text ® Convert to Paths.
-
Choose Modify ® Ungroup; then choose Modify ® Combine Paths ® Join. Now choose Modify ® Alter Paths ® Expand Stroke. Enter 3 for the Width and click OK.
-
Add a drop shadow using the default settings. Figure 18-11 shows the result.

Figure 18-11: The Expand operation applied to the text -
Click the eye icon in the Layers panel to hide this text and click to turn on the copied version.
-
Select the text, make a copy, and paste. Select the bottom text and change the fill to black.
-
Now with the black text selected, choose Text ® Convert to Paths; then choose Modify ® Ungroup, and choose Modify ® Combine Paths ® Join.
Cross-Reference See Chapter 17 for a better understanding of Combine operations, if needed.
-
Choose Modify ® Alter Paths ® Inset Path. The Inset Path dialog box opens. Click Outside for the direction and enter 3 for the width. Click OK.
-
Be sure the black text is below the other text object. Add a drop shadow to the black text object (Figure 18-12).

Figure 18-12: The text size increased using the Inset Path command
You expanded the size of the text by a pixel amount, without increasing the spaces around the letterforms. Scaling or adjusting the text size also increases the amount of space between the letterforms. This technique is a great way to add custom bevels and effects to your text or objects. A copy of this exercise is in your Chapter 18 images folder. Try turning off the visibility of the Inset Path text and turn on the Expand Path text to see yet another effect.
Power Text Mask, by Japi Honoo
I have spent a lot of time developing a process of making a futuristic skin to apply to a shape. It's done totally as a vector and remains editable. You'll be able to change the object's properties such as color, texture, and effects.
There is a bit of masking being done in this tutorial. If you need to know more about masking refer to Chapter 19.
To learn how to do some amazing things in Fireworks, follow these steps:
-
Open a new document (File ® New) and use a width of 560 and a height of 200 with a white canvas color.
-
Select the Text tool and use an appropriate font and size. I used the following values:
Font: Garamond Bold
Size: 230
Color: #36524F
The text size slider only goes to 99 but you can type in a number and press the Enter/Return key.
-
Type the word bible in lowercase letters.
-
With the text selected, choose Text ® Convert to Paths.
-
In the Property inspector access the Effects menu and choose Bevel and Emboss ® Inner Bevel and use these values:
Bevel Edge Shape: Smooth
Width: 35
Opacity: 100%
Softness: 10
Angle: 135
Button Preset: Raised
-
From the Effects menu (Property inspector) choose Adjust Color ® Curves and enter 43 for input and 25 for the output. Notice the point added to the curve.
It's important to use the Effects menu and not the Filters menu. Curves used from the Filter menu convert your vector object into a bitmap.
-
Access the Effects menu and choose Adjust Color ® Brightness and Contrast. Type in 9 for Brightness and 29 for Contrast.
-
Add the Brightness and Contrast effect one more time using the same values.
-
Access the Layer Options menu and click Duplicate Layer. Enter 2 for the Number and click the After Current Layer option to select it. Click OK to close the dialog box.
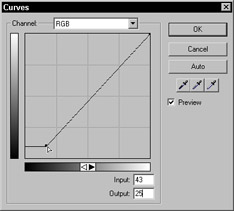
The Curve dialog box with the input and output settings adjusted
The text converted to paths, an inner bevel effect, and the brightness and contrast effect added twice -
Rename the layers, name the top layer Text1, the next Text2, and the bottom one Text3.
-
Select the Text3 layer and ungroup the object (Ctrl [Command]+Shift+G). Notice how the effects are removed after you ungroup the object.
-
Chose Modify ® Alter Path ® Inset Path. In the Inset Path dialog box, enter these values:
Direction: Inside
Width: 2
Corners: the icon on the right
Miter Limit: 10
Click OK
-
While the object is still selected, group it (Ctrl [Command]+G).
-
Repeat Steps 5–8 to add the bevel, curve, and brightness effects back to this copy of the text.
Adding the gold skin
To add gold skin to the text, follow these steps:
-
Click the eye icon in the Layers panel next to the Text3 and the Text1 layers to hide them.
-
Click the Text2 layer to select the object.
-
Click a fill color box and change the color to #9F8146.
-
To add guides to the document, be sure your rulers are visible; then drag out four horizontal guides. Double-click each guide and set these locations:
35.
98.
134.
161.
-
Draw two rectangles between the top two guides and the bottom two guides as shown here. Fill both rectangles with white.
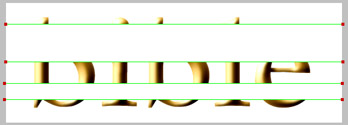
Two rectangles drawn over the text and filled with white for use as a mask -
Shift+select the rectangles and copy (Control/Command+C) and paste into the Text1 layer.
-
Back in the Text2 layer, group the two rectangles and then shift+select the text object.
-
Choose Modify ® Mask ® Group as Mask.
The rectangles are above the text object prior to applying the mask.
-
Add a drop shadow by accessing the Effects menu and choosing Shadow and Glow ® Drop Shadow using these values:
Distance: 2
Opacity: 80%
Softness: 3
Angle: 300
-
Turn the visibility back on for the Text1 and Text3 shapes.
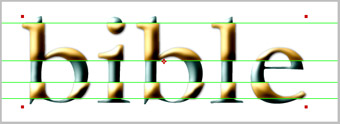
The text object with the gold skin applied using a mask
Apply the gray skin
To add the gray skin over the text, follow these steps:
-
Hide the visibility of Text2 and Text3 layers.
-
Select the grouped text object inthe Text1 layer and change the color fill to #000000 (black).
-
In the Property inspector, select a texture of Metal; move the percentage slide to 50%.
-
You don't need the two brightness and contrast effects for this layer. In the Effects list you can select the effect name and then click the minus sign to delete it or do it the way I like to use. Click the check mark, and an x that disables the effect appears. It's still there if you decide to use it.

The Property inspector showing the metal texture added and two effects disabled -
Select the top rectangle; in the Property inspector make it 4 pixels shorter (about 59 pixels high). Press the down arrow key twice.
-
Select the bottom rectangle, in the Property inspector; make it 4 pixels shorter (about 23 pixels high). Press the down arrow key twice.
-
Group the two rectangles.
-
Shift+select the rectangles that are on top of the text and the text. Choose Modify ® Mask ® Paste as Mask.
-
Make all the layers visible and you have some pretty snazzy text
-
Select the Text3 layer and add a drop shadow using a color of #333333 and the default settings.
-
If you want a background, draw a rectangle over the document in Text3 layer and drag it below the text. Fill with a pattern. I used a marble image. This is the final result (see the color section). This file is saved as bible.png in the Chapter 18 images folder.
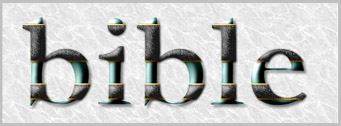
The futuristic text on a background
|
| < Day Day Up > |
|
EAN: 2147483647
Pages: 491