ASP.NET Security
Overview
If anyone tells you that security ends with the OS, they are dead wrong. Many times excellent network and host-based security has been bypassed exposing the very heart of the enterprise: all because of poor SQL Server configuration. That said...there is no "patch" for stupidity.
-from www.sqlsecurity.com
Many developers have learned on their own that security is not a feature that can be easily added to existing applications or introduced late in the development stage. Security is inherently tied to the functions of an application and should be planned as one of the first features, very early at the design level. As is the case with scalability, security has become much more important in the past few years because of the success of the Internet.
By nature, Web applications are subject to several types of attacks whose damage and impact can vary quite a bit, depending on the characteristics of the application itself. The most secure Web application is the application that actually resists attacks, not the application just designed to. Security is a rather intricate puzzle whose solution varies from one application to another. The important thing to remember is that, more often than not, security is manifested through a successful mix of application-level and system-level measures.
How can we design and code secure ASP.NET applications? First of all, the code can be secure or insecure regardless of the hosting platform. In addition, security is not a physical quantity subject to absolute measurement. Security is strictly related to the application's usage, its popularity, and the type of users who connect to it and work with it. Paradoxically, a poorly secured application that isn't attractive to hackers can be perceived as being much more secure than a well-armored application with just one loophole or two. Successful attacks are possible through holes in the system-level and application-level security apparatus. When it comes to security, don't look for a magic wand to do the job for you. Security is a state of mind, and insecurity is often the result of loose coding styles if not true programming laziness.
That said, ASP.NET simplifies programming secure applications by providing a built-in infrastructure that supplies application-level protection against unauthorized access to Web pages. Be aware, though, that this kind of security is only one side of the coin. A really secure Web site is especially well protected against server attacks, which can sneakily be used to bypass the highest walls of the application logic.
In this chapter, we will discuss both server-side IIS authentication mechanisms (such as Integrated Windows, Basic, and Digest) and ASP.NET application-side authentication mechanisms (such as Windows, Forms, and Passport).
Writing Secure Code
Writing secure Web applications is definitely a complicated task, at least as complex and variegated as writing a scalable application can be. The best word I can think of to describe the articulated topology of the subject is multidimensional. Security is multidimensional because it's not a physical quantity like RAM memory or hard-drive space. It cannot be measured in absolute terms because it mostly depends on the type and the frequency of attacks, and it is also a relative concept in terms of the possible consequences and the impact it might have on the target of the attack. Security is not the same for all applications and does come at a cost.
The only certain thing about security is that all attacks are conducted to exploit a hole in the system. Let's review the most common types of attacks and then look at a few golden rules to proactively defend your code.
Types of Web Attacks
Web attacks can be catalogued in two main groups: passive and active. Passive attacks are limited to monitoring information being exchanged between trusted sides acting over a network. Packets are sniffed and grabbed, and the contained information is consumed outside the native, legitimate environment. Confidentiality is broken, and the stolen information is often used to build the foundation of new and more intrusive attacks.
Active attacks work to alter and forge the information being exchanged, to inject false data, and to corrupt existing data. Other typical goals of active attacks are blocking the service and the network itself. To block a service, intruders can kill threads, violate the memory, isolate the machine on the network, or flood the server with fake requests.
Security is important because of the physical damage resulting from the theft or corruption of the data. In some cases, though, security is even more important to preserve the reputation of the company that is the target of the attack.
Passive Attacks
Let's review the most common types of passive attacks your network might be subject to and the countermeasures needed to defend.
- Eavesdropping A large part of network communications are still based on clear text, which makes it easy for an attacker to eavesdrop and read the packets of information being exchanged. Detecting eavesdroppers is generally one of the hardest security problems that an administrator faces in a corporate network. Typical eavesdropping attacks are conducted using sniffers—that is, ad hoc tools or devices capable of reading unencrypted network packets as they are transported on the network. There is only one solution to this problem: encryption. Strongly encrypted data makes it extremely hard and expensive for the intruder to decode an ongoing communication. Of course, the problem could also be addressed at its root by reinforcing the firewall around the enterprise to prevent sniffers from operating.
- Man-in-the-Middle In the man-in-the-middle attack scenario, a third user is silently and transparently filtering information two other users are exchanging. This attack is more active than eavesdropping and can include the attacker, for example, redirecting packets. Man-in-the-middle attacks are insidious because the attacker acts on behalf of you and actively communicates with other members of the network while passively listening to the information traveling on the wire.
Active Attacks
As you can easily understand, active attacks are much more dangerous because they configure an active role by attackers. In most cases, active attacks are preceded by passive monitoring and are often planned using critical information that was stolen during these prior passive, and perhaps unnoticed, attacks.
- Data Modification Data modification is the typical next step of a man-in-the-middle attack. The intruder sits between two sides and modifies data in the packet being transferred. Data modification often occurs blindly—that is, without the attacker knowing who the sender or receiver is.
- IP Address Spoofing Identity spoofing consists of using special programs to build IP packets that apparently originate from valid and trusted addresses inside the enterprise. Once the attacker has used the counterfeit packets to gain access to the network, he can simply eavesdrop or even proceed with deeper attacks.
- Password Attack Another alternative for an attacker is identity spoofing, which allows an attacker to exploit weak passwords to gain entry into a system. In many systems, access is granted by identity—that is, after a user name and a password are entered and verified. When an attacker finds a valid user account, she automatically gains the same rights as the real user. In the very unfortunate, but not unlikely, case in which the cloned account has administrative privileges, the attacker has made a huge score. She can obtain lists of valid user and computer names and network information; modify server and network configurations; and alter, reroute, or delete data.
- Compromised Key Encrypted communications are based on a key that is used to camouflage the information being exchanged. Normally, obtaining a key is a resource-intensive process, but depending on the value of the information being sought, an attacker might still see the effort as worthwhile. With the compromised key, the attacker can decrypt sensitive data and compute additional keys to unprotect other secured communications.
- Denial-of-Service The denial-of-service (DoS) attack is aimed at stopping a particular service from running, thus preventing valid users from accessing the network. Once an attacker has gained access to a system, he could circulate invalid data, which might ultimately cause the abnormal termination of applications and services. The attacker can flood the network with fake requests, thus overloading the system and blocking regular traffic. The attack rarely produces serious damage to the network itself, but it decreases user productivity and can seriously hurt the reputation of the company.
- Web Server Attacks A Web server normally implements a firewall to defend the internal applications from external attacks. An application-layer attack violates the defensive system of the server and lets the attacker bypass normal access controls. Once in the demilitarized zone, the attacker can virtually do everything. She can introduce and propagate viruses, install a sniffer to analyze the network, terminate applications, and disable security controls to set the ground for future attacks.
Golden Rules for Secure Coding
As mentioned, Web attacks always originate from holes in the security apparatus. Holes can be caused by a number of circumstances and behaviors. Sometimes the attack is made possible by unknown and unrevealed bugs in the Web server core code; sometimes, though, the attack exploits an outdated version of the system code in which recent patches and hotfixes have not been applied. In other situations, attacks find fertile ground in nave implementations of Web applications or careless use (or should I have said misuse) of built-in functions.
The following sections discuss a few golden rules every developer should be aware of. Even the strictest implementation of these security rules can't guarantee a bullet-proof Web site. However, by following these rules, you certainly make it harder for hackers to break in and crack your system.
Don't Trust
The first rule in security is, don't trust. Speaking of software security, this general-purpose rule translates to a more precise and definite adage, don't trust user input. User input is the main form of interaction for applications in general and Web applications in particular. If you don't strictly validate the data you're going to bring in, you automatically become a prime candidate to be the victim of a number of attacks.
Buffer Overruns
Any code that is going to accept input from an external source—that is, any method or function that takes a variable-length argument—should have clear in advance the characteristics and the size of the incoming information. When the method is finally called, it should validate the data first, before doing anything else. You should make sure that the string is not too long or too short for the use you're making of it. You should ensure that no disallowed character is included and, whenever possible, that the overall format of the string is compatible with a well-known pattern.
SQL Injections
SQL injection is a blanket term used to describe the act of passing SQL code into an application in a format that goes far beyond the original intentions of the developer. SQL injections are the perfect example of a creative use of buffer overruns. It is a common practice in applications to build SQL commands by concatenating constant strings and user arguments. Typically, the user argument has to be a key value needed to select one or more records. However, if not strongly validated, an innocuous key value can easily become malicious code when padded with extra statements. Let's consider the following code snippet:
void RunCommand(string empID)
{
 StringBuilder sb = new StringBuilder();
 sb.Append("SELECT * FROM customers WHERE customerid='");
 sb.Append(empID);
 sb.Append("'");

}
}
The method takes a string argument that, in the developer's mind, is expected to be a plain ID. Assume for a moment that the empID argument contains more code, as shown here:
ALFKI' DROP TABLE employees --
The final SQL statement looks like the following:
SELECT * FROM customers WHERE customerid='ALFKI'
DROP TABLE employees --
As you can see, a second command has been added and will be blissfully executed. Notice that the --comment symbol just tells the database to ignore what will then be added by the rest of the code.
A simple trick to somewhat mitigate, but not eliminate, the impact of SQL injection is passing quoted key values. Suppose you're using the following base command:
"SELECT * FROM customers WHERE customerpara">Note that the final quote is missing because you now assume that quotes will be provided by the key value. In this case, the quote character the attacker would add will break the SQL code and no code will be run. Don't think that you've eliminated SQL attacks, however. This is a very small line of defense. Much more effective would be avoiding rich accounts and stratifying the data access code by using business objects and stored procedures. In ADO.NET, enforcing strong typing in the parameters of the command objects is another fundamental security tip.
Another key aspect to consider is the account that is used to perform any database operation. SQL injections are especially harmful if combined with a lazy choice of user accounts. The more the running account is allowed to do, the more you're exposing your system to attacks. You should always use an ad hoc account with exactly the privileges needed to accomplish the particular task it's assigned. In real-world applications, the use of the sa (system administrator) user account is terribly dangerous because it would give attackers the power to conquer the database.
| Caution |
In this book, admittedly, we're not always practicing security as we preach it. In many examples, we're using the sa account to connect to the database. (In addition, we also use the blank password.) While these methods are strongly discouraged for any sort of production environment, they still make sense in the demos of a book. Using sa and the blank password, in fact, makes it much easier for you to run the samples without the need to configure anything. This is the only acceptable exception to the law. In real-world scenarios, saving configuration work might lead straight to security holes. |
Detecting SQL injections is difficult, and you usually detect it when it's too late. Code review is the only effective precaution. Using code generators to write Create, Read, Update, and Delete methods can also be useful to some extent. Although generators are often limited, in general it's much better to use them to save time than to save development time by skipping security reviews. Finally, note that SQL injections are not an exclusive feature (so to speak) of Microsoft SQL Server. Any database can be subject to SQL injections. For more information on SQL and SQL Server security, visit http://www.sqlsecurity.com.
Keep a Low Profile
In software, and especially when security is involved, keeping a low profile is key to reducing the likelihood of being attacked. Any piece of software exposed to the Internet (even if it's only through e-mail) should have restrictive security policies. Translated into practice, this recommendation says you should always grant the least possible amount of privileges to any user. If a user is given rights to write and he needs only to read, he will probably never exploit the write capability, but some malicious code, paradoxically, could on behalf of him.
The low profile rule pays off also when you look at it from the server code perspective. If you don't need a certain service to be up and running all the time to serve 80 percent or more of the clients, by all means, you should disable it. Unmonitored—because they are rarely used—running services are an ideal platform for intruders to gain entrance. Take some time to review all the code on the Web server machine, and make sure you shut down all utilities and services you don't really need.
Cross-Site Scripting
Another common security error is outputting unfiltered request data to the browser. If your pages retrieve data directly from the Request object, you should avoid writing that text directly to Response. If not validated, one of the query strings could contain dangerous script code, which could easily access your cookie data and post it to another external Web site. In this case, data validation is a key countermeasure. For example, you can implement validation using regular expressions to ensure the text has the right length and does not include potentially dangerous characters. If you can't avoid using input as direct output, at least get in the habit of encoding text in HTML before sending it out to the browser.
In ASP.NET 1.1, the machine.config file defines in the section a new attribute named ValidateRequest. The goal of this attribute is raising a (not too high) barrier against potentially dangerous script-code injections. The ValidateRequest option is turned on by default and can be controlled on a per-page basis using a new @Page attribute—ValidateRequest. (Note that this won't work for version 1.0 of ASP.NET.)
For performance reasons, ValidateRequest is realized through a hard-coded parser that basically passes the contents of cookies, form fields, and query strings through a regular expression. If a potentially dangerous client input value is detected, the processing of the request is aborted and an HTTP security exception is thrown. Let's consider the following page called, say, test.aspx:
<% Response.Write(Request.QueryString("Code")) %>
Try calling the page by passing some script code embedded in the URL, as shown here:
http://expo-two/test.aspx?code=
In this case, ASP.NET 1.1 detects a potentially dangerous situation and raises an HttpRequestValidationException exception, as shown in Figure 15-1.
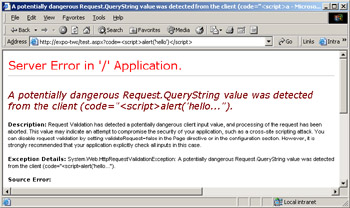
Figure 15-1: The ASP.NET runtime engine detected a potentially dangerous query string.
If for some reason your application legitimately needs to process script code that is passed through the URL, you can disable request validation. You accomplish this by setting the ValidateRequest attribute to false in the @Page directive or in the configuration file. However, it is strongly recommended, in this case, that you replace the standard code with some sort of application-specific validation code to block code-injection attempts. (Replacing ValidateRequest with a more specific barrier is generally a good thing to do to increase security.)
For more information about cross-site scripting, visit the following Web site: http://www.cert.org/advisories/CA-2000-02.html.
Configuring ASP NET Applications for Security
The rules and warnings discussed so far are general-purpose pills of wisdom that apply to all types of Web applications and, in some cases, to all software applications. Having an up-to-date server configuration in which patches and hot-fixes are regularly applied is the first step in the building of a solid and secure system. The server configuration should also be as lean as possible, with all unused services stopped and the minimum set of privileges granted to all that have to run.
A consistent and effective set of policies should be applied to security. Using a couple of configuration snap-ins such as the Security Templates and Security Configuration And Analysis, you can define your own security templates and apply them to the various machines in the network.
| Note |
You can install the aforementioned tools by running the Microsoft Management Console (mmc.exe) from the command line and then selecting Add/Remove Snap-in from the File menu. Add the tools you need from the list of available snap-ins, and save the changes. |
Using the Security Configuration And Analysis tool, you can define policies for passwords, account lockout, and auditing. A good starting point is the Security Configuration Template for High Security Web Server shown in Figure 15-2. It is named hisecweb.inf, and you can download it from the following URL: http:// www.microsoft.com/downloads/.
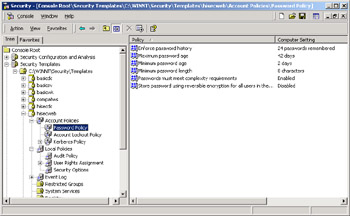
Figure 15-2: The hisecweb.inf file and its default settings for strong passwords.
When setting up the system software, you should look at the overall configuration of the application infrastructure. This entails looking at password definition and storage, database security configuration, and user accounts.
Choosing Strong Passwords
Do not undervalue the importance of using strong passwords. Passwords are sometimes the only barrier between hackers and a series of potentially harmful operations. Strong passwords meet at least the following requirements:
- Must be at least eight characters long
- Contain elements from any of the following groups: lowercase letters, uppercase letters, nonalphanumeric symbols (punctuation, *, #, $, and so forth), and digits
- Expire frequently; at least every 90 days
As a policy, you could also impose that a password history is maintained to avoid the same password being renewed over and over again. Other stricter rules are also possible, such as requiring certain elements fall within a certain range of positions. That said, remember that longer or complex passwords do not entirely eliminate the risk of brute-force attacks—attacks in which hackers try all possible combinations of characters to guess the right password. However, the longer and more articulated the password is, the more time it will take an attacker to decrypt it. Secure passwords, combined with an effective auditing policy, should significantly increase the likelihood of detecting an attack.
Storing Passwords
Let's say it upfront: there's no absolutely safe place in which critical data such as a password can be stored. In normal conditions, having the password stored as plain text in a file is not a problem per se. However, in the event of a successful attack, your critical password would be easily stolen.
If the password serves to connect to SQL Server, you might want to opt for trusted connections and Microsoft Windows and SQL Server integrated security. In this case, you need to configure the ASPNET account as a valid SQL Server login (more on this later in the "ASP.NET and SQL Server" section). Otherwise, you can store the password in a database or in a file located outside the Web application subtree. Again, this would not give you a 100 percent guarantee of inviolability, but it would certainly make it harder for anyone to hack the system.
Passwords and Encryption
Encrypting the password is certainly helpful in that it would add yet another layer of complexity. Do not try, though, to run your own homemade encryption algorithms. Serious hackers would break nave schemes in a few hours. If you opt for encryption, don't be afraid to use the .NET Framework cryptography model. You don't have to be an expert to use those classes, which have proven to be more effective than homemade algorithms.
The .NET Framework provides implementations of many standard cryptographic algorithms. To encrypt and decrypt data, you must use a key with an encryption algorithm that transforms the data. The use of the key lets us distinguish two main families of algorithms: symmetric and asymmetric.
Symmetric algorithms have a single key and use this key for both encryption and decryption. The key must be known only to the sender and the receiver. The DESCryptoServiceProvider class is an implementation of a symmetric algorithm.
Passwords and Basic Combinatorial Calculus
If you're not too convinced about the importance of strong passwords, have a look at the coming list, which describes the possible permutations of strings that a brute-force attack has to walk through to guess a password. To start out, let's suppose you decided that a five-characters password made of only lowercase or uppercase letters would suffice. Given an alphabet containing 26 letters, the number of five-character substrings is obtained through the following formula, in which the exclamation point (!) denotes the factorial of the number:
26! / (26-5)!
As alphabet and password length vary, the number of permutations changes as follows:
- Alphabet: Only lowercase (or only uppercase). 26 characters; Length: 5; Permutations: 7,893,600
- Alphabet: Only lowercase (or only uppercase). 26 characters; Length: 6; Permutations: 165,765,600
- Alphabet: Lowercase and uppercase. 52 characters; Length: 5; Permutations: 311,875,200
- Alphabet: Lowercase and uppercase. 52 characters; Length: 6; Permutations: 14,658,134,400
A hacker would probably employ an optimized combinatorial algorithm so that the effective number of attempts is smaller. However, my only goal here is to show the order of magnitude your password security grows just by making the password longer or adding an extra group of characters.
Asymmetric, or public-key, algorithms require that both sender and receiver maintain a pair of keys: a private key and a public key. The public key can be made available to anyone and is used for encoding data that is sent to a receiver. The private key must be safely stored and used only for decoding messages encoded using the receiver's public key. RSACryptoServiceProvider is an implementation of a public-key algorithm.
Typically, symmetric encryption is performed on streams and is therefore useful to encrypt large amounts of data. Asymmetric encryption is performed on a small number of bytes and is therefore only useful for small amounts of data such as a password.
The ASPNET Account
Once the system has been configured for security, you can start considering how to configure the ASP.NET runtime engine for security. The ASP.NET worker process does not run under the aegis of the almighty SYSTEM account and does not impersonate by default. As we saw in Chapter 12, "Configuration and Deployment," you can configure the ASPNET account through the section in the machine.config file. The following code snippet shows the default settings:
The user name machine is a nickname for a specific account named ASPNET, which is created when the .NET Framework is installed. A 14-byte password is autogenerated and stored in the Web server's machine LSA. The ASPNET user account can be changed, just like any other configuration setting. Note, though, that the attributes of the section cannot be overridden in a web.config file. The section is supported only in the machine.config file, and changes are not applied until Internet Information Services (IIS) is restarted.
Figure 15-3 shows that the ASPNET account belongs to the Users group and, as such, can leverage limited capabilities when processing Web pages. This fact alone makes certain programming tricks much harder to accomplish, but from the security standpoint, it's certainly good news.
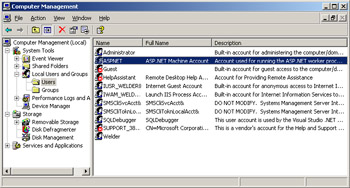
Figure 15-3: The ASPNET account shows up in the Users group.
| Note |
One particular limitation of an ASP.NET page is that it might lack the privileges to create or edit a local file. We'll see later in the "Enabling ASP.NET to Manage Local Files" section why this is so and how to work around the limitation. In my experience, though, this is the limitation that most frequently shows up in the development of serious ASP.NET applications. The bottom line is that we don't need overpowering accounts to write and run effective Web applications. More (unnecessary) privileges serve primarily to increase the risk of attacks. |
Privileges of the ASPNET Account
The ASPNET account is created in the Users group, is given a nonmodifiable and nonexpiring strong password and a minimum set of privileges. Of all the possible user rights assignments, ASPNET is granted only the following five:
- Access this computer from the network
- Deny logon locally
- Deny logon through Terminal Services
- Log on as a batch job
- Log on as a service
In addition, the account is given some NTFS permissions to operate on certain folders and create temporary files and assemblies. The folders involved are:
- .NET Framework Root Folder This folder contains some .NET Framework system assemblies that ASP.NET must be able to access. The physical folder is normally Microsoft.NETFrameworkv.1.x.xxxx and is located under the Windows folder. ASP.NET has only read and list permissions on this folder. Permissions on this folder are granted both to the ASP.NET worker-process account and the impersonated user, if any.
- Temporary ASP.NET Files This folder represents the file system subtree in which all temporary files are generated. ASP.NET is granted full control over the entire subtree. Permissions on this subtree are granted both to the ASP.NET worker-process account and the impersonated user, if any.
- Global Assembly Cache ASP.NET needs to gain read permissions on the assemblies in the global assembly cache (GAC). Permissions on this subtree are granted both to the ASP.NET worker-process account and the impersonated user, if any. The GAC is located in the WindowsAssemblyGAC folder. The GAC folder is not visible in Windows Explorer, but you can view the installed assemblies by opening the WindowsAssembly folder.
- Windows System Folder The ASP.NET process needs to access and read the System32 Windows folder to load any necessary Win32 DLLs.
- Application Root Folder The ASP.NET process needs to access and read the files that make up the Web application. The folder is typically located under InetpubWwwroot.
- Web Site Root ASP.NET might have the need to scan the root of the Web server—typically, InetpubWwwroot—looking for configuration files to read.
Some of the permissions are automatically inherited because the folder grants those privileges to everyone or to all the members of the Users group. Some are specifically set during the installation stage using the cacls.exe tool.
Who Really Runs ASP.NET Applications?
ASPNET is actually only the default account that is used to run ASP.NET pages. The role of the ASPNET account spins off as the combined effect of two settings in machine.config.
When impersonation is disabled, ASP.NET applications execute under the ASPNET account or under the account otherwise specified. If impersonation is permitted, ASP.NET applications are controlled by the Windows account authenticated through either Integrated Windows, Digest, or Basic methods. Otherwise, if anonymous access is used, ASP.NET runs under the IIS-defined account for anonymous access—typically, the IUSR_Machine account. The section in a configuration file controls the identity of the ASP.NET application. Unlike the section, the section can be set in a local web.config file. In all cases, local resources can be accessed only if the resource itself has an access control list (ACL) for the caller identity.
To change the account that executes ASP.NET applications, you can either define a custom account or impersonate a fixed identity. In the former case, you need to define a new account, possibly in the Users group. You should assign it a strong password and try to grant no more permissions than the set we discussed earlier for ASPNET. When you're done, you register the account in the machine.config file as shown here:
Storing credentials as clear text is not recommended, even though the machine.config file is considered significantly more secure than other resources because it's located outside the Web application space.
Secure Storage of Passwords
In ASP.NET 1.0, to change the ASP.NET worker process identity, to impersonate a fixed identity, or even to specify a connection string for the SQL Server session state, you need to store a password as clear text. Starting with the .NET Framework Service Pack 3, and of course in ASP.NET 1.1, you can use an encrypted password stored in the registry instead of plain text stored in a configuration file. This feature is supported by the following sections: , , and .
You can use the ASP.NET Set Registry tool (aspnet_setreg.exe) to encrypt the credentials and store them in the registry. The tool creates registry keys under the HKEY_LOCAL_MACHINE subtree and stores the encrypted user name and password there. By default, only administrators can create keys under this hive. For example, to create encrypted registry keys for the user name and password you need to store in , do the following:
aspnet_setreg.exe
 –k:"SoftwareProtected ASP.NETProcessModel"
 -u:userID
 -p:password
Figure 15-4 shows the settings in the registry after you execute the command just shown. Note that the aspnet_setreg.exe tool always creates an extra key named ASPNET_SETREG and, below that, the attributes userName and password contain encrypted data. You can change key and attribute names in the registry as needed to better camouflage them.
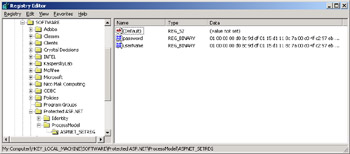
Figure 15-4: Newly created registry keys contain encrypted versions of the user ID, the password, or both for any of the critical configuration sections.
| Note |
Microsoft made available the aspnet_setreg.exe tool as part of a hotfix, as described in Knowledge Base article Q329290. The recommended way to get it, though, is through Service Pack 3 or ASP.NET 1.1. Getting the aspnet_setreg.exe tool alone is not sufficient because updates to aspnet_isapi.dll are needed too. |
The registry key is accessed by the aspnet_isapi.dll module which runs under the system account and as such can safely read the user name and password. The default ACL on the registry key, in fact, grants full control to System, Administrators, and Creator Owner accounts.
The and sections are processed by the ASP.NET worker process, whose identity might change and which is set to ASPNET by default. If you're going to have encrypted credentials for those sections, ensure that the actual ASP.NET worker process has read access to the registry keys. You can use regedt32.exe to set registry key permissions. (With Windows XP and Windows Server 2003, administrators can set registry permissions with a simple right-click in the Registry Editor (regedit.exe).)
Once the registry is set, you enter some changes into the involved configuration files (machine.config or web.config) and make the critical elements point to the registry for user ID, password, or both. You assign the userName and password attributes as shown in the following snippet. The sample text refers to the section.
registry:HKLMSOFTWAREProtected ASP.NETidentityASPNET_SETREG,userName
registry:HKLMSOFTWAREProtected ASP.NETidentityASPNET_SETREG,password
Basically, you make the attribute point to the registry path where the encrypted credentials have been stored. Note that you must explicitly mention the hive using the HKLM abbreviation. (HKLM stands for HKEY_LOCAL_MACHINE.) If you modified the default registry path, indicate the new one in the .config files. For this feature to work, you need updated versions of the aspnet_isapi.dll and the system.web assembly.
Enabling ASP.NET to Manage Local Files
In some situations, an ASP.NET application might have the need to create or edit a local file—for example, a configuration file. Let's consider the following simple code that opens a file for writing:
<%@ Page Language="C#" %>
<%@ Import Namespace="System.IO" %>
Try running this or similar code, and an unauthorized access exception will normally be thrown, as seen in Figure 15-5.
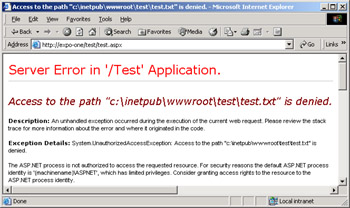
Figure 15-5: The ASPNET account has limited privileges and is not authorized to access the requested resource.
Avoiding the exception is simple. The only action to take is adding the ASPNET account to the list of accounts that have full control on the specific file or folder. In more technical terms, this action is defined as adding or editing an appropriately configured ACL on the file or folder.
If your application manages a well-known and constant number of files, you can deploy them with the needed security settings already in place. If the number and the names of the files being created is not known in advance, you could create a subdirectory, manage to put all the editable files there, and grant ASPNET write permissions on the folder.
But why can't ASP.NET applications create local files? By default, ASP.NET does not impersonate any user, and as a result, all local resources are accessed using the ASP.NET process identity—the ASPNET account. In light of this, Windows resources must have an ACL that grants access to the ASP.NET process account. When this is not the case, the exception in Figure 15-5 is generated. That's why you don't have to modify security configuration to work around the issue; you simply enable the ASPNET account to work in writing mode on the necessary resources.
| Note |
Writing to Microsoft Access .mdb files can often be problematic from within ASP.NET applications. The reason is always related to the fact that the default ASPNET account might not have sufficient permissions to connect to, or write to, an Access database. An Access database is treated as a standalone file; so from this standpoint, a .mdb database is in no way different from a plain text file. To work around the issue, you should grant read and write permissions to the ASPNET account to work on the database file. Finally, notice that the error message you get is different as you are trying to connect (without read permissions) or write (without write permissions). |
Changing the Identity of the ASP NET Process
In a situation in which you want to change the default ASPNET account to give it more or fewer privileges, how should you proceed? Is it preferable to create a custom account and use it for the worker process (via the section), or should you force the ASP.NET worker to impersonate a given identity through the section?
Setting the Process Account
Using the section is the only way to change the real identity of the ASP.NET process. You do this using the following setting:
If you set the process identity in the section, all threads in the process will use this as the base identity and no extra work is needed on thread switches. You should make sure the new account has at least full permissions on the Temporary ASP.NET Files folder. (Review carefully the minimum list of privileges required by the ASPNET account in "The ASPNET Account" section.)
Alternatively, you could require the worker process to impersonate a fixed identity. In this case, setting the section just sets up an impersonation. Note that the identity is tied to the process for the life of the process, while impersonations come and go and can be reverted too. As we'll see shortly, fixed impersonation might pose security issues too.
Unlike , the section can be used on a per-folder basis. This is a common approach when you run multiple Web applications on the same machine and need to give them different identities. Application hosting is one of these scenarios.
Note that when fixed impersonation is used, every thread processing a request needs to impersonate the specified account. Impersonation must be performed for each asynchronous call or thread switch because all these events take you back to the process ID. The impersonated account must have full permissions on the Temporary ASP.NET Files folder.
Impersonating an Identity
Impersonation is a trickier point that deserves some further explanation. To start out, let's say that to impersonate a fixed identity, you first define the user account and then add a setting to the web.config or machine.config file. The following snippet shows an example:
As mentioned earlier, impersonation doesn't really change the physical identity of the process running ASP.NET. More simply, the same ASP.NET process impersonates another user. The issue is that impersonating a fixed identity is possible only under certain conditions and configures potential security risks. Note that per-request impersonation (for example, impersonating the identity of the caller making the request) is always possible, but the extended form of the section, where an explicit account is set, must be handled with care.
A process running under a nonadministrator account—for example, ASPNET—cannot impersonate a specific account on Windows 2000 unless you grant it appropriate privileges. Obtaining a new logon session for the specified account requires the process to have the Act As Part Of The Operating System privilege, which is indeed a strong and powerful privilege that a nonadministrator process account like ASPNET generally will not have. The reason why the per-request impersonation still works is that IIS—which runs with administrative privileges—creates the session and passes the token to ASP.NET through the standard ISAPI protocol.
| Note |
The limitation discussed here disappears with Windows XP and Windows Server 2003, which will make it possible for you to create logon sessions without the SE_TCB_NAME privilege—that is, the Act As Part Of The Operating System privilege. |
Fixed impersonation requires a couple of unmanaged calls. The first is aimed at getting the impersonation token and requires the LogonUser Win32 API function. The second call is for the CreateProcessAsUser Win32 function, which is meant to create the process using the impersonated account. Both API functions are located in the system DLL advapi32.dll. The two calls require the following privileges to be granted to the ASPNET account or any other account attempting the impersonation. Table 15-1 lists the privileges required for impersonating a fixed identity.
|
Privilege |
Description |
|---|---|
|
SE_TCB_NAME |
Act as part of the operating system |
|
SE_ASSIGNPRIMARYTOKEN_NA ME |
Replace a process-level token |
|
SE_INCREASE_QUOTANAME |
Increase quotas |
In particular, the SE_TCB_NAME privilege might have serious security implications because of two factors: the inherent power of the privilege itself (which makes the account as powerful as that of an administrator), and the fact that in ASP.NET 1.0 applications run fully trusted.
Although the requirement for the SE_TCB_NAME privilege is an operating system feature that is removed from Windows XP and Windows Server 2003, the ASP.NET 1.1 runtime plays some tricks to re-vector the call back to the aspnet_isapi.dll module, which is running on the system account. Basically, the ASP.NET 1.1 ISAPI extension creates the security token and duplicates it in the memory space of the worker process. In this way, ASP.NET 1.1 supports fixed impersonation without requiring the SE_TCB_NAME privilege on the worker process account.
| Note |
Impersonation can apply to either an authenticated user or an anonymous user. Impersonation is optional in ASP.NET: the default behavior is to run everything in the context of the worker process—whether it's aspnet_wp.exe running as the ASPNET account, or in the IIS 6.0 process model, w3wp.exe running as the Network Service account. Impersonation can be configured at the machine, site, or application level. |
As long as you're running Windows 2000, fixed impersonation works as long as the worker process runs under an account that is granted the SE_TCB_NAME privilege. This process, of course, cannot be ASPNET.
Impersonating Through the Anonymous Account
To change the identity of the ASP.NET process, intervening at the level remains the most viable approach. A third possibility is impersonating through the anonymous account. The idea is that the ASP.NET application grants access to anonymous users, and the anonymous account is configured to be the desired account for the application.
In this case, the application uses per-request impersonation and the managed code executes as the impersonated account. The process account remains set to ASPNET, and it still compiles pages and reads configuration files using the ASPNET account. Impersonation is used only with the code executed within the page and not for all the preliminary steps that happen before the request is handed to the HTTP page handler.
Impersonation and Web Application Isolation
The impersonation model is thread local, meaning that the system places the token for the request on the thread that executes the request. ASP.NET—generally, the .NET Framework—supports an asynchronous programming model and enables developers to consume services processed by different threads. The common language runtime (CLR), though, does not save and restore the native thread security context across asynchronous calls. The net effect of this is that applications do not really run isolated from one another. Impersonation is therefore effective for those Web applications that can't rely on, or exploit, thread switching.
The managed code of an ASP.NET application can easily switch threads so that other mechanisms of isolation are required for applications. Alternative mechanisms include process-level isolation and the use of .NET code access security. With code access security, in particular, you restrict access to resources based on the intersection of both the identity of the calling thread and the identity of the calling code.
Code Access Security and the CLR
Code access security is a set of services that the CLR provides to control access to managed resources. The CLR provides four separate levels of policy that can be used to control access to managed resources. The levels are Enterprise, Machine, User, and AppDomain. The first three levels of policy can be administered by using the Microsoft .NET Framework Configuration tool available in Administrative Tools or a command-line tool named caspol.exe. The AppDomain policy is only configurable programmatically by CLR hosts.
In the CLR, running code is assigned to a security zone based on the evidence it provides about its origin—for example, the originating URL. Each security zone corresponds to a set of permissions. Actual permissions are intersected across policy levels so that effective permissions granted to an assembly can only be further reduced moving from the Enterprise level to the AppDomain level. By default, ASP.NET applications run from the MyComputer zone with full trust. If you want, you can change the level of trust of ASP.NET applications by changing the section in the web.config file.
Implementing the Section
ASP.NET uses the AppDomain policy to implement the section defined in the machine.config file. By default, applications run as fully trusted. In other words, ASP.NET does not restrict security policy in any way, but you can choose among a few other modes using the section.
The section can be used to configure permissions for a Web application and decide whether it has to run fully or partially trusted. Table 15-2 describes the levels of trust available in ASP.NET 1.1.
|
Level |
Description |
|---|---|
|
Full |
Applications run fully trusted and can execute arbitrary native code in the process context in which they run. This is the default setting. |
|
High |
Code can use most permissions that support partial trust. Appropriate for applications you want to run with least privilege to mitigate risks. |
|
Medium |
Code can read and write its own application directories and can interact with SQL databases. Supported only in ASP.NET 1.1. |
|
Low |
Code can read its own application resources but can't interact with resources located outside of its application space. |
|
Minimal |
Code can't interact with any protected resources. Appropriate for nonprofessional hosting sites that simply intend to support generic HTML code and highly isolated business logic. Supported only in ASP.NET 1.1. |
|
None |
This code won't be loaded or run. |
Note that the Full trust level is not necessarily appropriate for shared servers (for example, UNC shares) unless process isolation is used and individual accounts are used to isolate applications. Applications available over a shared server also run from the intranet zone with a restricted permission set.
ASP.NET Permissions
In version 1.1, ASP.NET implements a custom permission known as AspNetHostingPermission, which has a named level corresponding to each default level described in Table 15-2. All public types defined in the System.Web and System.Web.Mobile namespaces are protected with a requirement for the Minimal level of permission. This is a risk mitigation strategy that ensures Web application code can't be used unless an administrator, or a trusted host, explicitly grants the permission. Key ASP.NET permissions for each trust level are outlined in Table 15-3.
|
High |
Medium |
Low |
Minimal |
|
|---|---|---|---|---|
|
AspNetHosting |
High |
Medium |
Low |
Minimal |
|
FileIO |
Unrestricted |
Read/Write to application's space |
Read |
None |
|
IsolatedStorage |
Unrestricted |
ByUser |
ByUser(max 1 MB) |
None |
|
Printing |
DefaultPrinting |
Same as High |
None |
None |
|
Security |
Assertion, Execution, ControlThread, ControlPrincipal |
Same as High |
Execution |
Execution |
|
SqlClient |
Unrestricted |
Unrestricted (no blank password allowed) |
None |
None |
|
Registry |
Unrestricted |
None |
None |
None |
|
Environment |
Unrestricted |
None |
None |
None |
|
Reflection |
ReflectionEmit |
None |
None |
None |
|
Socket |
Unrestricted |
None |
None |
None |
|
Web |
Unrestricted |
Connect to origin host, if configured |
Same as High |
None |
More detailed information about the permissions actually granted to the default trust levels are available in the security configuration files for each policy. The name of the file for each level is stored in the section.
Full-trust applications run unrestricted. High-trust applications have read/ write permission for all the files in their application space. However, the physical access to files is still ruled by the NTFS access control list on the resource. High-trust applications have unrestricted access to SQL Server but not, for example, to OLE DB classes. (The OleDbPermission, and other managed provider permissions, are denied to all but fully trusted applications.) Reflection calls are denied with the exception of those directed at classes in the System.Reflection.Emit namespace.
Meta Variables in Security Configuration Files
While reading the contents of security .config files, you might run into a few particular names having the form of $xxx$. They are meta variables used to indicate absolute path names in the .config file. The contents of these sort of macros are calculated by ASP.NET at run time and described here:
- $AppDir$ The root application directory of a given Web application.
- $CodeGen$ The directory used for dynamic compilation by ASP.NET for a given application.
- $Gac$ The location of the global assembly cache on a given machine.
- $ASP.NET$ The current set of permissions based on the directive.
In any partial trust mode, any code running from both the $AppDir$ and $CodeGen$ directories is partially trusted and appropriately restricted based on the section.
Medium applications have unrestricted access to SQL Server, but only as long as they do not use blank passwords for accounts. The WebPermission is granted to both medium-and low-trust applications but requires that the URL be configured in the section of the web.config. Low-trust applications have read-only permission for files in their application directories. Isolated storage is still permitted but limited to a 1-MB quota.
Alternative Strategies for Isolating Applications
As long as your Web application runs under the IIS 5 process model, code access security is the most effective way to isolate applications from one another. By using a combination of separate accounts, access control lists and code access security policies, you prevent applications from accessing resources that belong to other applications. However, although separated to a great extent, ASP.NET applications are still all running in the context of a single worker process.
An even better way of isolating applications comes with IIS 6.0 and the new process model (w3wp.exe) on Windows Server 2003. IIS 6.0 supports application pools that run as distinct processes, each with its own set of security settings. If an application, for some reason, takes a Web process down, it will have an impact only on other applications within the process but not other application pools. In addition, with multiple processes running, an administrator can more easily figure out what resources a given process is consuming. Getting the same information is significantly harder if you're dealing with multiple AppDomains inside of a single process.
Using process isolation versus code access security-only isolation also poses some tradeoffs in terms of overall performance and scalability. More running processes result in more memory and system resources being used. For example, each process will have its own thread pool. This extensive resource consumption means that a finite number of concurrent application pools can be active at the same time. A reasonable estimate of this number ranges from 20 to 60 concurrent application pools.
User Authentication and Authorization
From an application point of view, security is mostly a matter of authenticating users and authorizing actions on the system's resources. ASP.NET provides a range of authentication and authorization mechanisms implemented in conjunction with IIS, the .NET Framework, and the underlying security services of the operating system.
When a client issues a Web request, the following sequence of authentication and authorization events occurs:
- IIS Authentication If the page can be viewed and the request comes from a nonrestricted IP address, IIS authenticates the caller using any of the predefined authentication mechanisms (Basic, Digest, or Integrated Windows).
- ASP.NET Authentication If ASP.NET is configured for Windows authentication (more on this later in the "Windows Authentication" section), no additional steps are needed and ASP.NET just accepts any security token it receives from IIS. If ASP.NET is configured for Forms authentication (more on this later in the "Forms Authentication" section), then the user is prompted for credentials using an HTML form. User ID and password are authenticated against a stored list of valid users. The application is free to choose the storage mechanism that best suits, including a SQL Server database or Active Directory services. Finally, if ASP.NET is configured for Passport authentication (more on this later in the "Passport Authentication" section), then the user is redirected to a Passport Web site and authenticated by the Passport service.
- ASP.NET Authorization ASP.NET verifies that the caller is authorized to access the requested resource to execute the operation. A few HTTP modules provide for this service; they are UrlAuthorizationModule and FileAuthorizationModule. The UrlAuthorizationModule class ensures that the authorization rules set in the element of the web.config file are fulfilled. The FileAuthorizationModule class gets into the game when Windows authentication is used and verifies that the caller has the necessary permission to access the requested resource. The verification is performed by comparing the ACL of the resource against the caller's token. At this stage of the process, .NET roles can also be used to verify the caller's authorization to work on a resource. (More on .NET roles and code access security at the end of this chapter.)
IIS Authentication
When a request hits IIS, IIS first ensures that the request comes from a trusted IP address. If it doesn't come from a trusted IP address, the request is rejected with an HTTP error 403.6. A second preliminary check is then made regarding whether the requested resource is available for reading or browsing. If it isn't, the request is rejected with an HTTP error 403.2.
Next, IIS attempts to authenticate the caller by using the Integrated Windows, Digest, or Basic authentication method. If Integrated Windows authentication is used, either Kerberos or NTLM is used.
| Note |
Windows NT Challenge/Response (NTLM) is the authentication protocol used on networks based on Windows NT. NTLM stands for Windows NT LAN Manager. For the same purpose, in Windows 2000 Microsoft introduced Kerberos, a more powerful and flexible alternative. |
In situations in which the resource is protected with an ACL, the user permissions are carefully verified. If the Web application includes pages that don't need authentication, IIS can be configured for anonymous access. In either case, at the end of the authentication phase IIS creates a Windows access token for the caller. The token refers to the authenticated user or, if anonymous authentication is enabled, IIS creates an access token for the predefined anonymous account. By default, this account is called IUSR_Xxx where Xxx is the machine name. You can change the anonymous user account in IIS as shown in Figure 15-6.
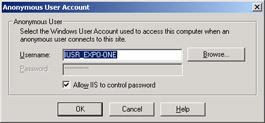
Figure 15-6: Configuring the Internet anonymous account in IIS.
ASP.NET Authentication Types
Depending on the type of the requested resource, IIS might or might not be able to handle the request itself. If the resource needs the involvement of ASP.NET (for example, an .aspx file), IIS hands the request over to ASP.NET along with the security token of the authenticated, or anonymous, user. What happens next depends on the ASP.NET configuration.
As mentioned earlier, ASP.NET supports three types of authentication methods: Windows, Passport, and Forms. A fourth possibility is None, meaning that ASP.NET does not attempt to perform its own authentication and completely relies on the authentication already carried out by IIS. In this case, anonymous users can connect and resources are accessed using the ASP.NET account. You choose the ASP.NET authentication mechanism using the section in the web.config file. By default, the authentication mode is set to Windows.
The authentication mode can be set in the machine.config or, better yet, in the application-level web.config file. Child subdirectories inherit the authentication mode chosen for the application.
ASP.NET Authorization Rules
The goal of the authorization mechanism is allowing or denying user access to particular pages of the application. You set authorization rules by using the section in the web.config file.
The authorization rules consist of two distinct blocks of information regarding what is allowed and what is denied. The child tag defines users, roles, and actions allowed; by contrast, the child tag indicates which users, roles, or actions are not permitted.
We'll cover authorization rules in greater detail later in this chapter.
ASP NET and SQL Server
To access a SQL Server database from within an ASP.NET application, you use the ADO.NET objects and specify a connection string. Depending on the SQL Server security configuration, the connection string might require a user name and a password. As you know, the password is sensitive information that you must hard-code in the software or read dynamically from some, more or less secure, location. To avoid all the risks connected with this operation, you might want to opt for a SQL Server trusted connection.
A trusted connection entails assuming the identity of the user or caller making the request to access SQL Server. In this case, it isn't necessary to specify a user ID and password in the connection string. SQL Server revalidates the account name and password by calling back to Windows for the information.
Setting Up Trusted Connections
When connecting to SQL Server, you request a trusted connection by using the trusted_connection token in the connection string, as shown here:
string connString = "SERVER=localhost;...;TRUSTED_CONNECTION=true;"; SqlConnection conn = new SqlConnection(connString); conn.Open();
Note that to indicate a trusted connection in ADO.NET connection strings, you can interchangeably use the keywords trusted_connection and integrated_security. Both names are case insensitive. Valid values for the keywords are true, false, or sspi (which is equivalent to true).
If you run the code just shown, the chances are good that it will throw an exception because of a failed login for the ASP.NET user—typically, ASPNET. In other words, SQL Server behaves as if the following connection string was specified:
SERVER=localhost;...;UID=ASPNET;PWD=...;
Unless ASPNET is really a valid SQL Server login name, an exception is thrown. To set up the ASPNET account as a SQL Server login, you open the SQL Server Enterprise Manager, select the Logins items under the Security node, and then select the New Login item from the Action menu. A dialog box pops up to let you choose the user account to associate with a particular database, as shown in Figure 15-7.
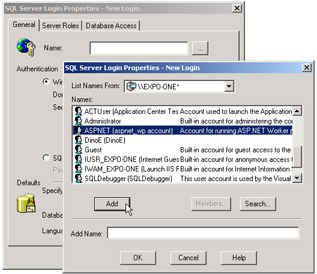
Figure 15-7: Setting up the ASPNET account as a SQL Server login.
On the Database Access tab, you specify which databases can be accessed using the login, as shown in Figure 15-8. You can check as many databases as needed and set up database roles as appropriate.
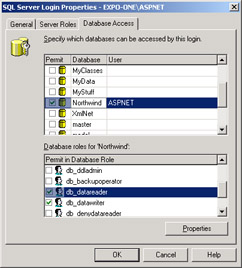
Figure 15-8: Setting up the database roles for the ASPNET account.
At this point, if you attempt to connect to SQL Server from within an ASP.NET application using the trusted connection mechanism, no exception will be thrown.
| Note |
Users who connect through a Windows user account can make use of trusted connections only if SQL Server is configured in Windows Authentication Mode or Mixed Mode. If SQL Server is configured to operate in SQL Server Authentication mode, trusted connections are not possible. |
Working with Untrusted Connections
Having SQL Server and ASP.NET configured for trusted connections doesn't mean that you must always connect through a trusted channel. When you don't require a trusted connection, and connect using a string as below, there are two possible scenarios.
SERVER=localhost;...;UID=dino;PWD=...;
If SQL Server was installed to use Windows Authentication, the connection just fails. If SQL Server was installed to use Mixed-Mode Authentication, the authentication is performed using the User ID and the password contained in the connection string.
| Note |
A general rule for choosing between trusted and untrusted connections is that you should opt for trusted connections if you're mainly relying on SQL Server, and the data tier, for securing the application. Because SQL Server needs more time to handle a trusted connection, you might want to opt for a different approach. One alternative is to implement any security restriction in the business tier so that you can be sure that only trusted and verified modules can ever access SQL Server. After that, you go with untrusted, but faster, connections and still preserve a reasonable degree of safety. In this case, you still need to read the password from some trusted location; the section in the machine.config is a valid option. To reinforce security at this level, you could also restrict access to the machine.config file by using an ACL. |
Windows Authentication
Let's start our examination of the ASP.NET authentication modes with the default one—Windows authentication. When using Windows authentication, ASP.NET works in conjunction with IIS. The real authentication is performed by IIS, which uses one of its three authentication methods: Basic, Digest, or Integrated Windows. When IIS has authenticated the user, it passes the security token on to ASP.NET. When in Windows authentication mode, ASP.NET does not perform any further steps and limits its use of the IIS token to authorizing access to the resources.
Typically, you use the Windows authentication mode in intranet scenarios when the users of your application only have Windows accounts that can be authenticated by the Web server. In most cases, Windows authentication is used in conjunction with file authorization—the FileAuthorizationModule HTTP module. The module does an ACL check to determine which user can access what resource. However, Windows authentication also works with URL authorization implemented by the HTTP module named URLAuthorizationModule. This module allows or denies access to URL resources to certain users and roles.
Authenticating Users Through IIS
As mentioned, there are three main ways in which IIS can authenticate the user making the request: Basic, Digest, and Integrated Windows. All techniques attempt to map callers to accounts available on the Web server machine. Of course, each of them accomplishes the same task in a different way.
Basic Authentication
Basic authentication is an HTTP standard supported by virtually any browser available on the face of the earth. If a user requests a page on a site where anonymous access has been disabled and Basic authentication has been configured, an HTTP 401 status code is returned, which instructs the browser to retry with credentials.
HTTP/1.1 401 Access Denied Server: Microsoft-IIS/5.0 WWW-Authenticate: Basic realm="expo-one" Connection: close
The browser prompts the user with a dialog box and gets the user name and password, as shown in Figure 15-9.
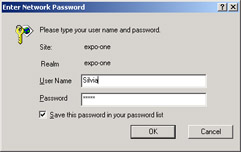
Figure 15-9: Basic authentication with Internet Explorer.
The information gathered is sent to IIS, which attempts to match it with any of the Web server's accounts. The following HTTP script illustrates the next request:
GET /intranet/ HTTP/1.1
Basic authentication works by transmitting the user name and password as clear text, encoded as Base64.
The Basic authentication mode works well with all browsers and does not pose any issue if firewalls or proxies are present. Because user credentials are transmitted in clear text, you might want to limit its use to HTTPS-encrypted channels or to any context in which security is not a critical issue.
Digest Authentication
Digest authentication differs from Basic authentication mostly because it does not transmit credentials (for example, user names and passwords) in clear text. Credentials, in fact, are hashed using a Web server–provided code. As with Basic authentication, a user's request for a page on a site where anonymous access has been disabled bounces back the first time with a status code of 401. The WWW-Authenticate header contains the code to use to encrypt the credentials. The user is prompted with a dialog box and asked to enter her credentials.
Next, the browser creates the message digest—that is, a nondecipherable version of the credentials—and prepares a new request. The message digest is passed back to the Web server using the Authorization HTTP header.
Digest authentication is usable across proxy servers, firewalls, and Web Distributed Authoring and Versioning (WebDAV). On the downside, we find that Digest authentication is a new HTTP 1.1 feature and, as such, is not supported by all browsers. For example, in the Internet Explorer family of browsers only Internet Explorer 5.0 and newer versions support it. If a noncompliant browser makes a request on a server that requires Digest authentication, the server will reject the request and send the client an error message. In addition, Digest authentication requires the password to be stored as clear text on the Web server and is supported only for domains with a Windows 2000 domain controller.
Integrated Windows Authentication
Unlike the other two modes, when Integrated Windows authentication is configured the user doesn't need to explicitly enter a user name and password. Instead, when a Windows user requests a resource on the Web server, a conversation is set up between the browser and the Web server. The browser passes the credentials of the currently logged-on user. The user needs to have a valid account on the server to be successfully authenticated. The authentication can take place through the NTLM challenge/response method or by using Kerberos.
The technique is not supported outside the family of Internet Explorer browsers (although it works with versions as far back as Internet Explorer 2.0) and is impracticable in the presence of firewalls.
| Note |
A fourth type of authentication mode exists and is based on certificates. You can use the Secure Sockets Layer (SSL) security features of IIS and use client certificates to authenticate users requesting information on your Web site. SSL checks the contents of the certificate submitted by the browser for the user during the logon. Users obtain client certificates from a trusted third-party organization. |
The Windows Authentication Provider
In ASP.NET, the Windows authentication mode is ruled by an HTTP module class named WindowsAuthenticationModule. During the authentication process, the module fires the Authenticate event that can be caught from within the global.asax file.
void WindowsAuthentication_OnAuthenticate(
 object sender,
 WindowsAuthenticationEventArgs e)
{

}
The event data is represented by the WindowsAuthenticationEventArgs structure and contains the following members: Context, Identity, and User.
Context is an instance of the HttpContext object and represents the HTTP context of the request. Identity is an object of type WindowsIdentity and represents an authenticated Windows user. Finally, User is a wrapper object that includes the identity and lets you check for the role of the identity. The User property can be used to get or set the identity object to be associated with the request. The identity object is also referred to as the principal.
How to Verify the Identity of the User
Let's assume that you configured the Web server to work with the Integrated Windows authentication mode and that you disabled anonymous access. The ASP.NET application works in Windows authentication mode. What happens when a user connects to the application?
First, IIS authenticates the user (popping up a dialog box if the account of the local user doesn't match any accounts on the Web server) and then hands the security token over to ASP.NET. The ASP.NET page shown in Figure 15-10 retrieves and displays the name of the connected user and the specific authentication mode used.
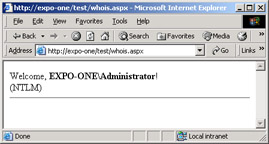
Figure 15-10: The page welcomes users by name.
<%@ Page Language="C#" %>
You use the User property on the Page class to access the identity of the current principal.
You can use this technique to build user-specific pages in which profile information is used or different functionalities are enabled. However, if you plan to differentiate pages based on the user's role, you're better off using URL authorization (more on this later in the "URL Authorization and User-Based Security" section).
Using ACLs to Authorize Access
User-specific pages in the Web application can be protected from unauthorized access using ACLs on the file. When ASP.NET is about to access a resource, the FileAuthorizationModule HTTP module is called into action. File authorization performs an ACL check on ASP.NET files using the caller's identity. This means that the user Joe will never be able to access an .aspx page whose ACL doesn't include an entry for him.
Note, though, that file authorization does not require impersonation and, more importantly, works regardless of whether the impersonation flag is turned on. There's good news and bad news in this statement. The good news is that once you've set an appropriately configured ACL on an ASP.NET resource, you're pretty much done. Nobody will be able to access the resource without permission. But what about non-ASP.NET resources such as local files?
Enabling Impersonation
In ASP.NET, impersonation is disabled by default. Impersonation refers to the ASP.NET capability of accessing pages and running code on behalf of the impersonated identity. You control the impersonation flag on a per-application basis using the following snippet in the web.config file:
As mentioned earlier, the section also lets you indicate a particular identity in terms of user name and password. If none of this information is specified, ASP.NET attempts to impersonate the server user that IIS has authenticated.
| Note |
Impersonating a fixed identity makes more sense in an application-hosting scenario, in which different applications have to run with different identities on the same machine. Using simple impersonation, in which no user is statically set, is particularly helpful to let the ASP.NET code serve personalized pages based on the user's identity. |
The key thing to consider about ASP.NET impersonation is that, when enabled, the Web application accesses any resource using the caller's identity. Without impersonation, you can control which pages are served to which user, but you cannot control whether a page, for some reason, serves the user content that she's not authorized to view. In other words, direct access to ASP.NET resources is controlled by the FileAuthorizationModule and ACL-based security is enforced. By default, though, all the code executed within the request runs as ASPNET unless impersonation is enabled. This means that ACLs set on a resource not directly handled by ASP.NET—for example, an Access database, a text file, an image, or an XML document—are not enough to protect against programmatic access performed by pages that are authorized to run for a certain user. To ensure that the code within the page runs under the same account that was authorized to access the page, you need to enable impersonation.
URL Authorization and User-Based Security
URL authorization is governed by the UrlAuthorizationModule HTTP module. The behavior of the module is driven by the settings stored in the section of the web.config file. From there, the module reads users, roles, and actions allowed or denied and then behaves accordingly.
The following configuration snippet authorizes only the DinoE user to connect to the application. This snippet translates to: the DinoE user is allowed to connect while all other users are denied.
Unlike , the section can be specified for each folder in the Web application, thus giving you a great chance to control access on a per-folder basis. On the downside of URL authorization, I should list the fact that only ASP.NET resources are monitored. On the other hand, this is in the natural order of things when you consider that, say, requests for HTML files and JPEG images are not processed by aspnet_isapi.dll but resolved directly by IIS. In this case, the URL authorization module has not even had a chance to get into the game.
In general, URL-based authorization is rarely used with Windows authentication. URL authorization is more effective with Forms authentication, and for this reason, we'll describe it in more detail later in the "URL Authorization" section.
| Note |
How can you protect an HTML page from unauthorized access? The first consideration is that an HTML page rarely needs to be protected against access. If you need to protect a page, the page very likely also needs to execute some server-side code. Implementing it as .aspx is more useful anyway. That said, by design HTML pages are not protected from unauthorized access and the best thing you can do is rename the page to .aspx so that it is processed by the ASP.NET runtime. As an alternative, you can rename the page to a custom extension and write a lightweight ISAPI extension (or a managed HTTP handler) to implement a made-to-measure authorization mechanism. |
Passport Authentication
Passport authentication is a Microsoft-centralized authentication service. Passport provides a way to authenticate users coming across all the sites that participate in the initiative. Users need to do a single logon and, if successfully authenticated, they can then freely move through all the member sites. In addition to the single logon service, Passport also offers core profile services for member sites.
ASP.NET provides the PassportAuthenticationModule to set up authentication for Web applications hosted by Passport member sites.
Understanding the Passport Initiative
In a certain sense, the Passport authentication mode is the Web-wide counterpart of the Integrated Windows mode or the SQL Server Mixed mode. In all cases, security and identity tokens are shared between participating entities in a way that is totally transparent to the user and improves her experience. The code running in the Web applications resorts to the Passport single sign-in service to get information about the user making the request. As mentioned, all this happens transparently for the user, who just signs in once and jumps from one site to the next until she signs out.
The Passport profile information for each user is severely protected and managed according to a strict privacy policy. Each participating site guarantees that personal customer information will be kept in a secure environment and implements security measures such as using SSL and deleting any cookies that contain Personally Identifiable Information (PII) during sign out.
The .NET Passport SDK is required to implement the .NET Passport single sign-in and other profile-related services on your Web site. The SDK is freely available for developing and testing purposes. However, to run a Passport-enabled Web site, you must submit an official request, adhere to the Passport software licensing and service agreements, and swear that you'll comply with all the strict standards for privacy and security. Only then will you be allowed to obtain encryption keys and other start-up elements to move the Web site into a production environment.
ASP.NET has built-in support for Passport, which saves you from having to interact with the Passport SDK to activate the authentication service and then implement single sign-in.
The Passport Authentication Provider
In the .NET Framework, the PassportAuthenticationModule class carries out the Passport authentication. Passport authentication is enabled by the following text in the application's configuration file:
When an HTTP request hits a Passport-enabled Web site, the HTTP module verifies whether or not the request contains a valid Passport ticket. If not, the Web server returns the status code 302 and redirects the client to the Passport Logon service. The query string contains properly encrypted information about the original request. The client issues a GET request to the logon server and passes the supplied query string. At this point, the Passport logon server prompts the client with an HTML logon form. After the user has filled out the form, the form is posted back to the logon server over an SSL-secured channel.
The logon server utilizes the form information to authenticate the user and, if successful, creates a Passport ticket. Next, the user is redirected to the original URL and the ticket is passed, encrypted, in the query string. Finally, the browser follows the redirect instruction and requests again the original Passport protected resource. This time, though, the request contains a valid ticket so that the PassportAuthenticationModule can make the request pass.
Passport utilizes the Triple DES encryption algorithm. Each member site receives its own encryption key upon registration. In ASP.NET, an identity recognized by Passport is represented by a PassportIdentity object. The class contains ad hoc methods and properties that represent the Passport ticket and the key operations such as sign-in and sign-out. The Passport server controls the lifetime of the ticket and makes decisions about expiration and reuse on other member sites.
| Note |
The Passport SDK version 2.1 can be downloaded from the Microsoft Web site at http://www.microsoft.com/net/services/passport/. Older versions are supported but not recommended. Note that Windows XP supports only Passport 2.0 and newer versions. |
Forms Authentication
If you're a former Web developer, regardless of the platform you used, you'll agree that both Windows and Passport authentication are seldom practical for real-world Internet applications. Windows authentication is based on Windows accounts and NTFS ACL tokens and, as such, assumes that clients are connecting from Windows-equipped machines. Useful and effective in intranet and possibly extranet scenarios, Windows authentication is simply unrealistic in more common situations. The same conclusion applies to Passport authentication, although for different reasons. Passport is not free, requires the implementation of serious security measures (which are not free and that you don't necessarily need in all sites), and makes sense mostly for e-commerce and co-branded Web sites.
So what is the ideal authentication mechanism for real Web developers? A Web programming best-practice recommends that you place some relatively boilerplated code on top of each nonpublic page and redirect the user to a login page. In the login page, the user is prompted for his credentials, which are verified, authenticated, and then, if all went fine, redirected to the originally requested page. All this code is not exactly rocket science, but it's still code that you have to write yourself and use over and over again.
Forms authentication is just the ASP.NET built-in infrastructure that greatly simplifies the implementation of the aforementioned pattern for login. Forms authentication is the ideal choice whenever you need to collect user credentials and process them internally—for example, against a database of login names. To some extent, the authentication pattern implemented by Forms authentication doesn't look radically different from Windows and Passport authentication. The key difference is that with Forms authentication everything happens under the strict control of the application.
The Forms Authentication Provider
The module that governs the forms-based authentication is an HTTP module implemented by the FormsAuthenticationModule class. The behavior of the component is driven by the contents of the various web.config files that make up the application. First, you enable Forms authentication by putting the following code in the application's web.config file:
This code alone doesn't cause significant changes in your application as long as anonymous access to the pages is allowed. If some pages in your application must be made available only to well-known users, you might want to indicate which users are not directly admitted. You can do this by using the section in the web.config file. For example, the following code blocks direct access to the all the pages for all users:
A protected resource is any ASP.NET resource (.aspx, .asmx, .ashx, and so forth) located in a folder in which Forms authentication and URL authorization is requested.
Accessing Protected ASP.NET Resources
When the browser attempts to access a protected resource, the Forms authentication module kicks in and attempts to locate an authentication ticket for the caller. A ticket is merely a cookie with a particular name. If no ticket is found, the module redirects the request to a login page. The login page is chosen by the programmer and hard-coded in the loginUrl attribute of the section.
The Forms authentication module intercepts the call and checks to see whether the request has an associated authentication ticket (much like Passport). If not, the module reads the login page URL and redirects the user there. The browser receives a response with a status code of HTTP 302 and the new location to query for. The user is prompted with the user-defined login page as shown in Figure 15-11.
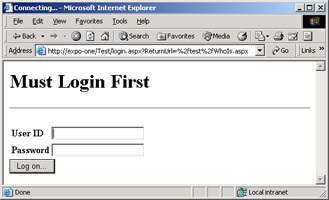
Figure 15-11: The user is attempting to access a protected resource and is not authenticated. The Forms module redirects the user to a user-defined login page.
It's interesting to take a closer look at the URL being used for redirection. Assuming that the originally requested page is http://expo-one/test/whois.aspx, the redirection URL looks like this:
/Test/login.aspx?ReturnUrl=%2ftest%2fWhoIs.aspx
The URL of the login page has a query string appended to it with a ReturnUrl parameter set to the original URL.
Validating User Credentials
The user enters her credentials (name and password) into the logon form and clicks a button to have them processed by the system. We'll review this process in detail later in the "The Login Process" section. For now, it suffices to say that either the Forms authentication module or the application itself can validate the credentials against a list of valid accounts. If the authentication process ends successfully, you call a method on the Forms provider to redirect the browser to the original page.
In doing so, the Forms authentication module also creates a cookie known as the authentication ticket. The cookie is given a particular name and duration. When the browser issues a new request for the same original page, the module gets involved again but this time the cookie is there and the call is successfully resolved.
Attributes of the Section
We already covered the fundamentals of the section in Chapter 12; in this section, though, we briefly revisit the concepts and the features in the context of the Forms authentication model.
Forms authentication is driven by the contents of the section of the section. The overall syntax is shown here:
path="/" >
The various attributes are described in Table 15-4.
|
Attribute |
Description |
|---|---|
|
loginUrl |
Specifies the URL to which the request is redirected for logon if no valid authentication cookie is found. |
|
name |
Specifies the name of the HTTP cookie to use for authentication. The default name is .ASPXAUTH. |
|
path |
Specifies the path for the authentication cookies issued by the application. The default value is a slash (/). Note that some browsers are case-sensitive and will not send cookies back if there is a path case mismatch. |
|
protection |
Indicates how the application intends to protect the authentication cookie. The Forms provider supports two methods—validation and encryption. The protection attribute can take any of the following values: All, Encryption, None, and Validation. The default and recommended value is All. |
|
requireSSL |
Indicates whether a secure connection (SSL) is required to transmit the authentication cookie. The default is false. If true, ASP.NET sets the Secure property for the authentication cookie and a compliant browser does not return the cookie unless the connection is using SSL. This attribute is supported only on ASP.NET 1.1. |
|
slidingExpiration |
Indicates whether sliding expiration is enabled. The default is false, meaning that the cookie expires at a set interval from the time it was originally issued. The interval is determined by the timeout attribute. This attribute is supported only on ASP.NET 1.1. |
|
timeout |
Specifies the amount of time, in minutes, after which the cookie expires. The default value is 30. |
Note that if multiple applications are running on a single server and more than one application is using Forms authentication, you are responsible for ensuring that each application ends up using a unique cookie name. You configure the cookie name in each application's web.config file.
Managing the Authentication Cookie
The contents of the cookie is also known as the authentication ticket and is represented by the FormsAuthenticationTicket class. It can be encrypted and/or validated. If encryption is specified, the cookie is encrypted using the Triple-DES (3DES) algorithm. Encryption is much more effective if combined with data validation. Data validation verifies that the contents of an encrypted cookie have not been tampered with along the way. Encryption and validation algorithms are controlled through the section. When encryption is 3DES, data validation for forms authentication defaults to the SHA1 algorithm. If the protection level for the cookie is set to All (both validation and encryption), the cookie data is concatenated with a validation key and a message authentication code (MAC) is computed and appended to the outgoing cookie. Encryption and validation take some CPU time; for this reason, if you're going to use HTTPS channels you might want to drop cookie security entirely, setting the protection attribute to None.
To use authentication cookies over HTTPS channels, you must indicate a secure URL for the login page and, of course, make sure that your Web server supports HTTPS in the folder in which the page resides.
In ASP.NET 1.1, the cookie by default expires after the specified timeout. In ASP.NET 1.0, on the other hand, the default behavior was that of a sliding expiration policy. Each request that involves the cookie resets the expiration of an active ticket to the specified number of minutes ahead of the current time. Note that the cookie is renewed only if half of its lifetime is already over. The method involved with this expiration policy is RenewTicketIfOld.
The Section
The section of the tag is not something that real-world applications will ever use. Basically, the section is expected to contain the credentials of the users enabled to access the application.
If the section is specified, only the users listed will be granted the permission to access the protected resources. The section is optional, but if you omit it you should provide an alternative and custom authentication scheme. Each child element describes a user in terms of his name and password. The passwordFormat attribute specifies the encryption format for storing passwords. Possible values are Clear, MD5, and SHA1. By default, the password is stored as clear text, but if you specify the MD5 or SHA1 value you can store passwords as encrypted text obtained by running the MD5 or SHA1 hash algorithm.
There is good news and bad news about the section. The good news is that in this way the authentication process is highly automated and looks like a declarative feature. The bad news is that storing users and passwords (even hashed) in a simple text file is neither secure nor practical. How could you cope with it when you have hundreds of users to manage? And what if a user changes her password? (Actually a user should change the password every few weeks.) What if a new user must be added or an existing one deleted? All these changes would occur on the web.config file and cause the entire subtree of pages to be invalidated and recompiled with the next access.
Although it's helpful for toy projects and good for demonstrating the extreme flexibility of the ASP.NET architecture, the section is scarcely useful in real-world scenarios. In a real-world application, you need to take total control of the login process and verify the user-typed credentials against a database. In some other cases, typically when the number of users is high and the security policies are strict and articulated, you might want to consider role-based authentication. In this case, after the user logs in, you attach to the principal object representing the user's identity a string describing the role of the user. Next, you let the Forms authentication provider verify authorized users and block the request if no match is found. Let's see both aspects more in detail.
The Login Process
Let's consider a scenario in which you don't want users to connect anonymously to the application. The following web.config file sets up the Forms authentication and denies access to anonymous users. Note that a question mark (?) within the section indicates the anonymous user; an asterisk (*) on the other hand indicates all users.
As a result, users for which an authentication ticket does not exist are redirected to the login page by the Forms module. The sample application, named MyCompany, provides the login page shown in Figure 15-12.

Figure 15-12: The login page of the sample application.
Collecting Credentials Through Login
The user enters the credentials, typically in a case-sensitive way, and then clicks the button to log on. When the login page posts back, the following code runs:
void LogonUser(object sender, EventArgs e)
{
 string user = userName.Text;
 string pswd = passWord.Text;

 // Custom authentication
 bool bAuthenticated = AuthenticateUser(user, pswd);
 if (bAuthenticated)
 FormsAuthentication.RedirectFromLoginPage(user, false);
 else
 errorMsg.Text = "Sorry, yours seems not to be a valid account.";
}
The event handler retrieves the strings typed in the user name and password fields and calls into a custom function named AuthenticateUser. The function returns a Boolean value. If the user has been successfully authenticated, the code invokes the RedirectFromLoginPage static method on the FormsAuthentication class to inform the browser it's about time that a new request is made to the original page.
The RedirectFromLoginPage method redirects an authenticated user back to the originally requested URL. It has two overloads with the following prototypes:
public static void RedirectFromLoginPage(string, bool);
public static void RedirectFromLoginPage(string, bool, string);
The first argument is the name of the user to store in the authentication cookie; this name will also be used by the URL Authorization module to deny or grant access based on the section of the web.config file. The second argument is a Boolean value that denotes the duration of the authentication cookie being created. If false, the cookie is given the normal duration—that is, the number of minutes set by the timeout attribute (30 minutes by default). If this argument is true, the cookie is given a much longer lifetime. Finally, the third argument specifies the cookie path. Note that if no login page is indicated, the authentication mechanism defaults to a page named default.aspx.
Authenticating the User
If you can afford to keep the user list in the web.config file, you can simply call the Authenticate method on the FormsAuthentication class. The method validates the user credentials against those contained in the section. The following code calls a function named AuthenticateUser that returns a Boolean value indicating if the user is authenticated.
void LogonUser(object sender, EventArgs e)
{
 string user = userName.Text;
 string pswd = passWord.Text;

 // Custom authentication
 bool bAuthenticated = AuthenticateUser(user, pswd);

}
If you want to check the credentials against a database or any other user-defined storage device, just write your own function and make it return a Boolean value. The following listing shows the aforementioned AuthenticateUser function, which accesses a SQL Server table named Users in the ProAspNet database. The Users table contains three string columns: ID, pswd, and role.
bool AuthenticateUser(string username, string pswd)
{
 string connString, cmdText;
 connString = "SERVER=localhost;DATABASE=proaspnet;UID=sa;";
 cmdText = "SELECT COUNT(*) FROM users WHERE id=@user AND pswd=@pswd";

 SqlConnection conn = new SqlConnection(connString);
 SqlCommand cmd = new SqlCommand(cmdText, conn);
 cmd.Parameters.Add("@theUser", SqlDbType.VarChar, 25).Value = username;
 cmd.Parameters.Add("@thePswd", SqlDbType.VarChar, 12).Value = pswd;

 conn.Open();
 int found = (int) cmd.ExecuteScalar();
 conn.Close();
 return (found >0);
}
The query is configured to return an integer that represents the number of rows in the table that match the specified user name and password. Notice the use of typed and sized parameters in the SQL command as a line of defense against possible injection of malicious code. Notice also that the SQL code just shown does not support strong passwords because the = operator doesn't perform case-sensitive comparisons. To make provisions for that, you should rewrite the command as follows:
SELECT COUNT(*) FROM users WHERE
 CAST(RTRIM(id) AS VarBinary)=CAST(RTRIM(@theUser) AS VarBinary)
 AND
 CAST(RTRIM(pswd) AS VarBinary)=CAST(RTRIM(@thePswd) AS VarBinary)
The CAST operator converts the value into its binary representation, while the RTRIM operator removes trailing blanks.
Figure 15-13 shows the page of the application once the user has been successfully authenticated.

Figure 15-13: The user has been authenticated and his name and role show up in the user interface.
Accessing the Authentication Cookie Programmatically
By default, the authentication cookie lives for 30 minutes, or for whatever timeout value is on the element. The cookie lifetime is independent from the duration of the browser session. By varying the timeout attribute, you can change the cookie lifetime for all the pages in the application. To programmatically access the cookie being generated for an authenticated user, you must drop the RedirectFromLoginPage method and create your own equivalent method.
void CustomRedirectFromLoginPage(string userName, int minutes)
{
 // The false argument means that no persistent cookie is created

 // Get the redirect URL
 string redirectURL;
 redirectURL = FormsAuthentication.GetRedirectUrl(userName, false);

 // Create the cookie
 FormsAuthentication.SetAuthCookie(userName, false);

 // Retrieve the cookie
 string cookieName = FormsAuthentication.FormsCookieName;
 HttpCookie c = Response.Cookies[cookieName];
 c.Expires = DateTime.Now.AddMinutes(minutes);

 // Redirect
 Response.Redirect(redirectURL);
}
The method shown in the preceding code performs four basic operations: obtain the redirect URL, create the authentication cookie, retrieve and modify the cookie from the Response object, and finally redirect to the original URL. The basic tasks are accomplished through ad hoc methods on the FormsAuthentication class. In particular, the SetAuthCookie method creates and attaches the cookie to the cookie's collection of the outgoing response. The method is void and does not perform a redirect. To retrieve and programmatically access the cookie, you simply extract it by name from the Cookies collection of the HttpResponse class.
If you use a Boolean value of true as the second argument of the method RedirectFromLoginPage, you create a persistent cookie totally unaffected by timeout attribute. A persistent cookie is simply a cookie with a very long expiration date—50 years. You can't change this trait of the system declaratively. However, you can rewrite the redirect method and put your hands on the physical cookie.
Signing Out
While an explicit sign-in is always required by Web sites that need authentication, an explicit sign-out is less common but legitimate nonetheless. The Forms authentication module provides an explicit method to sign out. The SignOut method on the FormsAuthentication class takes no argument and resets the authentication cookie. In particular, the SignOut method removes the current ticket from the Cookies collection of the HttpResponse object and replaces it with an empty and expired cookie.
After you call SignOut, you might want to redirect the application to another page—for example, the home page or the login page. To do this, you don't have to redirect the browser, but as long as the page is publicly accessible, you can use the more efficient Server.Transfer method that we described in Chapter 4, "Working with the Page."
void Signout(object sender, EventArgs e)
{
 FormsAuthentication.SignOut();
 Server.Transfer("login.aspx");
}
Role Based Authentication
So far, we have authenticated users by name and haven't put a lot of attention on the building of the actual site. If you have the need to authenticate users, the chances are good that you also need to serve them personalized pages. When it comes to this, there are basically two possibilities: either you implement a profile system and store configuration information for each user, or you define roles and map users to one or more of these categories.
In the case of a profile system, you maintain a lot of profile records that probably need to store user interface items as well as references to functions to enable or disable. While designing the page, you access the profile record for the current user and be sure to find in it any needed information.
If you don't have to maintain user-specific information but simply need to catalog groups of users and maintain profile information on a per-group basis, then roles are a better approach. A role is a name that identifies a set of functions, user interface elements, and permissions that the page grants to each user who plays that role.
Defining Roles
Defining roles is a two-step procedure. First, you define all the possible roles and give each user one or more roles. This association is normally done at the database level. In fact, our sample ProAspNet database of users purposely contains a Role column. Second, you need to figure out a way to retrieve this information at the page level to draw controls properly.
One possible approach entails you loading the table of users in memory when the application starts. After that, whenever you're in the process of designing a page, you access the table from Application and read the role based on the authenticated name. In global.asax, you put the following code:
<%@ Import Namespace="System.Data" %>
<%@ Import Namespace="System.Data.SqlClient" %>
Each page that needs to be personalized based on the user's role will retrieve the role from the table using the user name as the key. The following listing shows how to proceed:
string GetRole(string name)
{
 DataSet ds = (DataSet) Application["MyData"];
 DataRow[] rows = ds.Tables[0].Select("ID='" + name + "'");
 if (rows.Length >0)
 return rows[0]["role"].ToString();
 else
 return "";
}
The role string can be a comma-separated string indicating more roles. In this case, you use the IndexOf method of the role string to check for a particular role. For example:
if (role.IndexOf("Employee") != -1)
{
 LinkButton l = new LinkButton();
 l.Text = "Employee task #1";
 RoleEmployee.Controls.Add(l);
 RoleEmployee.Controls.Add(new LiteralControl("
"));
 l = new LinkButton();
 l.Text = "Employee task #2";
 RoleEmployee.Controls.Add(l);
}
This code generates controls dynamically and binds them to a particular placeholder control specific to the role. Note that this code lacks the event handler for each newly created link button.
Serving Personalized Pages
There might be other ways to design the user interface of a page so that it accommodates controls and links specific to certain users. An alternative to dynamically creating controls is to simply declare on the .aspx file all the controls you plan to use regardless of the role, and then hide all those that do not belong to the current roles. To hide controls, you can use the Visible property, which also has the advantage of not generating HTML code for that control.
Figure 15-14 shows a list of links that has been dynamically created to reflect the capabilities of the role of the currently logged user.
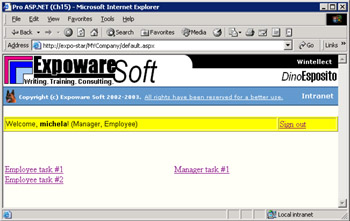
Figure 15-14: A page personalized for a user who acts as employee and manager.
URL Authorization
Whether you need to design pages, or simply authorize access to them, using roles gives you a significant level of flexibility and allows you to work with more coarse-grained entities—groups of users instead of individual users—which can be a determining factor in the success of an application with a high volume of users. In this case, reasoning in terms of roles is more natural and, above all, greatly simplifies the maintenance of the code.
In the previous section, we analyzed the implementation of user-specific pages based on roles. To top off the discussion, let's review how to use roles to authorize access to pages. Earlier in this chapter, we saw that blocking unauthenticated users solves only the first half of the more general problem of controlling access to pages. In other words, the following configuration script guarantees that no anonymous users will ever access a given page; it doesn't guarantee, though, that authenticated users can access it.
To limit access to only authorized and authenticated users, we need to implement another layer of code, and URL authorization comes to the rescue.
The Section
The tag controls client access to URL resources. It's made of two subtrees—one to allow users, and one to deny access. Both the and child nodes have the same structure and use the same methods to identify callers by name, role, or action.
The users attribute represents a comma-separated list of authenticated users that are granted access to the resources under the jurisdiction of the web.config file. A question mark (?) allows or denies anonymous users; an asterisk (*) allows or denies all users. The Forms authentication module uses this information to block incoming requests after the caller has been successfully identified. The following code grants access only to dinoe and silviac and denies all other users.
The roles attribute represents a comma-separated list of roles that are granted or denied access to the resources. To use this information for authorization purposes, the Forms module needs to associate an authenticated user with a role. In the previous example, we did it by using the Application object. However, in this case we need a more general approach that enables an external tool to retrieve application and user-specific information.
Finally, the verbs attribute is a comma-separated list of HTTP methods that can be used to access a resource. Verbs registered to ASP.NET are GET, HEAD, POST, and DEBUG.
Note that you can combine and tags in any way or order. For example, you could allow users and deny roles, or allow a few roles and deny all the other users. Bear in mind that the nodes are processed in a top-down fashion, so the first directive is stronger than the ones that follow. In the sample just shown, the users dinoe and silviac are authorized first, so they are out of the range of users affected by the successive statement that denies access to all users.
Binding Roles and Identity Objects
By the time a user is authenticated, no role information is associated with the identity. There is, however, a function to check whether a given identity plays a certain role. The following code snippet shows how to check whether the current user is in a certain role:
if (User.IsInRole("Boss"))
 Response.Write("The user is the boss");
The IsInRole function is defined on the GenericPrincipal class, which represents a generic principal object describing a user. Other principal classes exist for the various authentication modes discussed in this chapter. They are WindowsPrincipal, PassportPrincipal, and FormsPrincipal. Side by side with principals are identity objects, which represent the identity of the user.
To associate a role with an authenticated user, you must create a new principal object, either generic or of the same type of the authentication. After you hold an instance of the new principal, you set the role and then attach it to the context of the request. The best place in which you can do this is the AuthenticateRequest event fired by the Application object and caught in the global.asax file.
void Application_OnAuthenticateRequest()
{
 if (!Request.IsAuthenticated)
 return;
 string roleString = GetRole(User.Identity.Name);
 string[] roles = roleString.Split(',');
 Context.User = new GenericPrincipal(User.Identity, roles);
}
The GetRole function is used to retrieve the role string for the current user from a database or from an in-memory lookup table. In the most general case, the string is a comma-separated sequence of roles. We transform it into an array of strings and pass the array to the constructor of the GenericPrincipal class. We build a new user object with the same identity as the current user but a different set of roles. The new user object replaces the current User object in the context of the request.
At this point, the authentication module can check the role of the user against the section of the local web.config file. For example, a folder whose web.config file contains the following snippet would make its pages accessible only to users belonging to the Boss role:
The authentication module uses the IsInRole function to authorize access by role. Figure 15-15 shows a user in the Boss role that is allowed access to a protected page.

Figure 15-15: Only a user belonging to the Boss group can access this page. Other users not in the role are redirected to the login page.
A signed-in user can jump to protected pages and be authorized as long as the role provides for that. Any direct or indirect access to the page made by users not in the role cause the Web server to redirect the browser to the login page. If you design the user interface of the page to display to the user only the links and controls she needs to use, you significantly reduce the attempts to jump to reserved areas of the Web site and subsequently reduce the chances of overloading the system.
Conclusion
For Web applications, security is a two-headed animal. Securing a Web application entails protecting the Web server against a variety of attacks, including packet and port sniffing, denial of service, and sensitive data stealing. In addition, a secure Web application implements effective policies to prevent illicit access to its pages. ASP.NET provides some built-in layers of code to authenticate and authorize users and actions. Configuring the Web server to limit loopholes and applying patches and hot-fixes constitute another kind of security job that involves system administrators more than developers.
Developers, though, should pay more attention to buffer overruns, malicious SQL injections, and data validation. Interestingly, ASP.NET 1.1 introduces the ValidateRequest option in the machine.config file, which is better than nothing but is certainly not the silver bullet to stop all sorts of attacks of the present and the future.
In this chapter, we reviewed some best practices for writing more secure code—that is, code that is less subject to common types of attacks. We applied some of these practices to ASP.NET applications and exploited the built-in features for authentication and authorization. Finally, we spent some time discussing security aspects that involve the configuration of the ASP.NET runtime and the worker process.
In summary, ASP.NET defines three different security contexts at different levels—IIS, the worker process, the HTTP pipeline. The token generated by IIS for the request is passed on to the worker process and contributes to determine the account under which the request is serviced. Once the user has been authenticated, we enter in the realm of the ASP.NET application-specific security. ASP.NET provides three providers for authentication—Windows, Passport, and Forms. Forms authentication is the one that seems more suitable for real-world applications. Authentication is often combined with authorization and file access control. Accessing files on disk is not an easy operation in ASP.NET because of the various security constraints. In the next chapter, we'll tackle file I/O in the ASP.NET.
Resources
- Writing Secure Code, Second Edition, Michael Howard and David LeBlanc (Microsoft Press, 2003)
- Essential .NET Security: ASP.NET (http://www.develop.com/kbrown/book/html/asp.html)
- ASP.NET Security Chat (http://msdn.microsoft.com/chats/vstudio/vstudio_091202.asp)
- Add Custom Info to Authentication Cookies (http://www.aspnetpro. com/features/ 2003/05/asp200305jp_f/asp200305jp_f.asp)
- Building Secure ASP.NET Applications: Authentication, Authorization, and Secure Communication (http://msdn.microsoft.com/library/en-us/dnnetsec/html/secnetlpMSDN.asp)
- Forms Authentication with ACL Authorization (http://www.aspnetpro. com/features/ 2002/07/asp200207rh_f/asp200207rh_f.asp)
- Stop SQL Injection Attacks (http://www.aspnetpro.com/features/2003/02/asp200302jp_f/asp200302jp_f.asp)
- Authentication in ASP.NET: .NET Security Guidance (http://msdn.microsoft.com/library/en-us/dnbda/html/authaspdotnet.asp)
- Authenticate Users with Microsoft Passport (http://www.aspnetpro. com/features/ 2002/07/asp200207st_f/asp200207st_f.asp)
Part I - Building an ASP.NET Page
Part II - Adding Data in an ASP.NET Site
- The ADO.NET Object Model
- Creating Bindable Grids of Data
- Paging Through Data Sources
- Real-World Data Access
Part III - ASP.NET Controls
Part IV - ASP.NET Application Essentials
- Configuration and Deployment
- The HTTP Request Context
- ASP.NET State Management
- ASP.NET Security
- Working with the File System
- Working with Web Services
Part V - Custom ASP.NET Controls
- Extending Existing ASP.NET Controls
- Creating New ASP.NET Controls
- Data-Bound and Templated Controls
- Design-Time Support for Custom Controls
Part VI - Advanced Topics
Index
EAN: 2147483647
Pages: 209
