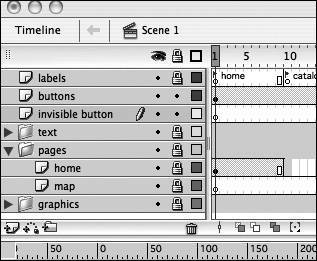
| You found out that what is entered into the Hit state of a button is not visible when you view a SWF file. You will take advantage of that now and create an invisible button that contains only a hit area and does not have any graphics. An invisible button is very much like a "hot spot" in HTML. When you roll over or click a hot spot, something happens, even if it does not look like a button is there. Invisible buttons do the same thing in a SWF file. You will use an invisible button as a trigger to close the three menus that serve as the main navigation for the Tech Bookstore. When you roll over one of the three buttons in the bookstore, the menus open by animating downward. Then when you roll over the invisible button, the menus will animate upward so they appear to be closing. Whenever the mouse rolls outside of the menu area, you want the menus to close. The invisible button uses a button symbol's hit area to enable it to serve as a trigger to close the menus. 1. | Create a new layer called invisible button below the buttons layer.
Select the text layer folder and click Insert New Layer. Double-click the new layer and type in invisible button. This layer is layered beneath the three buttons you created on the buttons layer that will be used to open menus. You are layering the invisible button underneath the three buttons so the invisible button does not interfere with opening and closing the menus. If you layer buttons, whatever button's on top is the one that takes precedence in the SWF file. If the invisible button were layered on top of the three buttons, the menus would not open because the invisible button on top of the three buttons would trigger them to close. Thus, the importance of layer order!
 | 2. | Add three horizontal guides to the Stage at 120, 140, and 160 pixels. Create a fourth guide that is vertical at 450 pixels.
If rulers are not visible, select View > Rulers from the main menu. Click and drag a new guide from the horizontal ruler above the Stage and drag it downward until you reach 140 pixels on the vertical ruler. Create a second one that sits at approximately 120 pixels on the horizontal ruler. Then click and drag a guide from the vertical ruler and drop it at the 450-pixel mark.
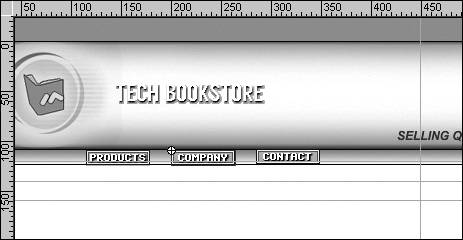 | 3. | Select the Rectangle tool, and select any color for the fill in the Tools panel. Switch to Merge Drawing mode and draw a rectangle from the document's upper-left corner to the intersection of the guides at 450 and 120. Draw a rectangle that covers the area between the guides at 140 and 160, from the document's left edge to the vertical guide at 450.
The buttons that trigger the menus are within the grBar graphic, and the menus extend below it to where the guide is placed. You want to cover all the areas around where the menus will be, but not the area the menus are in. You also don't need to cover the rest of the Stage. The button should cover some of the Stage below the menus, which is the area below the guide. You are switching to Merge Drawing mode so that you can create a slightly more complex shape. You'll be drawing several rectangles so that they all overlap, merging into one larger graphic, making your invisible button custom built to the menu system you are creating.
Create a rectangle that covers from the upper-left corner of the Stageabout 450 pixels wide. The rectangle should stop just about the bottom of the buttons, at the 12-pixel point on the vertical ruler (where you set the guide to in Step 2).
Tip If you want to be able to see what's on the Stage while creating the hit area for this button, maximize the Color Mixer panel, click the fill color icon, and reduce the Alpha percentage to about 20%. This makes the fill color for the rectangles transparent so you can see through to the Stage, which helps you define the hot spot. If you have already created some of the rectangles, select the shape on the Stage before reducing the Alpha percentage. The second rectangle you create below the guide should be the same width of the Stage and just below where the menus open. Draw a rectangle beneath the guide set at 140 (created in Step 2). This rectangle should be approximately 20 pixels tall.
| 4. | Add two more rectangles on either side of the buttons, making sure that the graphics overlap with your two previous rectangles.
In case a user moves the mouse off the left or right side of the menu, you also need to have two more rectangles spanning either side of where the menus will be. When you are finished, your rectangles should be merged together and appear as in the following figure.
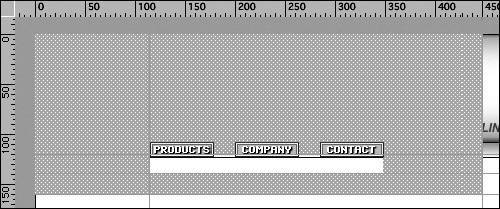 Note After you actually build and animate the interactive menus, you might need to slightly modify the invisible button, depending on where you precisely place the buttons and menus in your FLA file. The height of the rectangles you just created does not matter, as long as they overlap the rectangles above and below them so there are no gaps in-between. The empty space between the rectangles is where the drop-down lists will appear.
| 5. | Click the keyframe in the invisible button layer to select the rectangle you just drew. Select Modify > Convert to Symbol and select the Button radio button. Name the button btnInvisible and then click OK. Double-click the symbol on the Stage to get into symbol-editing mode.
After creating the btnInvisible symbol, the content on the Stage should now have a bounding box around the edge of it. Double-click the symbol to open symbol-editing mode. The rectangles you just drew should all be in the first (Up) frame in the button. However, you need content only in the Hit frame because you are using only the clickable part of the button.
| 6. | Drag the rectangles to the Hit frame.
Click the keyframe in the Up frame and then drag it over to the Hit frame.
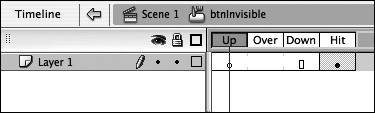 You can just leave all of the other states empty, so the button does not have any states with graphics. Nothing placed in this frame is visible after you publish the SWF file: The button is completely invisible.
Tip To quickly convert a selection into a symbol, press F8 or drag the selection into the library. You have to drag it into the area below the Preview pane (under the Name list) and then the Convert to Symbol dialog box opens. | 7. | Click on Scene 1 to return to the main Stage, and hide and lock the invisible button layer.
The Stage should now have a large turquoise and slightly transparent area covering a portion of it. The turquoise area is where the invisible button's hit area is. You will use this area as the trigger to close the menus. Even if this transparent turquoise area is not visible in the SWF file that you publish, it might interfere with your work in the Flash authoring environment.
Go to the Timeline and click the Hide layer dot (the dot under the large eye icon) in the invisible button layer. Click under the Lock icon to lock the layer. This means that the layer cannot be seen, be selected, or have content accidentally added to it.
| 8. | In the document library, drag the btnInvisible symbol into the buttons library folder.
You created a new library folder in Lesson 2 called buttons. Move all the button symbols you created in the previous three exercises into the buttons folder. In Lesson 9, you will add some ActionScript for the invisible button that makes it target the menus so they close when the mouse rolls over the area.
| 9. | Save your work.
|
|