| Sometimes you need to create a button that is made out of only text with no background. You will use text buttons like this for part of the menu. You will create text buttons in this exercise and then insert them into the menu later on in the lesson. One of the more important parts of creating text buttons is properly defining hit areas for them. The hit area refers to the area in which a user can click the button. It is particularly difficult to click a text button if you leave text on the Stage without a hit area defined. A person who is trying to click the button would have to click within the small lines defining each character, which isn't easy to do! Note It is not really a best practice to make text buttons because they aren't really reusable. It makes more sense to create a button with no text in it, but merely a graphic of some sort, and use many instances of it underneath a text layer. Remember, each button you make in the library increases file size.
In this exercise, you will create text buttons that will be placed in the menu and define a hit area for each button. Creating a proper hit area for a text button is easy. All you need to do is follow these steps. 1. | Select the Text tool and click the Stage to create a text field. In the Property inspector, select Static text from the drop-down list, set the font to Arial, text color to black (#000000), font size to 8. Click the Bold button. Set the text rendering to Anti-alias for readability.
After you click on the Stage with the Text tool, maximize the Property inspector and enter the new settings for the font, color, and size. Ensure that you have the correct text type (Static) and that the Bold button is selected. Make sure that the text is set to Anti-alias for Readability.
Select the buttons layer on the Timeline (make sure it is unlocked) and then click the Text tool on the Stage and type CATALOG (all capitals) into the new text field.
Note It doesn't matter which layer you create the text field on because you will temporarily delete the buttons from the Stage when you finish the exercise. | 2. | Select the text field and then press F8 to place it inside a button symbol.
Select the Selection tool from the Tools panel and then select the text field. Use F8 on your keyboard or select Modify > Convert to Symbol to convert the text field into a button symbol. Type btnCatalog into the Name field and click OK when you're finished.
 | 3. | Open btnCatalog in symbol-editing mode and center the text field in the symbol.
Double-click the button to open it in symbol-editing mode. Select the text field and then use the Align panel to center the text field. Make sure that the To Stage button is selected in the Align panel, and then click the Align Horizontal Center and Align Vertical Center buttons in the panel.
| 4. | Add Over, Down, and Hit states for the button.
Select the Down frame and press F5 to insert a frame. The same text is displayed for the Up, Over, and Down frames of the button because you don't need a different visual appearance for each state of these text buttons.
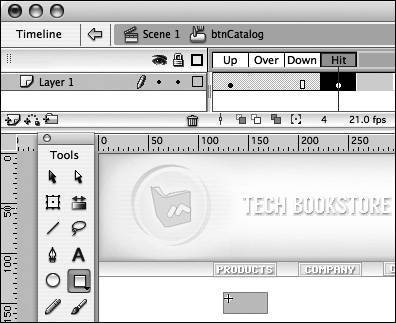
Tip If you want rollover or click colors for the text, you need to insert a keyframe in the Over frame and/or Down frame, then select the text field and change the text fill color using the Property inspector. The text color changes when a visitor rolls the mouse over the text in these buttons. | 5. | Create a hit area for the button in the Hit frame with the Rectangle tool.
Select the Hit frame and press F6 to enter a new keyframe. You can see that the text from the Down frame is entered into the Hit frame. You can use the text field as a reference for where the hit area needs to be created. Select the Rectangle tool and select any color for a fill color and No Color for the stroke. Then draw a rectangle that completely covers the text that's in the frame. You want to make the rectangle slightly larger than the text area so the button is easy to click.
 | 6. | Create five more buttons for the menu: REVIEWS, TOUR, NEWS, FEEDBACK, and MAP. Then delete them from the Stage and lock the buttons layer.
Repeat Steps 1 to 5, except add different text (REVIEWS, TOUR, NEWS, FEEDBACK, and MAP, all in capital letters) for each button. You should have six new buttons in the library when you finish: btnCatalog, btnReviews, btnTour, btnNews, btnFeedback, and btnMap. After you have checked you have the correct number of buttons in the library, delete the text buttons from the Stage. In the library, move the symbols into the buttons folder. You will add these buttons that are stored in the library to three menus you create later on in the lesson.
Lock the buttons layer when you finish.
| 7. | Save your file.
|
Remember to save the changes to the file before moving on. |