Using the Site Manager
| The Site Manager is a Win32 application called NRclient.exe. It is located at <installation drive>:\Program Files\Microsoft Content Management Server\Client\. The Site Manager is launched using the shortcut from the Start menu (Start > Programs > Microsoft Content Management Server > Site Manager).
NOTE: The shortcut points the Site Manager application on the local machine to the login ASP page on the CMS server box, as follows:<installation drive>:\Program Files\Microsoft Content Management Server\Client\NRclient.exe http://<CMS server name>:<port number>/NR/System/ClientUI/login.asp. The Site Manager can be installed on any computer running Windows 2000/XP. It uses HTTP as the protocol for connecting to the CMS server, so HTTP access is required between the computer where the Site Manager is installed and the CMS server. Although the Site Manager uses HTTP to connect to the CMS server, it doesn't have a browser interface; the HTTP access is implemented by a proxy.
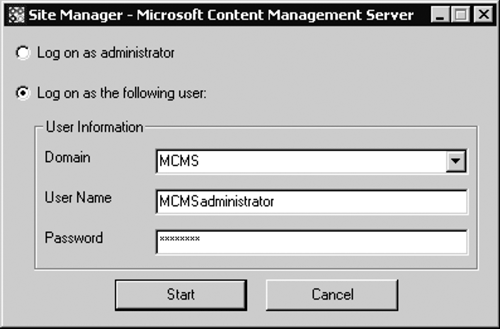
NOTE: If the Site Manager cannot be launched on the client, check that the URL http://<CMS server name>:<port number>/NR/System/ClientUI/login.asp is accessible from the browser on the client machine. The Site Manager is an administration tool; therefore, only authorized users have access to it. When you start the Site Manager, the authentication dialog is always displayed (Figure 9-4). There are two choices: "Log on as <user name>" provides the credentials of the currently logged-on user to the CMS server; "Log on as the following user" requires specifying the domain, user name, and password explicitly. Figure 9-4. Site Manager authentication dialog
NOTE: The credentials of the currently logged-on Windows user are not sent to CMS automatically; you have to select the first option in the authentication dialog for this to happen. When you start the Site Manager for the first time after creating a new CMS site, only the CMS administrator account specified in the DCA is authorized to access the Site Manager. As shown in Figure 9-4, you need to type in the CMS administrator credentials and click Start.
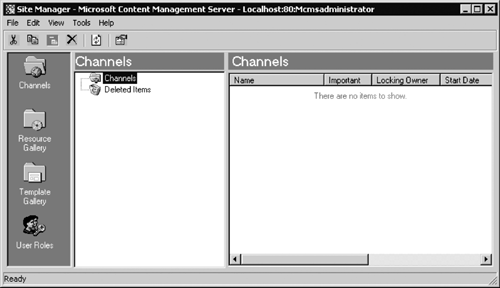
NOTE: It is a good practice for the CMS administrator account to be different from the system administrator account. The Site Manager window consists of three panes (Figure 9-5). The left pane provides the ability to switch between configuring channels, resource galleries, template galleries, and user roles. Depending on which icon you select in the left pane, the middle and the right pane will show the appropriate information. Figure 9-5. Site Manager window showing a new empty site
When you select the Channels icon, the middle pane shows the channel structure, while the right pane shows the pages within a selected channel. When you start the Site Manager, the channels hierarchy is displayed by default. For each page within a channel, several properties are displayed in the right pane: the page name, whether the page has been flagged as Important, the locking owner, the start date, the expiry date, and the date and time when the page was last modified. When you select the Resource Gallery icon, the middle pane shows the resource galleries structure, while the right pane shows resources within a selected gallery. For each resource, the following properties are displayed: the resource name, the locking owner, the file size, the file MIME type, and when the file was last modified. When you select the Template Gallery icon, the middle pane shows the template galleries structure, while the right pane shows templates within a selected gallery. Each template has the following properties displayed: the template name, the locking owner, and when it was last modified. Channels and template and resource galleries contain other data; within the CMS environment they are collectively known as containers. The Site Manager interface uses the familiar Windows Explorer-type metaphor. We can cut, copy, paste, and delete objects displayed in the middle and the right panes in the usual way. The first four buttons on the Site Manager toolbar provide shortcuts for the Cut, Copy, Paste, and Delete operations. The next button on the toolbar is the shortcut for Global Refresh. When we work on the site structure using the Site Manager, the objects and the settings we configure are stored in the CMS database. However, only user rights are updated in the database immediately. All other settings are first put in a cache. This cache resides on the client; it is implemented in the proxy. We actually change the settings on the cached objects; the database is not updated right away. Caching is used to increase Site Manager performance and to prevent the database objects from being locked. However, sometimes when multiple users are creating objects or changing the settings, the cached objects can become out of sync with the database. To synchronize the Site Manager cache with the CMS database, use the View > Global Refresh menu command or the Global Refresh button on the toolbar. You can individually synchronize each object by selecting Refresh from the object's shortcut menu.
NOTE: If, for any reason, an individual object is locked in the CMS database, to release the lock you can use the Kill Lock command from the object's shortcut menu. To release the lock for all objects in the CMS database, use the Tools > Kill Lock menu command. The Kill Lock command is available to users with administrative rights, such as CMS administrators and channel managers. The last button on the toolbar is the Properties button; it displays the properties dialog for an object selected in the middle pane.
NOTE: All buttons on the toolbar are available when you select the Channels, Resource Gallery, or Template Gallery icons in the left pane. Only the Global Refresh button is available when you select User Roles. All objects presented in the Site Manager are uniquely identified within the CMS database by their Globally Unique Identifier (GUID). Object names do not act as unique identifiers; therefore, we can have objects with the same names if required. For example, to provide a seamless consecutive update for a page, you can have two pages with the same name within the same channel. The expiration date of one version of the page should be set as the start date of the other version; both pages have to be approved using the Web Author console.
NOTE: CMS does not enforce uniqueness for the object names. We will discuss objects with the same names in more detail in Chapter 16. When an object in the middle or the right pane is deleted, it is moved into the Deleted Items container displayed in the middle pane. The channels, resource galleries, and template galleries hierarchies have their own Deleted Items container, which acts as a Recycle Bin for the hierarchy; you can restore objects from there or clear the deleted items. By default, when a channel is deleted, the Site Manager displays a warning message. If you don't want this warning to be displayed, in the Tools > Options dialog clear the Delete Channel Notice check box (Figure 9-6). Figure 9-6. Site Manager Options
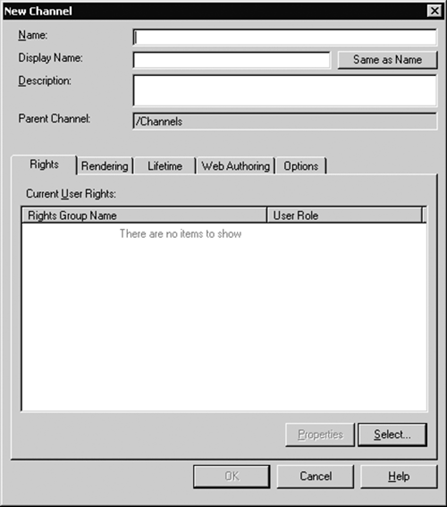
Creating the Channels HierarchyTo create a new channel, in the Site Manager, display the channels hierarchy by clicking the Channels icon in the left pane of the Site Manager window; right-click the channel where you'd like the new channel to be created, and select New Channel. Since we are creating the first channel for the site, right-click the root node in the hierarchy called Channels, and then select New Channel. The New Channel dialog box is displayed, as shown in Figure 9-7. It contains several fields at the top of the dialog and several tabs underneath. Let's look into the Name, Display Name, Description, and Parent Channel fields. Figure 9-7. New Channel dialog box
We will start with giving our new channel a name. This name will be used as part of the hierarchical URL for all pages and subchannels in the new channel. When the channel name is used in the URL, it is URL-encoded. If special characters are used in the channel name, the URL can become very user unfriendly. For example, a space character in a channel name is replaced by a plus sign (+) in the URL; therefore, it's a good practice to avoid spaces in channel names. There are restrictions on what a channel name can contain. These restrictions are listed in the sidebar. For the sample site, we will name the top-level channel "bots consulting."
NOTE: Our sample Web site is installed as a Web application in a virtual directory off the root of an IIS virtual Web site. As we discussed in Chapter 8, if you'd like your CMS site to be in the root of a Web site, the top-level channel name should be mapped to the HTTP host header; in our example, it would be www.botsconsulting.com. Both approaches are perfectly viable.
The Display Name property doesn't have the same restrictions as the Name property. It can contain non-US-ASCII as well as spaces. As we have mentioned already, the display name is a user-friendly alias that is used as text for a link pointing at your channel when the channel is presented to the users for example, within a navigational structure for your site in a browser, or within the Web Author console or the Authoring Connector. The Display Name property can be set up in any language because it can include non-US characters, including double-byte characters. This is particularly useful for multilingual sites. If you are happy for the display name to be identical to the channel name, you can click the Same as Name button (Figure 9-7). For the "botsconsulting" channel, we will use the display name BOTS Consulting. The Description field is an optional field that allows us to provide a meaningful description for the channel. It is not normally used outside the Site Manager and can contain any characters. The only limitation is its size it should not be more than 255 characters in length. The Parent Channel field is a read-only field that displays the full path to the parent channel from the root of the channels hierarchy. We are creating the first channel for the site; therefore, the parent channel is the root identified as /Channels. For example, when you create a first-level channel, such as the "knowledge" channel in our sample site, the parent channel will be identified as /Channels/botsconsulting/knowledge. There are several configuration tabs in the New Channel dialog box: Rights, Rendering, Lifetime, Web Authoring, and Options. We don't need to use them now; after the channel has been created, the same configuration options are available from the Channel Properties dialog box. In this section, we concentrate on creating the channels structure for our site; all channel configuration options are discussed in detail later in the book in Chapter 16.
NOTE: If you'd like to know more about channel configuration options now, refer to Chapter 16, and then come back to this chapter. To save the newly created top-level channel, click OK in the New Channel dialog box. We will carry on with creating the channels hierarchy for our sample site using the names and display names that are listed in Table 9-1.
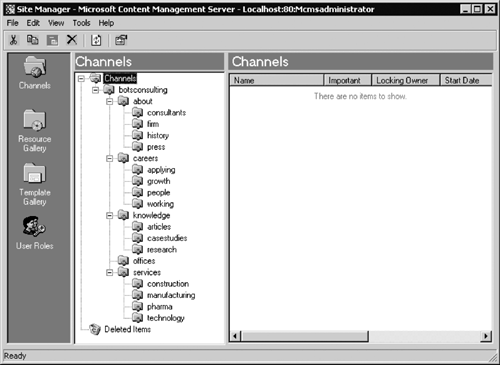
NOTE: >When you create multiple subchannels within a channel, by default the subchannels are sorted and displayed in alphabetical order. To change the sorting order within a channel, right-click the channel in the Site Manager, select Properties, choose the Sorting tab, and arrange the subchannels in the required order. This is important for dynamic navigation generation. After all channels have been created, the channels hierarchy in the Site Manager appears as shown in Figure 9-8. Figure 9-8. Channels hierarchy for the sample site
The channels we have created don't contain any pages. Let's see what is displayed in the browser if we access one of the channels we've just created for example, Services. Because the sample site has been created as a Web application off the root of the IIS virtual server, this channel is accessible using the URL http://www.botsconsulting.com/botsconsulting/services.
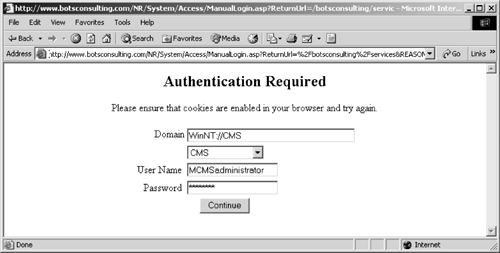
NOTE: If the sample site were created in the root of the IIS virtual server, the URL for the services channel would be http://www.botsconsulting.com/services. Refer to Chapter 8 for options for creating CMS sites. After we've typed the URL in the browser, CMS displays the default authentication page (Figure 9-9). Figure 9-9. CMS authentication page
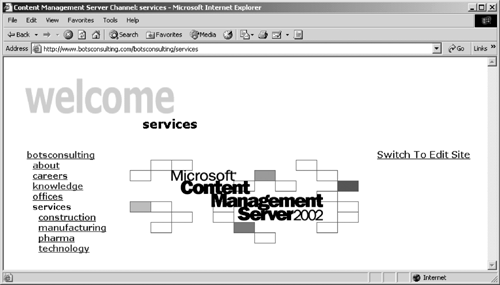
NOTE: The default authentication page is an ASP page called Manual Login.asp, located in the folder <installation drive>:\Program Files\Microsoft Content Management Server\Server\IIS_NR\System\Access\. We have to type in the CMS administrator credentials because this account is currently the only one that exists in CMS. Then the CMS default channel page is displayed (Figure 9-10). This page shows the links to the parent channel, the same-level channels, and the child channels for the services channel. The Switch to Edit Site link is displayed because the CMS administrator by default has authoring rights in all channels. Figure 9-10. CMS channel default page
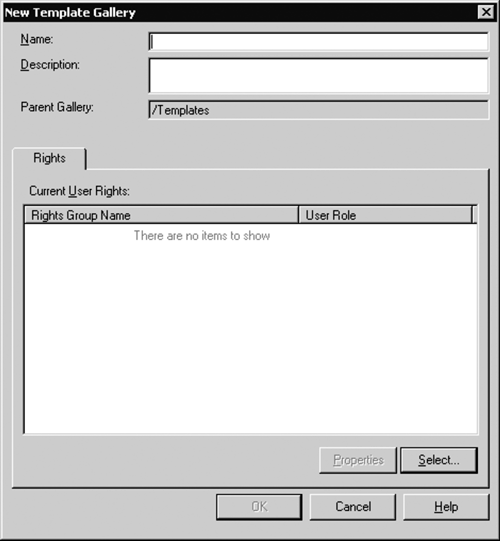
NOTE: The channel default page is an ASP page called Cover.asp, located in the folder <installation drive>:\Program Files\Microsoft Content Management Server\Server\IIS_NR\Shared\. Creating the Template Galleries HierarchyJust as channels provide a way to organize pages, template galleries allow us to organize templates. A template gallery may contain templates and other template galleries. A template galleries hierarchy is an integral part of the CMS site structure. Template galleries can be created in the Site Manager and in Visual Studio .NET (VS.NET); templates are created using VS.NET only. Usually, site developers create templates and template galleries in VS.NET; we will look into that in the next chapter. However, you may need to create a template gallery using the Site Manager; let's do it. To create a new template gallery in the Site Manager, click the Template Gallery icon in the left pane to display the template galleries panes; then right-click the gallery where you'd like the new gallery to be created and select New > Gallery. We are creating the first template gallery for the site; therefore, right-click the root node in the tree called Templates and select New > Gallery. The New Template Gallery dialog box appears (Figure 9-11). Figure 9-11. New Template Gallery dialog box
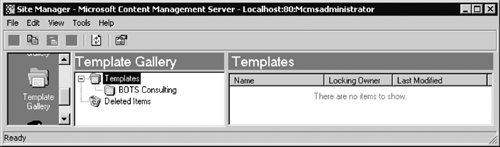
Using the New Template Gallery dialog box, we can name the new template gallery and provide a description for it. The name should be easily understood by the content authors. The description is optional and is limited to 255 characters in length. Parent Gallery is a read-only field that shows the full path to the parent gallery from the root of the template galleries hierarchy. We will talk about the Rights tab later; click OK to create the new gallery. For our sample site, we have created a template gallery called BOTS Consulting (Figure 9-12). Figure 9-12. Template gallery hierarchy for the sample site
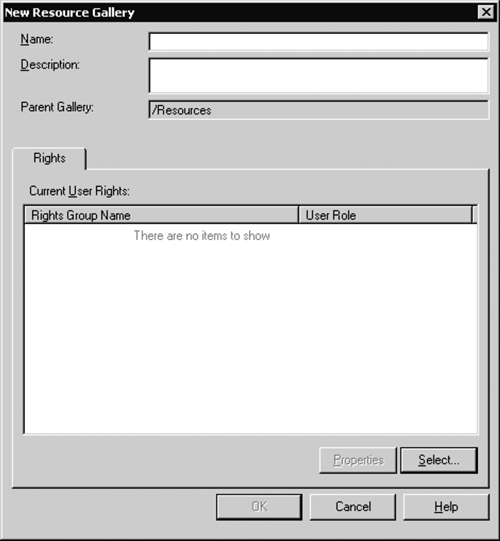
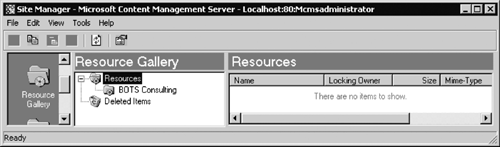
Creating the Resource Galleries HierarchyA resource gallery provides the ability to organize resources for our site. The resource gallery can contain individual files for example, images as well as other resource galleries. A resource galleries hierarchy is part of the CMS site structure. Resource galleries are created using the Site Manager but are populated with resources using the Resource Manager in the Web Author. To create a new gallery, click the Resource Gallery icon in the left pane to display the resource galleries panes; then right-click the gallery where you'd like the new gallery to be created and select New > Gallery. We are creating the first resource gallery for the site; therefore, right-click the root node in the tree called Resources and select New > Gallery. The New Resource Gallery dialog box appears (Figure 9-13). Figure 9-13. New Resource Gallery dialog box
To name the new gallery, in the New Resource Gallery dialog box type in the Name field. The name should be meaningful for the content authors. The description is optional and, similar to other containers, is limited to 255 characters in length. As with template galleries, Parent Gallery is a read-only field that shows the full path to the parent gallery from the root of the resource galleries hierarchy. We will talk about the Rights tab later; click OK to create the new gallery. Again, for our sample site, we have created a resource gallery called BOTS Consulting (Figure 9-14). Figure 9-14. Resource Gallery hierarchy for the sample site
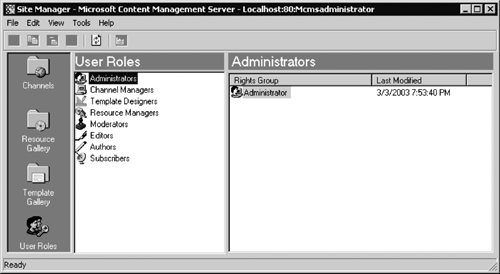
User RightsChannels and template and resource galleries form the structure for the CMS site. However, at the moment, this structure is only accessible to one user the CMS administrator. This is not sufficient; therefore, we need to assign CMS permissions on our site to other users. In the CMS environment, there are eight predefined user roles: administrators, channel managers, template designers, resource managers, authors, editors, moderators, and subscribers. We have already come across the subscribers, authors, editors, and moderators roles. For example, in Chapter 6, we have seen the user roles involved in the publishing workflow, such as authors, editors, and moderators. The other four roles administrators, channel managers, template designers, and resource managers perform various tasks in site development and administration. Administrators have permissions to perform any tasks in the CMS environment; channel managers are responsible for administration of the channels they are assigned to; template designers develop templates; and resource managers look after resources in the resource galleries they are assigned to. We will have a detailed discussion focused on user roles and setting up user rights in the CMS environment later in the book, in Chapter 17. However, there are two groups of users that need to have appropriate permissions on the site during the development stage: the subscribers and the template designers. In this section, we will concentrate on assigning rights for these two types of users. To access the user roles panes in the Site Manager, click the User Roles icon in the left pane (Figure 9-15). Assigning permissions to user accounts involves several steps, which include adding a user account to a CMS rights group within a role and then assigning this group to the appropriate containers. Figure 9-15. User roles within the Site Manager
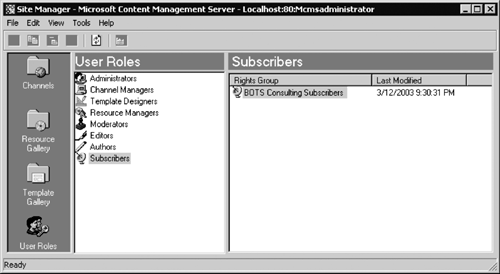
Let's start with subscribers. Subscribers are ordinary users who are allowed to browse our site. In the CMS environment, there is no anonymous access to the site; all access must be authenticated. In Chapter 8, we have already enabled a guest account to be used for anonymous access to the site; we now need to provide subscriber permissions for this account. First of all, we need to create a subscribers rights group. Right-click the Subscribers role in the middle pane and select New Rights Group. The group called New Rights Group is created and is displayed in the right pane; right-click it, select Rename, and give it a meaningful name. For our sample site, we will call the group BOTS Consulting Subscribers (Figure 9-16). Figure 9-16. Subscribers rights group for the sample site
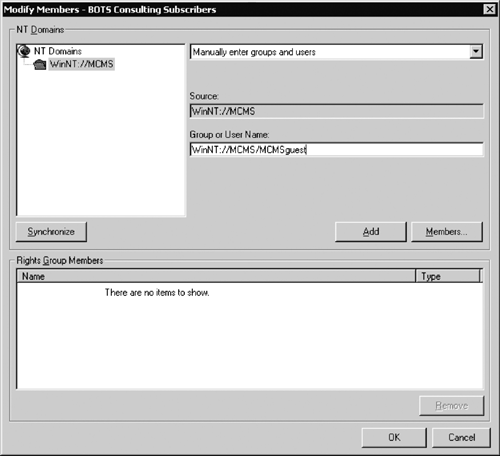
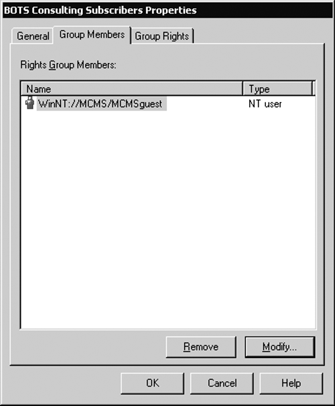
Second, we need to add the CMS guest account to this group. To add the account to the group, right-click the group, select Properties, and choose the Group Members tab. The Rights Group Members list is currently empty; there are no group members. Click the Modify button; in the Group or User Name field, type the guest account name using the format WinNT://<domain name>/<account name> for example, WinNT://MCMS/MCMSguest (Figure 9-17). If you don't want to type a name, you can select a domain from the list called NT Domains, then from the top drop-down list choose Select from a list of all groups and users, and then browse to the guest account. Don't be confused by the label NT Domains. It is inherited from the previous version of CMS; in fact, Windows 2003, 2000, and NT domains are listed. After you've specified the guest account either by typing or by browsing, click Add and then OK. The guest account has been added to the group members list (Figure 9-18). Figure 9-17. Specifying the group member account
Figure 9-18. Guest user membership of the Subscribers rights group
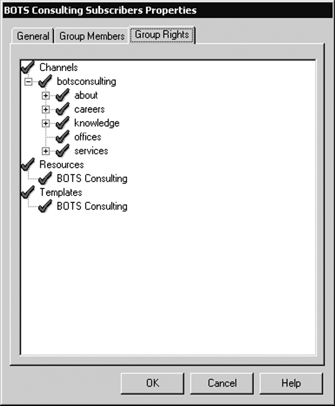
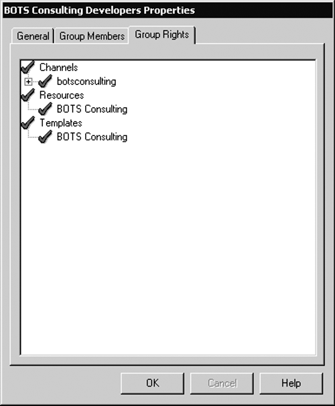
The third step is to assign permissions to the new group. To assign permissions for multiple containers, we will use the group's Properties > Group Rights tab. The tab displays the containers hierarchies. The red X beside a container name indicates that the group does not have permissions for this container. To assign one container to a rights group, you need to click once the name of the container. The red X beside the container name changes to a green check mark, which means that the group has permissions on the container. The actual permissions are defined by the subscribers role. In order for our users to browse the whole site, they need to be able to view content in all channels and galleries; this means that the subscribers group must be assigned to all containers. By default, the child containers don't inherit the rights from the parent container. However, you'll be relieved to know that we don't have to change the red Xs to the green check marks for each container individually. Instead, we can assign the permissions to the root containers and propagate them to the rest of the hierarchy. For example, click the Channels root container to assign permissions for it, then right-click the container, and select Propagate Rights to Children. Each red X beside the container and all its children changes to a check mark. Repeat the same process for the Resources and Templates root containers (Figure 9-19); click OK. Figure 9-19. Subscribers group rights for the sample site containers
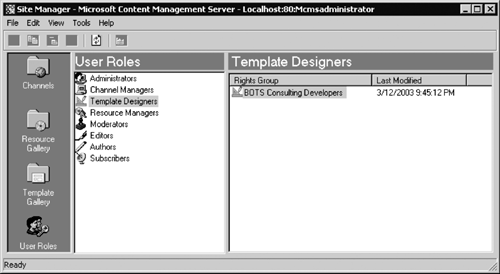
NOTE: To assign permissions individually for each container, use the Rights tab in the container's Properties dialog box. We have enabled the users to browse the site without authentication. However, at the moment there is nothing for them to browse, because the site is empty. The content for the new site will be provided by the site authors. In order to be able to provide the content, the site authors need the templates on which to base their pages. The templates for our new CMS site must be created by the site developers; without the templates, there will be no content and therefore no site. In order for the developers to be able to create CMS templates, they must be assigned the appropriate permissions. That's what we will do next. A template designer is a special user role within the CMS environment for the site developers. When a template designers group is assigned to a container, the members of this group can create new containers within this container and assign rights to these new containers, including channels, template galleries, and resource galleries. When a template designers group is assigned to a template gallery, within this gallery the members of the group can create and edit templates as well as delete the templates they own. To test their work, they have the subscribers, authors, editors, moderators, and resource managers permissions within the containers where they have rights. To assign the permissions for the template designers, create the rights group within the template designers role, add the developers accounts to this group, and then assign the group to the appropriate containers. You can have more than one template designers group with permissions assigned for different site containers. For our sample site, we will create one group called BOTS Consulting Developers within the template designers role (Figure 9-20), add the developers accounts to it, and then assign the group to all containers within the site (Figure 9-21). Figure 9-20. Template designers rights group for the sample site
Figure 9-21. Template designers group rights for the sample site containers
|

EAN: 2147483647
Pages: 298