Using Site Deployment Manager
| Site Deployment Manager is a utility that ships as a part of CMS. SDM is used to import and export CMS-based assets. Exported assets are placed in a Site Deployment Object file, also referred to as a "package." When you are importing, the SDO file is processed by SDM, and the objects contained in the package are placed in the destination repository. The interactive user interface for SDM is contained within Site Manager. This interface allows channel managers to export content and administrators to import or export content. Figure 21-1 shows the user interface for the import operation, and Figure 21-2 shows the export user interface. Figure 21-1. The SDM import interface
Figure 21-2. The SDM export interface
Keep in mind that SDM is meant for CMS-based assets. SDM packages cannot include assets that are stored external to CMS. For example, all the template ASPX files are stored externally to CMS. As a result, when you deploy a CMS site, you'll have to create an SDO file for the CMS-based assets and then move the non-CMS based assets, placing them both on the destination server. Microsoft recommends using Application Center Server to handle moving the file-based assets. However, you may choose to use other methods perhaps a scripted FTP or other such method. There are no specific requirements for moving non-CMS based files, so the choice is yours.
NOTE: When moving a CMS application from one server to another for the first time, you must create a virtual directory on the destination server. When you create a new project through VS.NET, a virtual directory in your solution called CMS is automatically created. When moving your application to a new server, you must manually create this virtual directory under your application directory. The new virtual directory should be mapped to X:\program files\Microsoft Content Management Server\Server\IIS_CMS. This virtual directory contains the JavaScript code and certain assemblies for the Word Authoring Connector and the edit console. Also, you must remove the new application created for the new virtual directory; this virtual directory should inherit the application settings from your CMS application. Creating PackagesThere are two methodologies for processing packages in SDM: manual and scripted. If you choose to manually process packages, you will be using the interactive Site Manager interface. If you choose to use scripts, you'll end up using VBScript (VBS), which uses a COM-based API (yes, COM). Either methodology will work, and it's likely you'll use a combination, depending on the situation. In the following sections, we'll discuss both the creation and the consumption of SDO files. We'll first start by showing you how you can create and consume SDO files using the interactive interface. After that, we'll walk you through the process of creating script files to allow you to incrementally deploy content from CMS.
NOTE: It's not possible to perform a full deployment through a script, and it's not possible to perform an incremental deployment through the interactive interface. In most cases, you'll end up using both methods at different times, based on the operation you need to perform. In addition, there may be some cases where it's simply easiest to back up and restore the entire SQL database. The drawback to this method is that you also carry the CMS settings specific to the source environment. We would recommend using an SQL backup/restore if you're moving a very large CMS database from one environment to another, similar environment. Use Site Deployment Manager for ongoing deployments. Manually through Site ManagerOnce of the easiest ways to process SDO files is using the manual interface in Site Manager. This interface will allow you to both export and import. The only restriction to processing SDO files is that only administrators can import content. However, channel managers have the ability to export content from their channels. ExportTo begin, you have to start Site Manager. Click the File menu in Site Manager. Now, choose Package and then Export. In Figure 21-3 you can see how this is done. Figure 21-3. Starting SDM from Site Manager
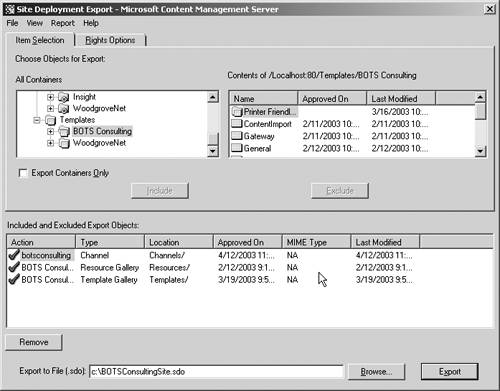
Once you've started SDM, you'll be provided with an interface that allows you to choose which objects you'd like to export (shown in Figure 21-4). You'll immediately notice on the left side of the dialog box a complete listing of all containers in the system. To choose an item for export, simply click it and then click Include. This will place the object in the export list, just below the All Containers element. For our example, we've decided to export the BOTS Consulting site. So, we've chosen the botsconsulting channel and clicked Include to add it to the list of objects to be exported. When you chose a container, SDM will export that container and all its children. Since we picked the botsconsulting channel, SDM will export all channels and postings contained in the hierarchy of that channel. However, if you want to export a single posting object, you can simply select that single object. In our example, for each category of object (channels, templates, and resources), we've selected all the relevant containers for BOTS Consulting. In addition, we've supplied a file name in the Export to File field. In Figure 21-4, you can see what our export interface looks like now that we've added all the containers we want. Figure 21-4. SDM set to export the BOTS Consulting site
Once you're ready to export your objects, just click Export. SDM will prompt you either to continue or to run a preexport report. If you choose to run a preexport report, SDM will simulate the export process to determine what will be exported and if any errors will occur. This same report can also be generated after the actual export process if you so choose. In our case, we've checked the option box that disables this prompt, and our export occurs immediately. When you export objects, SDM will dutifully export all the objects you've specified, in addition to all dependent objects. For example, if a posting links to a resource that's in the resource gallery, the resource gallery item will automatically be moved, even though you didn't specifically include it in the export; in this way CMS prevents objects from "breaking" in the new environment. The only downside to this behavior occurs when you're moving content "backward" from production to development for testing. Since a posting needs a template to run, SDM will drag the templates for each posting along with the postings themselves. When you import the SDO in your development environment, the development templates will be overwritten with the ones from production. To avoid this problem, you should export your templates in development first, import your SDO from production, and then reimport your original development templates. The length of time SDM takes to run depends entirely on the number and size of the objects it has to export. If your site is mostly HTML, is relatively flat, and doesn't have too many postings and/or resources, SDM could be done in a matter of seconds. If your site is very large, has a complex channel structure, and/or has lots of binary files, SDM may take longer to run. Once SDM finishes, you'll end up with one SDO file, which you can transfer to the other implementation of CMS to import. In Figure 21-5, we've provided a screen shot of one portion of the export report for our BOTS export exercise. As you can see, the report shows not only the channels, but the postings it exported. Figure 21-5. The SDM export report
Now, let's go back to our export process and explore a few of the options available to you. The following is a list of options and functions in SDM and a brief explanation of each.
ImportNow that you've walked through a manual export process, let's look at the import process. The import interface is started in a similar way to the export interface. First, start Site Manager, and pick the File menu and then Package. From the submenu choose Import. This will start SDM in import mode. Figure 21-6 shows this choice on the File menu. Figure 21-6. Choosing Import from the Package menu
Once you've started SDM in import mode, let's open the SDO we created earlier and perform an import. Click the File menu and choose Open Package. Once you've done that, your SDO package will be listed at the bottom of the interface, in the Import from File (.sdo) field. Figure 21-7 shows the import interface with our BOTSConsultingSite. SDO chosen. Figure 21-7. The SDM import interface with our SDO selected
As you can see, the import interface has a few more choices. In a lot of cases, it's likely you can simply perform the import with the default settings. However, let's review each of the options in the interface, described in the following list, before we proceed. When Adding Containers:
When Replacing Containers:
NOTE: Templates will not be deleted if pages based on the template still exist in the destination server. At this point, we should be set up for a basic import. To begin the import process, simply click the Import button. Once the import completes, SDM will give you a success or failure message and the opportunity to see the import report. In Figure 21-8, you can see a portion of our import report. If you refer back to Figure 21-5, you will see the corresponding section of the export report; the two should match. Figure 21-8. A portion of the import result report
So, now you should be familiar with the basics of importing and exporting objects. The interactive interface of SDM is a pretty easy tool to use and is quite handy. However, manually importing and exporting objects is not the best methodology if you have to continually move content between environments. As a result, Microsoft provides a COM-based interface to allow you to script an incremental import and export process. This COM-based interface can completely automate the process of importing and exporting content so that you can perform scheduled updates between, say, a development and staging environment or an authoring and production environment with little or no human interaction. In the next section, we'll show you how to create these incremental deployment scripts. Deploying Content through the COM InterfaceAlthough the interactive interface of SDM is convenient for the ad hoc movement of CMS objects from one environment to another, any regularly scheduled incremental import/export should be automated. Microsoft provides a COM-based interface that allows you to create scripts that can be used to export and import objects on some regularly scheduled basis.
NOTE: The COM interface will only export content that's changed. However, it will import anything in the source SDO file. The COM interface is broken into two parts client and server and then two subcomponents import and export. Both the client and the server interfaces are the same from a functionality standpoint. The server object set is used to act on a local machine, and the client object is used for performing import or export tasks remotely. For example, if you were creating an export package on a source server, you'd use the server components. Once you've created the SDO package on the source server using the server component, you would transfer the SDO to the destination and use the client component on the source server to start a remote import process on the destination. In our examples, we're going to use the server object to export a package and then use the client object to perform the import. Both the server and the client deployment objects have virtually the same properties and methods. ExportTo begin, we're going to create an incremental export script to perform an incremental export of our BOTS Consulting site. In our example, we're going to use a VBS file. However, the COM objects can be used from within an ASP page or a .NET script (using the COM Interop). We chose a VBS file because it was convenient and it allowed us to easily create a task in the Task Scheduler (covered at the end of this chapter). In our VBS file, we start by creating an export object from the CmsDeployServer library. The export object will handle all aspects of the export process on the server. To create the CmsServerExport object, use the following code: Set myCmsServerDeployment = Wscript.CreateObject("CmsDeployServer.CmsDeployExport.1") Next, you'll need to authenticate on the server. Remember, you can export content as a channel manager or an administrator. In our example we've embedded the user ID and password of our administrator for demonstration purposes. You could also pass in the credentials as parameters to the VBS file. The object model also provides an Authenticate AsCurrentUser method, which will use the current Windows user credentials, or the "run as" credentials if you use the Task Scheduler; choose the option that's appropriate for your environment. Call myDeployObject. AuthenticateAsUser("WinNT://CMSSERVER/admin","password") Once you've authenticated on the server, you can stipulate your export options by setting the ExportOptions properties in the CmsDeploy Export object. There are only two options when exporting and they're both related to the export of security information. The IncludeRightsGroups property allows you to determine whether you're going to export the rights groups in the SDO, and the IncludeCreatedBy property determines whether you're going to export the CreatedBy information (see Listing 21-1). Listing 21-1 Setting the export options in our VBS fileSet myExportOptions = myDeployObject.Options If ( Err.Number <> 0 ) Then Call Msgbox(Err.Description, vbCritical, "Export Problem Authenticating User") Set myDeployObject = Nothing Set myExportOptions = Nothing Exit Sub End If ' Include Rights groups and their members. ' ' IncludeRightGroups: (1) Do not export rights groups or users (default) ' (2) Export rights groups without members ' (3) Export rights groups with members ' ' IncludeCreatedBy: (1) Do not include created by information ' (2) Include created by information (default) ' myExportOptions.IncludeRightsGroups = 3 myExportOptions.IncludeCreatedBy = 2 Once you've set the export options, you can start the export. In our example, we added some additional code for stipulating the export package we wanted to create. The export returns a URL to an export report. In a noninteractive mode, you may want to simply redirect the output to a file for review later. In our example, we're starting a browser session to show the report immediately. Listing 21-2 shows our code. Listing 21-2 Setting the SDO file name and beginning the export processDim strPackageFileName, sdoDateQualifier Dim strReportUrl ' Create a date qualifier for creating unique export names sdoDateQualifier = day(now()) & month(now()) & _ year(now()) & hour(now()) & minute(now()) & second(now()) ' Set a string with the name and path of the SDO file strPackageFileName = "C:\BOTSConsultingSite" & sdoDateQualifier & ".sdo" ' Start the deployment ' The first option specifies the name of the export file ' The second option specifies the time interval. A value ' of 0 specifies to export all objects that have changed since ' the last export regardless of time. A value of 1 or greater ' specifies the age of objects to be exported. For example, ' a value of 200 stipulates that all objects that have changed in ' the last 200 minutes should be exported. ' The last option specifies the channel to export. If no value ' is provided, the entire repository will be evaluated. All objects ' from the specified channel and below will be evaluated if a value ' is provided. strReportUrl = myDeployObject.Export(strPackageFileName,0,"/Channels/botsconsulting") If ( Err.Number <> 0 ) Then Call Msgbox(Err.Description, vbCritical, "Export Problem creating SDO File") Set myDeployObject = Nothing Set myExportOptions = Nothing Exit Sub End If Now, to finish out our script, we've included some basic messages back to the administrator. Again, we're using the Msgbox object to indicate the status. However, in a noninteractive mode, you'll want to remove these references. In Listing 21-3, we've provided the complete script from beginning to end. Listing 21-3 The complete export script[View full width] Call ExportCMSObjects() Sub ExportCMSObjects Dim myDeployObject Dim myExportOptions On Error Resume Next Set myDeployObject = Wscript.CreateObject("CmsDeployServer.CmsDeployExport.1") If ( Err.Number <> 0 ) Then Call Msgbox(Err.Description, vbCritical, "Export Problem Creating Deployment If you use the code we've provided, be sure to specify your domain name when authenticating as well as the appropriate export channel. Other than those two changes, the script should operate as described.
NOTE: One last mention automated scripting is meant for incremental exports only; it's not meant to provide a mechanism for moving the entire repository. If you want to export the entire repository, you can use a SQL backup and restore or use the interactive SDM interface in Site Manager. ImportOnce you've completed your export, it's time to import the content. As we mentioned in the export section, we're going to use the client object to perform the import. This will allow us to remotely connect to a CMS server to perform the import. For the most part, the import process is very similar to the export. For the sake of brevity, we provide the following list of the general operations performed in the import process, and we share the script code in Listing 21-4.
Listing 21-4 The import code example[View full width] Call ImportCMSObjects() Sub ImportCMSObjects() Dim myDeployObject, myImportOptions Dim winShell On Error Resume Next Set myDeployObject = WScript.CreateObject("CmsDeployClient.CmsDeployImport.1") If ( Err.Number <> 0 ) Then Call MsgBox(Err.Description, vbCritical, "Import Problem Creating Import Object") Set myDeployObject = Nothing Exit Sub End If ' Authenticate against the remote server, either by stipulating the credentials ' or using the current Windows user credentials. These calls are similar to the ' authentication methods for the export process, except you must also provide ' the URL to the remote system. Both methods are shown below. Call myDeployObject.AuthenticateasUser("http://localhost/","WinNT://cmsdemo1 Once you've completed your script, you should have a fully functional import process! Creating ProfilesWhen using SDM in an interactive mode, you may want to preserve certain predetermined settings for a deployment. For example, if you periodically need to export a specific set of objects, like new templates from development to production, you may want to create a profile. A profile allows you to preset deployment options and save them in a file, which can be used over and over again to perform a predetermined deployment. There are two types of profiles in SDM. An export profile stores all settings for a predetermined export process. Conversely, an import profile stores all the settings for a predetermined import process. Creating profiles for semiregular export/import operations will ultimately save you time. Since we've covered a lot of ground in this chapter with regard to deployment, we're combining the creation of an export and an import profile in a more generic description of creating a profile; both operations are similar enough that they don't require separate explanations. The first step in creating a profile is to start SDM interactively through Site Manager. Be sure to start SDM in the appropriate mode for the profile you wish to create. For example, if you want to create an export profile, start SDM in export mode. If you're creating an export profile, select all the objects you wish to export. In an import profile, you simply have to set how the import process occurs. Once you've finished making all the setting changes and/or selecting the objects, click the File menu. Next, click Save Import/Export Profile (Import or Export based on the mode you're in). Now, just browse to the directory where you want to save the profile, provide the profile with a name, and click OK. When you're ready to use your profile, begin by opening SDM in interactive mode through Site Manager. When SDM appears, click the File menu and choose Open Import/Export Profile. Once the profile has loaded, SDM will automatically configure itself based on the settings in the profile. Now, just click the Import/Export button. |
EAN: 2147483647
Pages: 298