Managing Documents and Workflow
SharePoint Server 2007 makes available several features that allow you to implement sophisticated document management processes. Metadata, policies, workflows, and templates are among the powerful features that can be associated with a document library. These features can also be associated with content types, which are discussed in Chapter 10, "Records Management in Microsoft Office SharePoint Server 2007," and covered thoroughly in Chapter 15, "Managing Content Types." In this section, we will explain how these features work in the library context as part of a basic document management architecture.
Creating Metadata
When you want to store additional information about a document in the document library and make it available to users to sort and filter by, you create custom columns, also referred to as metadata. These custom columns, once defined, can then be updated by users when they upload and edit documents to provide meaningful information about the status, schedule, budget, ranking, or any other aspect of a file that might be useful to an organization. As a result of performance improvements made in SharePoint Server 2007, the practical number of custom columns that a document library can have has been greatly increased.
Creating a New Document Library Column
To create a new document library column, complete the following steps:
-
From the document library's Settings menu, click Create Column.
-
In the Column Name box, type the name of the metadata.
-
Select the data type for the column.
-
Optionally, type a description for the column as well.
-
Complete the additional column settings.
-
Click OK.
Choosing Column Data Types
When creating a custom column in a document library, you have a variety of data types to choose from, as shown in Figure 9-7. Table 9-2 describes each data type that is available.
| Data type option | Description |
|---|---|
| Single Line Of Text | A basic text entry field with a maximum length of 255 characters. |
| Multiple Lines Of Text | An advanced text entry field that supports text entered on separate lines and with carriage returns. The field has a default maximum character limit of 255. Setting the Allow Unlimited Length In Document Libraries option to Yes removes this restriction. The Number Of Lines For Editing property specifies how long the text in the entry box should be in the HTML pages, up to a maximum of 1000 lines. The text box will automatically provide scroll bars to access text that exceeds the number of display lines. |
| Choice (Menu To Choose From). | Presents the user with one of three types of selectable fields: drop-down menu, radio buttons, or check boxes. Of these three, the check boxes option is the only one that allows multiple items to be selected. The items a user chooses from are entered manually at the time the field is created. |
| Number (1, 1.0, 100) | Validates the data as numeric, and requires that it contain only digits or numeric formatting (for example, a period or comma). You can specify a minimum and maximum range of values and display the number with a percent (%) sign as part of the formatting. This option does not convert a number to a percentage, so entering "1234" will display as "1234%" not "123400.00%" as it does in Microsoft Office Excel. You can also limit the number of decimal places of accuracy to store in the field. Note that this is not just a formatting setting. Setting the decimal places to "2" and entering a value such as "2.345" will round the value when it is saved and store it as "2.35". |
| Currency ($, ¥, €) | Similar to the Number (1, 1.0, 100) entry field, with the additional feature of including a formatting pattern on the data that rounds numbers to two decimal places and applies the chosen denomination character. The currency setting will not change the standard decimal and thousands separators used (for example, 1.234,56 versus 1,234.56). To change this setting, use the Regional Settings page under Site Settings. |
| Date And Time | Supports storing either a date or a date and time together within the valid range of 1/1/1900 to 12/31/8900. Dates and times must be entered in the format defined in the Regional Settings of the site. |
| Lookup (Information Already On This Site) | Allows you to link the data in this field to data from a field in another list on the same site. When you edit the value of this field for a document, you will be presented with a drop-down list displaying the values from the other field. An advantage of this data type is that the selected value itself is not stored in the lookup field; instead, it's stored to a link back to the selected value in the source list. If the source list is later changed, the selected value in the lookup column also changes. |
| Yes/No (Check Box) | A basic Boolean entry field that supports the values of Yes and No. |
| Person Or Group | A special field new to SharePoint Server 2007 that allows you to use the standard SharePoint user lookup tool to select a user from Active Directory or from a list of users in a specific SharePoint group. The user entering a value for this field must know the user name, first name, or last name of the user being selected. The Show Field property determines which attribute of the selected user will be displayed. |
| Hyperlink Or Picture | A specialized column that will display in entered URL as either a clickable hyperlink or an image. The URL must either begin with a valid protocol reference (HTTP, HTTPS) or be a relative URL beginning with a forward slash (/), which will be replaced with the root site reference. |
| Calculated (Calculation Based On Other Columns) | Allows you to use a calculated column to display the results of arithmetic or textual analysis on another column in the same list. Calculations begin with an equal sign, and column names should be enclosed in square brackets. For example, if the list contains the columns Cost and Revenue, you create a calculated column called Profit using the formula =[Revenue] - [Cost] to display the net gain. Other useful functions include the following:
|
| Business Data | A new field type in SharePoint Server 2007 that allows you to add data from business applications registered in the Business Data Catalog to a document library. (For more information on the Business Data Catalog, see Chapter 12, "Administrating Data Connections.") |
| Audience Targeting | Another new field type in SharePoint Server 2007 that allows you to choose a specific audience, distribution list, or SharePoint group to target the document to. Adding this column displays an audience picker control that you can use to browse the audience, distribution list, or SharePoint groups and select one or more to filter the list by for your users. |
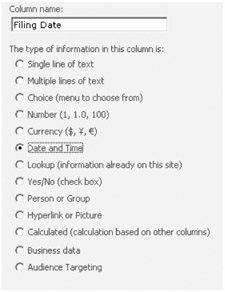
Figure 9-7: New column data types
Setting Metadata Values
When a custom column is added to a library, the values for the column will be blank for any existing document and will need to be populated retroactively. When a new document is added to a library, the user will be prompted to enter data for the custom columns, depending on which method is used to upload the document. Methods available include the following:
-
Created as New from a library template. The user will see the Document Information Panel at the top of the page, allowing them to fill in the properties.
-
Upload a single document. The user will be presented with a Properties page after the file is uploaded. Required properties need to be populated before the document can be checked in.
-
Upload multiple documents, either through the Multiple Upload control or a drag-and-drop operation in Explorer view. No page is provided for populating columns. Properties must be set after the documents are uploaded.
Editing the Existing Metadata of a Document
You can directly edit the metadata of a file in SharePoint Server 2007, as shown in Figure 9-8, by following these steps:
-
Click the drop-down menu for the document.
-
Click Edit Properties.
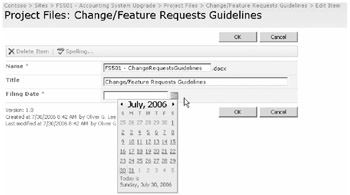
Figure 9-8: Document metadata-editing metadata
Document Information Panel
Custom columns are fully integrated into the 2007 Microsoft Office system as well as the SharePoint Server 2007 pages. When you open a document for editing in Word 2007, for example, a Document Information panel similar to the one shown in Figure 9-9 is displayed at the top of the screen so that authors using Word 2007 and other SharePoint-compatible clients can edit metadata columns defined on the server. If the panel does not appear at the top of a 2007 Microsoft Office system window, you can open it by clicking the File menu, selecting Prepare, and then clicking Properties.
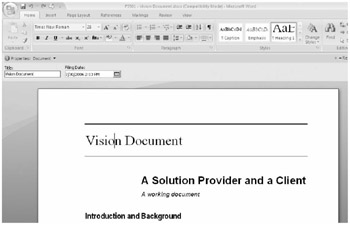
Figure 9-9: Document information panel in the 2007 Microsoft Office system
Creating Site Columns
About the time you discover the value of using custom columns in your libraries, you will also realize that you want to use the same column in more than one library. You don't have to re-create the column multiple times; instead, you can define the column once as a Site Column and then re-use it anywhere in the site.
Creating a New Site Column
To create a new site column, complete the following steps:
-
On the Site Actions menu, click Site Settings.
-
Under the Galleries section, click Site Columns, and then click Create.
-
Define the name and attributes of the column, and click OK.
-
Follow the procedure below to add the new site column to a document library.
Adding an Existing Site Column
After you have defined the column at the site level, you can add the column to each of your document libraries. When you open the Add Columns From Site Columns page, you'll see that a large number of site columns are built into the product, as shown in Figure 9-10. Searching through the list of existing columns, you might find that the metadata you want to track has already been defined.
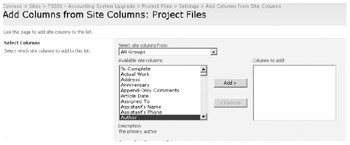
Figure 9-10: Document metadata-adding site columns
To add a site column, complete the following steps:
-
On the library settings menu, click Add Columns From Site Columns.
-
Select the existing site column to apply to the library, and click Add.
-
Select or deselect the option to add the column to the default view.
-
Click OK.
| Note | If you have enabled Content Types in the library, you will have an additional check box option to add the site column to all of the content types. |
Defining Workflow
You use workflows in SharePoint Server 2007 to define how documents will be handled to conform to standardized business processes in your organization. Workflows are covered extensively in Chapter 28, "Implementing Microsoft Windows Workflow Services," so we will provide only an overview of this subject here. You can create customized workflows in SharePoint Server 2007 and associate them with a document library so that they can be applied to any document in the library. When you launch a workflow, it generates status entries for each of its stages in a Tasks list and the workflow's progress is recorded in a workflow history list.
A vital part of the life cycle of a document is the series of steps it needs to pass from creation, through approval, cataloging, and finally disposition. Until now, the most common way to pass a document through these steps has been to send it via e-mail to a distribution list or an individual for processing. As simple as this approach is, it usually requires manual effort to initiate the process, track the status of a document, and move the document to a final storage location when it is finished. It also has the disadvantage of creating multiple copies of the file as it is sent from one person to another. In SharePoint 2007, you can define a document workflow to automate these operations and ensure that the handling of the document conforms to standardized business processes in your organization.
For example, you might have a standardized performance evaluation that managers need to prepare on each staff member they supervise. The requirements are that the document must be created from a specific template and that when it is submitted by a manager, a serial approval process begins that must include a senior manager and the manager of the Human Resources department. You can achieve this in SharePoint 2007 by creating a custom workflow in a document library and triggering the workflow to start when the evaluation is published as a major version.
Standard Workflows
SharePoint Server 2007 includes several standard workflows that are ready to be applied to your document management processes. Here are the types of workflows available:
-
Approval Routes a document to one or more site members who are designated as Approvers. The tasks that are generated notify each user in turn and ask them to approve or reject a document. If one user rejects the document, the workflow ends. Otherwise, it proceeds until all assignees have approved the document. By default, Approval is a serial workflow wherein Approvers are assigned their task in a sequential order specified by the workflow author.
-
Collect Feedbacky Routes a document for review by one or more members of the site chosen by the workflow author. The Collect Feedback workflow is defined as parallel by default so that all reviewers receive e-mail notification and are assigned a task at the same time. Participants can optionally delegate their tasks or decline to participate.
-
Collect Signatures Routes a document to a set of participants who must sign the document. This workflow is configured on the document library on the server, but it is initiated in the 2007 Microsoft Office system client by selecting Start Workflow from the File menu.
Creating a Document Workflow
To create a typical workflow, such as an employee evaluation, complete the following steps:
-
Browse to the site and document library where the workflow will be defined. In this case, the library is called Staff Evaluations.
-
Select Document Library Settings from the Settings menu.
-
Click Workflow Settings under Permissions And Policies. If this is not the first workflow in the library, click Add Workflow. The page will appear as shown in Figure 9-11.
-
From the Select A Workflow Template list, choose the type of workflow-in this case, Approval.
-
In the Type A Unique Name For This Workflow text box, specify a workflow name that will be used to identify it in reports. In this case, we will call it Evaluation Approval.
-
Select which tasks list will be used to store the task items for each user assigned an action in the workflow. You can choose to use an existing tasks list or have Share-Point Server create a new one for you for this workflow by clicking the listbox and selecting New Task List.
-
Select which list will be used to track the history of actions and operations that take place in the workflow. You can choose an existing list or have SharePoint Server create a new one for you for this workflow by selecting Workflow History (New).
-
Select which events can automatically start this workflow and whether a user can start the workflow manually. Because we want to control when this workflow begins, we will select only the Start This Workflow To Approve Publishing A Major Version Of An Item option. (The option to start the workflow when a major version has been published is available only if Document Approval has been enabled under the versioning settings.)
-
Click Next and the next page will appear as shown in Figure 9-12.
-
You can choose to assign the workflow tasks to all users at once, which constitutes a parallel workflow, or to each user in turn, which is a serial workflow. In this case, you want to route the document only after the previous user has approved it, so you will select the One Participant At A Time (Serial) option.
-
You can also allow users to make changes to the workflow by either reassigning the task to another person or requesting a change to the document before approving it. In this case, we will select only the Request A Change Before Completing The Task option.
-
In the next section on the page, you can specify which users the document will be routed to for approval. In this case, we will route it first to the senior manager in this department (Mark Hassall) and finally to the Active Directory Domain group HR Managers. Because there might be more than one member of HR Managers, we will also select the option Assign A Single Task To Each Group Entered option so that all members of the group will receive the task at once rather than serially.
-
The last setting we will set is the Due Date of the task that is assigned to each user in the workflow. In a parallel workflow, tasks are assigned a specific date. In a serial workflow, such as this one, each user will be given a specific number of days or weeks to complete his or her task in the workflow. We will specify 2 as the number of weeks for review and approval of the evaluation.
-
Click OK.
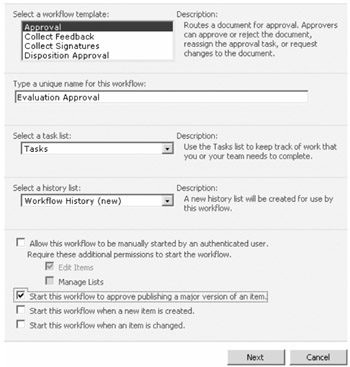
Figure 9-11: Creating a new workflow
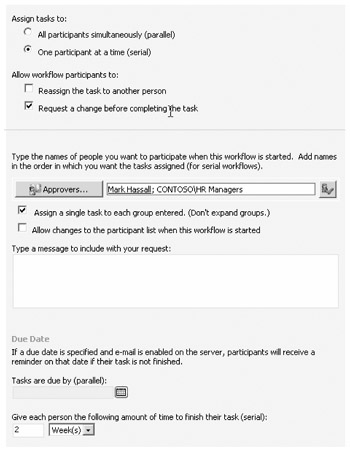
Figure 9-12: Document workflow-creating a new workflow, second page
Completing the Workflow
After you have defined your workflow, it will be initiated when a user triggers it through the specified actions or by starting it manually, if that option was allowed in the workflow definition. In this case, the workflow will start when a user publishes a major version of the evaluation, which will initiate the following steps:
-
When a user publishes an evaluation, the Start page for the workflow will open as shown in Figure 9-13. At this point, we can simply start the workflow and it will automatically generate the first task.
-
The first action in our workflow creates a task for Mark Hassall to approve the evaluation and sends him an e-mail with a link to the task. He can approve the evaluation either from within the e-mail in Microsoft Office Outlook or from the SharePoint Server 2007 site. The e-mail also contains a link to the document for approval.
-
After Mark Hassall has approved the evaluation, his task is marked as 100% completed and a new task is generated to the HR Managers group for its approval. After the document has been approved by a member of HR Managers, the workflow routing is complete and the document is marked as Approved.
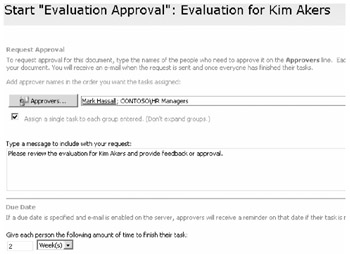
Figure 9-13: Document workflow-Workflow Start page
Monitoring the Workflow
While the workflow is in progress, you can view a report of the current status of the workflow. To view the Workflow Status page, which displays the history of users who have acted on the workflow and the current user the workflow is assigned to, follow these steps:
-
Click the drop-down list for the document.
-
Select Workflows.
-
Click on the workflow you want to review under Running Workflows.
Workflows are also tightly integrated into the 2007 Microsoft Office system client applications, allowing users to easily participate in them from within the client program. For example, the following tasks can be performed either from the Web site or a 2007 Microsoft Office system application:
-
Viewing the workflows available to run on an item
-
Initiating a workflow
-
Viewing and launching a workflow task
-
Completing a workflow task, and filling the task completion form
Using Document Templates
The New drop-down menu in a document library gives users the option to create a file from a template stored in the Forms folder. By default, document libraries have one default template that all new files are created from. The default template is selected from the list of standard built-in templates at the time the document library is created and can be changed later.
You can change the default template for any document library to use a different starting file by following these steps:
-
Create a customized file in Word 2007, Excel 2007, or another client program written to work with SharePoint Server 2007 and copy it to your clipboard
-
From the Actions menu, select Open With Windows Explorer.
-
Double-click on the Forms directory and paste your customized file into this directory.
-
Click the Back button twice to return to the main view of your document library.
-
From the Settings menu, select Document Library Settings.
-
Click Advanced Settings under General Settings.
-
In the Document Template box, enter the relative URL of the new template, including the name of the document library-for example, Documents/Forms/Leave Request.docx.
Converting Documents
SharePoint Server 2007 provides a means to allow you to automatically convert documents from one format to another. For example, you can use this feature to convert a Word 2007 document into a Web page for viewing by users who do not have Word 2007 installed. Conversions can be set to run programmatically, as in a workflow, or they can be initiated by the user. Two services are installed with SharePoint Server 2007 that handle the conversion process: the Office Document Conversions Launcher service and the Office Document Conversions Load Balancer service.
The Load Balancer Service
By load balancing conversion tasks across SharePoint servers in the server farm, this service ensures that requests for document conversions do not overwhelm any single server. When a document conversion is started, SharePoint Server 2007 passes the request to the Load Balancer service, which identifies which SharePoint server will be used to perform the conversion. The Load Balancer service then connects to the Launcher service on that server through .NET Remoting and passes it the conversion settings information.
The Launcher Service
This service is called by the Load Balancer service and is responsible for queuing and initiating the conversion request. The Launcher passes the specified document to the appropriate document converter, which generates the converted file. SharePoint Server 2007 then loads the converted copy, performs post-processing on it, and uploads it into the document library where the original file was.
SharePoint Server 2007 maintains metadata in the document library to track the relationship between the original document and the converted document, and it retains the relationship as long as both documents remain in the same document library. Through this metadata on the converted document, SharePoint can identify the original document, but it does not work the other way around. Moving or deleting either of the files will break the conversion relationship, but copying or renaming the files does not.
Configuring Document Conversion
To configure document conversion, complete the following steps:
-
In Office SharePoint Server 2007 Central Administration, browse to the Operations tab and click Services On Server.
-
Start the Document Conversions Load Balancer Service.
-
Start the Document Conversions Launcher Service.
-
Select the Load Balancer server to associate the Launcher service with.
-
Specify a unique port number for the Launcher service to use when communicating with the Load Balancer service.
-
Browse to Application Management, and click Document Conversions under External Service Connections.
-
Click Yes to enable document conversions on the application. Choose the Load Balancer server to use, and select how often the Document Conversion timer job will run. Click OK.
Performing a Conversion
In some cases, document conversion can be configured to occur automatically, such as with the Form Conversion For Archiving feature discussed in more detail in Chapter 10. Otherwise, users can invoke this conversion manually by doing the following:
-
Browse to the document that you want to convert. If the document supports a converter, a Convert Document command will appear in the document drop-down list in the document library.
-
Click Convert Document, and select the converter to execute. An example of converting a Word document to a Web page is shown in Figure 9-14.
-
Follow the steps on the conversion page.
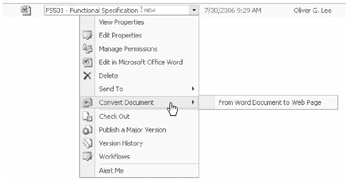
Figure 9-14: Convert Document option
EAN: 2147483647
Pages: 299