Performing the Upgrade Process
This section provides additional details on the three upgrade approaches described previously in Chapter 23. The upgrade process can be divided into the following four tasks:
-
Task 1: Install SharePoint Server 2007 binaries.
-
Task 2: Run the prescan tool.
-
Task 3: Run the SharePoint Products And Technologies Configuration Wizard.
-
Task 4: Upgrade/Migrate your SharePoint Portal Server 2003 Web sites using one of the three approaches described previously.
We will detail, in this section, how these tasks are different than they were described in Chapter 23. In addition, we will detail the use of the stsadm.exe command line tool in the upgrade process. If you plan to use the content database migration approach, you should install the new hardware with SharePoint Server 2007 as detailed in Chapter 5, and then return to this chapter for details on the database migration task.
Task 1: Installing SharePoint Server 2007 Binaries-In-place/Gradual Upgrade Approach
To install the SharePoint Server 2007 binaries, complete the following steps:
-
On the front-end Web server running Central Administration, install SharePoint Server 2007 from the CD by double-clicking on Setup.exe if the installation process does not automatically start. Setup will notice that you have an existing installation, and it will present you with a screen of choices to select your upgrade approach.
-
Gradual Upgrade: Choose Yes, Perform A Gradual Upgrade.
-
In-Place Upgrade: Choose Yes, Perform An Automated In-Place Upgrade (selected by default).
-
Content Database Migration: No, Do Not Upgrade At This Time.
-
-
If you are upgrading a farm installation and this is the first server in the farm that you're upgrading, change the default server type on the Server Type tab from Stand-alone to Complete. Use Standalone only if your installation of SharePoint Portal Server 2003 uses the Microsoft SQL Server 2000 Database Engine (MSDE).
Note The recommended upgrade option for a SharePoint Portal Server 2003 installation that uses MSDE is the in-place upgrade.
-
The remaining two tabs can be used to customize your installation, as described in Chapter 5. If you plan to use the server for search, you should choose a location with plenty of disk space available.
-
When Setup is complete, remember to clear the check box for starting the Post-Setup Configuration Wizard before you close the Microsoft Office SharePoint Server 2007 window.
If you get a dialog box with the message, "In order to complete setup, a system reboot is necessary. Would you like to reboot now", click Yes and restart your computer.
Task 2: Running the Prescan.exe Tool
This should be the second time you have run this tool. The first execution of the prescan.exe tool should have been during the planning stage. (The syntax of the prescan.exe tool was described previously in Chapter 23.) Run the prescan.exe tool on one of your SharePoint Portal Server 2003 servers as explained in the following steps:
-
Open a command prompt, navigate to the Windows SharePoint Services 3.0 directory: %SystemDrive%\Program Files\Common Files\Microsoft Shared\Web server extensions\12\BIN, and type the following command:
Prescan /c preupgradescanconfig.xml /all
Note In Chapter 23, you had to specify a configuration file only if your installation contained custom site definitions. SharePoint Portal Server 2003 depends on a number of site definitions that are used as templates to create areas within a portal Web site, such as Topics, News, Sites Directory, and My Site. If you do not specify the preupgradescanconfig.xml configuration file, the upgrade process will incorrectly identify these site definitions as custom templates, with the result that the upgrade process may not know how to handle area pages, which in turn may lead you to wrongly identify post upgrade tasks that need to be completed by your developer. The templates identified by the configuration file are those identified in the WEBTEMPSPS.XML located in the Windows SharePoint Services 2.0 directory %SystemDrive%\Program Files\Common Files\Microsoft Shared\Web server extensions\60\BIN, except for the STS template entry.
-
After the scan has completed, the names of the summary report and log files are displayed in the command-line window. These files should be reviewed for any outstanding issues, such as customized site definitions (templates) or customized Web Parts, as well as broken sites.
Task 3: Running the SharePoint Products And Technologies Configuration Wizard
Before running the configuration wizard, be sure to perform these actions:
-
Disable all antivirus software before trying to upgrade.
-
Deploy upgraded definition files and site definitions.
-
Upgrade custom Web Part packages. If you are using the content database migration upgrade option, redeploy all custom Web Parts to the new Web front-end servers. Similarly, if you are using the gradual upgrade option, you must redeploy your Web Parts to the \BIN folder of the new Web applications.
-
If you need language packs, install them now.
-
Ensure that all your SharePoint Portal Server 2003 Web applications are started on all Web front-end servers.
After performing these steps, it is time to run the configuration wizard. To successfully do this, follow these steps:
-
Run the SharePoint Products And Technologies Configuration Wizard on the first server in your farm. Choose the install type that matches the upgrade option you have chosen, and select a server type of Complete.
-
Progress through the rest of this task as detailed in Chapter 23, Task 3, steps 2 to 12.
Note Your SQL Server will now include a new database named SharePoint_AdminContent_<GUID>. For a gradual upgrade, it will include a new configuration database, which if you accepted the default, is named SharePoint_Config.
In a Web farm environment, once SharePoint Server 2007 is successfully installed, either run the SharePoint Products And Technologies Configuration Wizard on the other servers or run the SharePoint Products And Technologies Configuration command-line tool (psconfig.exe) to upgrade the other servers to the SharePoint Server 2007 platform. To use the psconfig.exe command-line tool, follow these steps:
-
Open a command prompt, and navigate to %SystemDrive%\Program Files\Common Files\Microsoft Shared\Web server extensions\12\BIN.
-
For an in-place upgrade, use the following command:
PSCONFIG -CMD configdb -CONNECT -SERVER <SQLServerName> -DATABASE <configDBname> -USER <Domain\username> -PASSWORD <pw> -CMD installfeatures -CMD services -INSTALL -CMD secureresources -CMD upgrade -INPLACE.
-
For a gradual upgrade, use the following command:
PSCONFIG -CMD configdb -CONNECT -SERVER <DBSERVERNAME> -DATABASE <configDBname> -USER <user acct> -PASSWORD <pwd> -CMD installfeatures -CMD services -INSTALL -CMD secureresources -CMD upgrade -SIDEBYSIDE
Here is an explanation of the elements contained within the preceding commands:
q
<SQLServrName> is the SQL Server that hosts your configuration database.
q
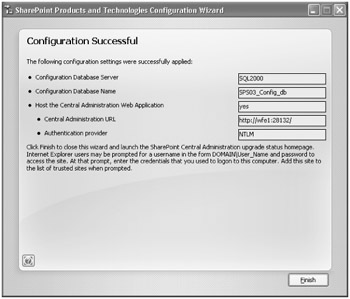
<configDBname> is the name of your configuration database, which for an in-place upgrade is the name of the configuration database that you created for your SharePoint Portal Server 2003 installation. For a gradual upgrade, it is the name of the configuration database you created when you ran the SharePoint Products And Technologies Configuration Wizard on the first server of your farm. The default name for SharePoint Server 2007 is SharePoint_Config. The name of the configuration database can be found on the Configuration Successful screen as shown in Figure 24-11.
q
<Domain\username> is the Server Farm administrator account. If you do not specify a valid username, psconfig returns an error message.
-

Figure 24-11: The Configuration Successful screen showing the name of the configuration database.
| Note | The psconfig command-line tool is a useful tool, and it has more parameters than those mentioned. For more information on the psconfig command-line tool, open a command prompt and type psconfig -?. To find more information on the configdb command, type psconfig -help configdb. If you have to repeat this process on multiple servers I recommend you create a batch file that contains this command. |
| Important | If you use the SharePoint Products And Technologies Configuration Wizard to upgrade other servers in the farm, select to join an existing farm. Then on the Advanced Settings page, if the server is an application server, select Do Not Use This Machine To Host The Web Site or if the server is a Web front-end server, select Use This Machine To Host The Web Site. |
Task 4a: Performing In-Place Upgrade of SharePoint Portal Server 2003 Web Sites
To complete the in-place upgrade process, complete the following steps:
-
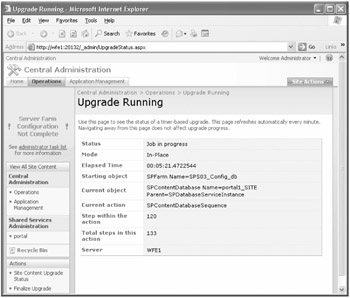
After you have completed the steps detailed in task 3, the SharePoint Products And Technologies Configuration Wizard closes and the Upgrade Running page opens, as shown in Figure 24-12.
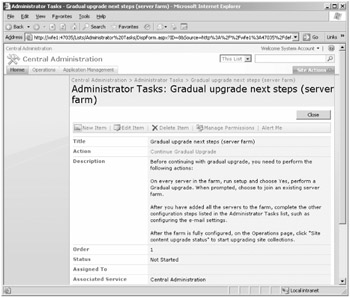
If this is not a standalone implementation, in the left navigation pane you will see the words "Server Farm Configuration Not Complete" in red and a link to the administrator's task list below it. When you click the link, you are redirected to the home page of the Central Administration Web application, as shown in Figure 24-13.
-
Once the upgrade process is complete on the first server in the SharePoint Server 2007 farm and the Upgrade Running page displays "No job pending," click the Continue Gradual Upgrade link, and complete the upgrade process on the other servers.
-
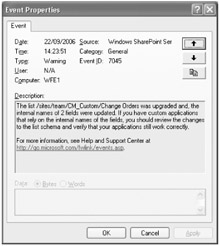
If the upgrade fails or reports issues, check the event logs on the server and the messages in the Upgrade.log and the trace log files, which are located at %SystemDrive%\Program Files\Common Files\Microsoft Shared \Web server extensions\12\LOGS. An example of an event log entry is shown in Figure 24-14. This particular entry warns of internal name changes.

Figure 24-12: Upgrade Running page

Figure 24-13: Central Administration-server farm configuration not complete

Figure 24-14: Application event log-List schema changes
| Note | You should review these resources even if the upgrade is a success, as they will inform you of changes made and the timing of the upgrade process. During the test pre-upgrade task, this information can be used in the planning stage of the upgrade process. |
Task 4b: Performing a Gradual Upgrade
If your SharePoint Portal Server 2003 environment enabled shared services, you should upgrade the parent portal first. Once you have decided which portal to upgrade, you must upgrade the root of the portal-that is, http://portal.contoso.msft. Once the root is upgraded, you can then choose to upgrade other site collections. A SharePoint Portal Server 2003 portal Web site will consist of a number of site collections: the root, such as http://portal.contoso.msft; a site collection for each personal site, such as ">http://portal.contoso.msft/personal/<username>; and sites under the managed path, such as ">http://portal.contoso.msft/sites/<sitename>. You might have other managed paths with other site collections. Because areas are just Web sites under the root, you will upgrade all areas under a given portal. The granularity of the gradual upgrade process is the site collection.
Gradually upgrading your site collections, including the root, is similar to the gradual upgrade task detailed in Chapter 23. There will be slight differences. For example, on the Set Target Web Application Web page, you will be asked for the SSP and Search database names. However, the two processes are basically the same. This section summarizes the tasks you should complete.
-
Ensure you have a healthy SharePoint Server 2007 environment by completing the following tasks:
-
Navigate to the SharePoint 3.0 Central Administration Web site, and complete the administrative tasks listed there. Ensure all services that are applicable for the servers in the Web farm are started. An SSP will be created when you upgrade your first portal site.
-
Review the log files.
-
Review the event logs.
-
Resolve any issues.
-
-
Check that the site collection's SharePoint Portal Server 2003 Web application and the Windows SharePoint Services Web Application service are started on all Web front-end servers. This is required so that the Windows SharePoint Services 3.0 Timer service can create all the Web application pairs on all the required Web front-end servers. You can start this service using the following command line:
stsadm -o provisionservice -action start -servicetype SPWeb
-
If this is your second attempt at upgrading a root Web application or a site collection that results in the addition of a content database, ensure that the databases created from the previous attempt no longer exist.
-
To upgrade your site collection, either use the SharePoint 3.0 Central Administration Web pages or use the stsadm.exe command-line tool. Use the following command as a model if you choose to use the stsadm.exe command-line tool:
stsadm -o upgrade -sidebyside -url http://portal.contoso.msft -sitelistpath c:\sites.xml
In this command, sites.xml is a file that contains a list of site collections to upgrade. The xml file should contain text similar to the following for each site collection:
<WebApplication URL="http://portal.contoso.msft"> <Database name=" portal1_site"> <sitecollection URL="http://portal.contoso.msft/personal/peter"/> <sitecollection URL="http://portal.contoso.msft/sites/team" /> (more as needed) </Database> </WebApplication>
| Note | To reduce the amount of typing and to ensure you don't miss any site collections when creating this XML file, open a command prompt, navigate to the Windows SharePoint Service 2.0 directory %SystemDrive%:\Program Files \Common Files\Microsoft Shared\Web server extensions\60\BIN, type stsadm -o enumsites -url http://<name of your portal>, and redirect the output to a text file. This will provide a URL to each site collection in the virtual server. You need to run this command for each virtual server in your SharePoint Portal Server 2003 farm. |
Other parameters that you can use with the upgrade option are as follows:
-
-forceupgrade
-
-quite
-
-farmuser <Domain\userid>, which specifies the userid to use during the upgrade
-
-farmPassword <password>
The upgrade process will create one target database for each original content database, plus a single temporary database used during the upgrade process. You can change the names of these databases, but the default names are <Portalname>_SITE_Pair and WSSUP_TEMP_<GUID>. These databases will be created on the same SQL server as the original content database. You should check the settings of these databases and include them in your maintenance and backup procedures.
To revert a site collection to SharePoint Portal Server 2003, use the SharePoint 3.0 Central Administration pages, as detailed in Chapter 23. Before you revert a site, ensure that the site still exists in your SharePoint Portal Server 2003 environment. We recommend you take a copy of the site collection before you revert it by using the stsadm -o export command. See Chapter 30, "Microsoft Office SharePoint Server 2007 Disaster Recovery."
Task 4c: Performing the Content Database Migration
Once you have installed and configured SharePoint Server 2007 on a new farm, complete the following steps:
-
On one of the servers on your SharePoint Portal Server 2003 Web farm, open a command prompt and navigate to the Windows SharePoint Services 3.0 directory %SystemDrive%\Program Files\Common Files\Microsoft Shared\Web server extensions\12\BIN. Then type the following command:
prescan /c preupgradescanconfig.xml /all
-
Set the relevant SharePoint Portal Server 2003 SQL content databases as read-only.
-
Copy the content databases to the SQL server that the SharePoint Server 2007 uses.
-
Migrate the content database by using the SharePoint 3.0 Central Administration pages or the stsadm -o addcontentdb command, as detailed in Chapter 23.
EAN: 2147483647
Pages: 299