8.5 Development guidelines
|
| < Day Day Up > |
|
8.5 Development guidelines
In this section we describe:
-
How to enable an EJB target application as an RPC style Web service provider.
-
How to enable a Web source application as an RPC style Web service client.
We are using the Web Services for J2EE support provided with WebSphere V5.0.2 to implement our solution, which includes command line tools to generate the Web services classes and deployment descriptors. WebSphere Studio Application Developer V5.1 also provides full support for the creation of Web services for J2EE.
Although all the specifications are human readable (XML), there is a strong need for tools supporting development because many documents with overlapping content are involved. It would be cumbersome and error prone to define all these files without tools.
8.5.1 Web service enabling the target application
Figure 8-9 shows the steps involved in creating the Web services enabled target application using the stateless session bean from our sample code.
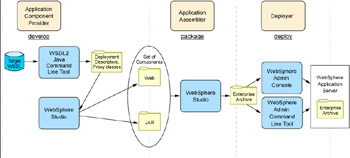
Figure 8-9: Web service development for target application
Let's walk through the process shown in Figure 8-9 for our target application.
We have already created a simple EJB application using IBM WebSphere Studio Application Developer. We can create an RPC style Web service using this EJB as follows:
-
Create a service endpoint interface for the Web service in a new package. (This step has already been done for you in our sample application.)
-
Using WebSphere Studio, switch to the J2EE Perspective and click the Project Navigator tab.
-
Navigate to the ITSOTargetAppEJB → ejbModule folder.
-
Right-click the ejbModule folder and select New → Package. Set the package name to com.ibm.itso.ws.inventory.
-
Create the service endpoint interface by copying the Inventory EJB Remote Interface, Inventory.java, from the com.ibm.itso.ejb.inventory package to Inventory.java in the new com.ibm.itso.ws.inventory package.
-
Edit the new Inventory.java file, so that it extends java.rmi.Remote, as shown in Example 8-1.
Example 8-1: Inventory service endpoint interface

package com.ibm.itso.ws.inventory; public interface Inventory extends java.rmi.Remote { public void updateInventory(String partNo) throws java.rmi.RemoteException; public String getDeliveryDate(String partNo) throws java.rmi.RemoteException; }
-
-
Open a command window and change to ITSOTargetAppEJB \ejbModule in your Studio workspace folder.
-
Generate a Web Services Description Language (WSDL) file from the service endpoint interface. We used the command shown in Example 8-2.
Example 8-2: Generating WSDL using Java2WSDL
C:\WebSphere\AppServer\bin\Java2WSDL -verbose -implClass com.ibm.itso.ejb.inventory.InventoryBean -location http://target.itso.ral.ibm.com:9080/ITSOTargetApp/services/Inventory -output C:\workspace\ITSOTargetAppEJB\ejbModule\META-INF\wsdl\Inventory.wsdl -style rpc -use literal -voidReturn ONEWAY com.ibm.itso.ws.inventory.Inventory WSWS3010I: Info: Generating portType {http://inventory.ws.itso.ibm.com}Inventory WSWS3010I: Info: Generating message {http://inventory.ws.itso.ibm.com}getDeliveryDateRequest WSWS3010I: Info: Generating message {http://inventory.ws.itso.ibm.com}getDeliveryDateResponse WSWS3010I: Info: Generating message {http://inventory.ws.itso.ibm.com}updateInventoryRequest WSWS3010I: Info: Generating message {http://inventory.ws.itso.ibm.com}updateInventoryResponse WSWS3010I: Info: Generating binding {http://inventory.ws.itso.ibm.com}InventorySoapBinding WSWS3010I: Info: Generating service {http://inventory.ws.itso.ibm.com}InventoryService WSWS3010I: Info: Generating port InventoryYou can see the result of the -voidReturn ONEWAY option we specified with Java2WSDL by examining the generated WSDL, Inventory.wsdl. As shown in Example 8-3, the getDeliveryDate operation has input and output messages, so it is a request-response operation where a reply is required. The updateInventory operation, however, only has an input message, so it is a one-way operation that does not require a response.
Example 8-3: Generated portTypes for Inventory service
... <wsdl:portType name="Inventory"> <wsdl:operation name="getDeliveryDate" parameterOrder="partNo"> <wsdl:input message="intf:getDeliveryDateRequest" name="getDeliveryDateRequest"/> <wsdl:output message="intf:getDeliveryDateResponse" name="getDeliveryDateResponse"/> </wsdl:operation> <wsdl:operation name="updateInventory" parameterOrder="partNo"> <wsdl:input message="intf:updateInventoryRequest" name="updateInventoryRequest"/> </wsdl:operation> </wsdl:portType> ...
Note One-way invocations will not throw any exceptions if the target application is not available.
-
Using the WSDL file created in the previous step, generate the Web services deployment descriptors and classes using the WSDL2Java tool. We used the command shown in Example 8-4.
Example 8-4: Generating server deployment descriptors and classes using WSDL2Java
C:\WebSphere\AppServer\bin\WSDL2Java -verbose -role server -container ejb -output C:\workspace\ITSOTargetAppEJB\ejbModule C:\workspace\ITSOTargetAppEJB\ejbModule\META-INF\wsdl\Inventory.wsdl WSWS3185I: Info: Parsing XML file: C:\workspace\ITSOTargetAppEJB\ejbModule\META-INF\wsdl\Inventory.wsdl WSWS3330I: Info: C:\workspace\ITSOTargetAppEJB\ejbModule\com\ibm\itso\ws\inventory\Inventory.java already exists, WSDL2Java will not overwrite it. WSWS3282I: Info: Generating C:\workspace\ITSOTargetAppEJB\ejbModule\com\ibm\itso\ws\inventory\InventorySoapBindingImpl.java . WSWS3282I: Info: Generating C:\workspace\ITSOTargetAppEJB\ejbModule\com\ibm\itso\ws\inventory\Inventory_RI.java. WSWS3282I: Info: Generating C:\workspace\ITSOTargetAppEJB\ejbModule\com\ibm\itso\ws\inventory\InventoryHome.java. WSWS3282I: Info: Generating C:\workspace\ITSOTargetAppEJB\ejbModule\META-INF\webservices.xml. WSWS3282I: Info: Generating C:\workspace\ITSOTargetAppEJB\ejbModule\META-INF\ibm-webservices-bnd.xmi. WSWS3282I: Info: Generating C:\workspace\ITSOTargetAppEJB\ejbModule\META-INF\ibm-webservices-ext.xmi. WSWS3282I: Info: Generating C:\workspace\ITSOTargetAppEJB\ejbModule\META-INF\Inventory_mapping.xml.
Note The deployment descriptors and class files will not be regenerated when the tool is re-run, unless the existing files have been removed first.
-
Right-click the ITSOTargetAppEJB project and select Refresh. You should see the generated files shown in Figure 8-10.
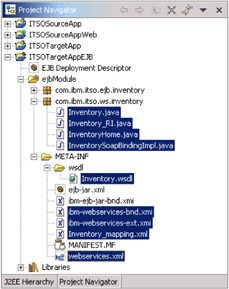
Figure 8-10: WSDL2Java generated filesThe webservices.xml deployment descriptor defines the set of Web services that are being deployed in the Web service-enabled J2EE container.
-
Navigate to ITSOTargetAppEJB → ejbModule → META-INF and edit webservices.xml. Set the ejb-link element to Inventory, as shown in Example 8-5.
Example 8-5: Updating webservices.xml
<?xml version="1.0" encoding="UTF-8"?> <!DOCTYPE webservices PUBLIC "-//IBM Corporation, Inc.//DTD J2EE Web services 1.0//EN" "http://www.ibm.com/webservices/dtd/j2ee_web_services_1_0.dtd"> <webservices> <webservice-description> <webservice-description-name>InventoryService</webservice-description-name> <wsdl-file>META-INF/wsdl/Inventory.wsdl</wsdl-file> <jaxrpc-mapping-file>META-INF/Inventory_mapping.xml</jaxrpc-mapping-file> <port-component> <port-component-name>Inventory</port-component-name> <wsdl-port> <namespaceURI>http://inventory.ws.itso.ibm.com</namespaceURI> <localpart>Inventory</localpart> </wsdl-port> <service-endpoint-interface>com.ibm.itso.ws.inventory.Inventory</service-endpoint-interface> <service-impl-bean> <ejb-link>Inventory</ejb-link> </service-impl-bean> </port-component> </webservice-description> </webservices>
The ejb-link element corresponds to the ejb-name element of the required EJB, as defined in ejb-jar.xml.
-
Export the ITSOTargetApp project to an EAR file:
-
Right click the ITSOTargetApp project and select Export....
-
Select EAR file and click Next.
-
Select the destination you want the EAR file to be exported to, for example:
C:\WebSphere\AppServer\installableApps\ITSOTargetApp.ear
-
Click Finish.
-
-
Run the endptEnabler command line tool to add an HTTP router module to the EAR file. (This step has already been done for you in our sample application.) We used the command shown in Example 8-6.
Example 8-6: Running the endpoint enabler tool
C:\WebSphere\AppServer\bin\endptEnabler WSWS2004I: IBM WebSphere Application Server Release 5 WSWS2005I: Web Services Enterprise Archive Endpoint Enabler Tool. WSWS2007I: (C) COPYRIGHT International Business Machines Corp. 1997, 2003. WSWS2006I: Please enter the name of your EAR file: ITSOTargetApp.ear WSWS2003I: Backing up EAR file to: ITSOTargetApp.ear~ WSWS2016I: Loading EAR file: ITSOTargetApp.ear WSWS2017I: Found EJB Module: ITSOTargetAppEJB.jar WSWS2029I: Enter http router name for EJB Module ITSOTargetAppEJB [ITSOTargetAppEJB_HTTPRouter.war]: ITSOTargetAppWeb.war WSWS2030I: Enter http context root for EJB Module ITSOTargetAppEJB [/ITSOTargetAppEJB]: ITSOTargetApp WSWS2024I: Adding http router for EJB Module ITSOTargetAppEJB.jar. WSWS2036I: Saving EAR file ITSOTargetApp.ear... WSWS2037I: Finished saving the EAR file. WSWS2018I: Finished processing EAR file ITSOTargetApp.ear.
Tip This step is only required if the Web service is implemented in an EJB module.
The endptEnabler tool makes the following changes to the EAR file:
-
Adds a Web module to the EAR file that contains the HTTP router for the EJB module. Also sets the context root for the Web module in application.xml.
-
Adds servlet and servlet-mapping elements to the Web module deployment descriptor. These elements map the Web service endpoint URL to the Web services router servlet, and are added for each Web service in the module.
-
Adds a routerModules element to ibm-webservices-bnd.xmi in the EJB module.
| Tip | If you are using WebSphere Studio V5.1, you can right-click the EAR project, and select Web Services → Endpoint Enabler from the pop-up menu. |
The EAR file is now ready to deploy in the IBM WebSphere Application Server V5.0.2 runtime.
| Note | The WebSphere V5.0.2 Web service deployment tools will not append new Web services to existing Web services deployment descriptors. If you need to deploy more than one Web service in a module, you will need to manually merge the Web service deployment descriptors. |
8.5.2 Web service-enabling the source application
Figure 8-11 shows the steps involved in Web services-enabling the source (client) application.
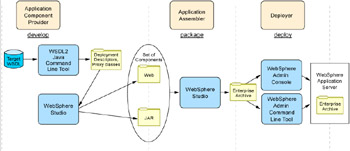
Figure 8-11: Web service development for source application
Let's walk through the process shown in Figure 8-11 for our source application.
When developing a Web services client, you must have access to a server application. This could be developed by a separate department within your organization, which will supply the WSDL file defining their server. In our example, we use the target application described in 8.5.1, "Web service enabling the target application" on page 161.
Web service-enabling our source application is simply a matter of obtaining the WSDL file for the target Web service, and running the WSDL2Java tool to generate the required deployment descriptors and proxy classes:
-
Copy the target application WSDL file to the source application Web module:
-
Using WebSphere Studio, switch to the J2EE Perspective and click the Project Navigator tab.
-
Navigate to the ITSOSourceAppWeb → WebContent → WEB-INF folder.
-
Right-click the WEB-INF folder and select New → Folder. Set the folder name to wsdl.
-
Copy the target application WSDL file, Inventory.wsdl, from the ITSOTargetAppEJB/ejbModule/META-INF/wsdl folder to Inventory.wsdl in the new ITSOSourceAppWeb/WebContent/WEB-INF/wsdl folder.
-
-
Open a command window.
-
Using the WSDL file created in step 1, generate the Web service client deployment descriptors and classes using the WSDL2Java tool. We used the command shown in Example 8-7.
Example 8-7: Generating client deployment descriptors and classes using WSDL2Java
C:\WebSphere\AppServer\bin\WSDL2Java -verbose -role client -container web -output C:\workspace\ITSOSourceAppWeb\WebContent C:\workspace\ITSOSourceAppWeb\WebContent\WEB-INF\wsdl\Inventory.wsdl WSWS3185I: Info: Parsing XML file: C:\workspace\ITSOSourceAppWeb\WebContent\WEB-INF\wsdl\Inventory.wsdl WSWS3282I: Info: Generating C:\workspace\ITSOSourceAppWeb\WebContent\com\ibm\itso\ws\inventory\InventoryService.java. WSWS3282I: Info: Generating C:\workspace\ITSOSourceAppWeb\WebContent\com\ibm\itso\ws\inventory\InventoryServiceLocator.java . WSWS3282I: Info: Generating C:\workspace\ITSOSourceAppWeb\WebContent\com\ibm\itso\ws\inventory\Inventory.java. WSWS3282I: Info: Generating C:\workspace\ITSOSourceAppWeb\WebContent\com\ibm\itso\ws\inventory\InventorySoapBindingStub.jav a. WSWS3282I: Info: Generating C:\workspace\ITSOSourceAppWeb\WebContent\WEB-INF\webservicesclient.xml. WSWS3282I: Info: Generating C:\workspace\ITSOSourceAppWeb\WebContent\WEB-INF\ibm-webservicesclient-bnd.xmi. WSWS3282I: Info: Generating C:\workspace\ITSOSourceAppWeb\WebContent\WEB-INF\ibm-webservicesclient-ext.xmi. WSWS3282I: Info: Generating C:\workspace\ITSOSourceAppWeb\WebContent\WEB-INF\Inventory_mapping.xml.
-
In WebSphere Studio, move the generated Java source files from the Web module's WebContent folder to its JavaSource folder:
-
Right-click the ITSOSourceAppWeb project and select Refresh from the pop-up menu. The generated files should now appear in the Studio workspace.
-
Move the com.ibm.itso.ws.inventory package in the ITSOSourceAppWeb\WebContent folder to the ITSOSourceAppWeb\JavaSource folder.
The generated files are highlighted in Figure 8-12.

Figure 8-12: Generated client binding files and deployment descriptorsThe webservicesclient.xml deployment descriptor defines the JNDI name for accessing the Web service and the associated service endpoint interface to be used.
-
-
Add client application code to invoke the Web service on the target application.
To invoke getDeliveryDate on the target application, we added the code shown in Example 8-8. We added this code to the com.ibm.itso.command.WebServiceBean command bean in our ITSOSourceAppWeb module.
Example 8-8: Web service client code for getDeliveryDate
public String getDeliveryDate(String partNumber) throws Exception { String deliveryDate = null; try { Context ctx = new InitialContext(); InventoryService service = (InventoryService) ctx.lookup( "java:comp/env/service/InventoryService"); // Request the Service Endpoint from the Service Inventory port = service.getInventory(); // Get the quote deliveryDate = port.getDeliveryDate(partNumber); } catch (Exception e) { //... } return deliveryDate; } -
Test the source and target applications in the WebSphere Studio Application Developer V5.1 test environment.
Note If you want to go ahead and test the RPC style Web service before you implement the document style Web service (described in Chapter 9, "Using document style Web services" on page 183) you need to comment out the following imports and methods in com.ibm.itso.ejb.inventory.Inventory and com.ibm.itso.ejb.inventory.InventoryBean in the ITSOTargetAppEJB module in the sample application:
import com.ibm.itso.ws.inventory.reply.InventoryReply import com.ibm.itso.ws.inventory.request.InventoryRequest public void updateInventory(InventoryRequest reqMsg) public InventoryReply getDeliveryDate(InventoryRequest reqMsg)
-
Deploy the source and target applications in your IBM WebSphere Application Server V5.0.2 runtime environment to try the applications on separate machines.
Figure 8-13 shows the results page for our Get Delivery Date use case.
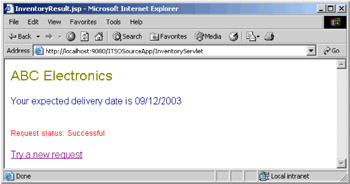
Figure 8-13: Get delivery date results page
Changing the Web service endpoint URL
By default, the endpoint proxy class (InventoryServiceLocator in our example) will use the endpoint address specified in the WSDL file when the proxy class was originally generated. It is likely that the endpoint address used will change over time, as the client application moves though the development, test, and production environments, for example. You can set the endpoint address in several ways:
-
When getting an instance of the generated endpoint class from the Service interface, you can optionally pass an endpoint address that will override the default address obtained from the WSDL file. Compare the following approach with that used in Example 8-8 on page 169:
// Request the Service Endpoint from the Service // overriding the default endpoint address Inventory port = service.getInventory(new java.net.URL( "http://localhost:9080/ITSOTargetApp/services/Inventory"));
-
When deploying your client application to IBM WebSphere Application Server V5.0.2, you can specify the Deploy WebServices option, as shown in Figure 8-14.
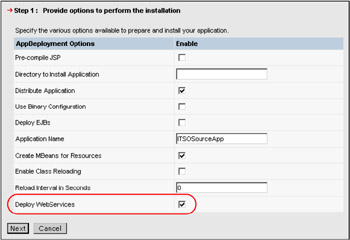
Figure 8-14: Deploying Web services using the WebSphere administrative consoleWebSphere will regenerate the deployment code based on the Web services client deployment descriptors, updating it with the current endpoint address from the WSDL file. Similar to EJB deployment, this only needs to be performed when the deployment details have changed.
Example 8-9 shows how the endpoint address is specified in the WSDL file for our Inventory service.
Example 8-9: Setting the endpoint address in the WSDL file
... <wsdl:service name="InventoryService"> <wsdl:port binding="intf:InventorySoapBinding" name="Inventory"> <wsdlsoap:address location="http://localhost:9080/ITSOTargetApp/services/Inventory"/> </wsdl:port> </wsdl:service> ...
The second option is recommended in most cases. Using this method, the endpoint address can be specified at application packaging/deployment time using the Web services deployment features of the application server.
8.5.3 Monitoring SOAP messages
You can trace the XML messages exchanged between a Web service client and the server. In this section we look at two tools:
-
The TCPMon tool provided with IBM WebSphere Application Server V5.0
-
The TCP/IP Monitor Server provided with WebSphere Studio Application Developer
WebSphere TCPMon tool
The TCPMon tool allows SOAP messages to be traced by redirecting messages from one port to another, displaying the contents as they go. The WebSphere application server normally listens on port 9080. To trace messages sent to the application server, TCPMon can be configured, for example, to listen on port 9088 and redirect messages to 9080. The client is modified to use port 9088 to access the Web service.
This tool is provided with IBM WebSphere Application Server V5.0.2. It allows you to view the contents of the SOAP messages exchange between the source and target applications, as shown in Figure 8-15.
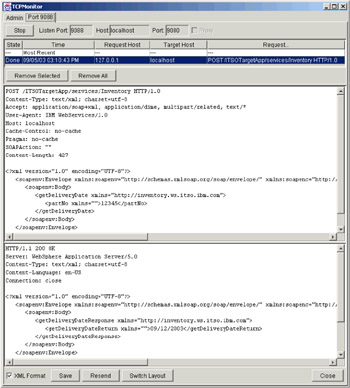
Figure 8-15: Tracing SOAP messages using TCPMon
You can start TCPMon from a command window as follows:
set CLASSPATH=%CLASSPATH%;<WAS_HOME>\lib\webservices.jar <WAS_HOME>\java\bin\java com.ibm.ws.webservices.engine.utils.tcpmon
For further details on TCPMon, see the InfoCenter article Tracing Web services messages at:
-
http://www.ibm.com/software/webservers/appserv/infocenter.html
The SOAP request for our one-way updateInventory() method is shown in Example 8-10.
Example 8-10: SOAP request for updateInventory
POST /ITSOTargetApp/services/Inventory HTTP/1.0 Content-Type: text/xml; charset=utf-8 Accept: application/soap+xml, application/dime, multipart/related, text/* User-Agent: IBM WebServices/1.0 Host: localhost Cache-Control: no-cache Pragma: no-cache SOAPAction: "" Content-Length: 427 <?xml version="1.0" encoding="UTF-8"?> <soapenv:Envelope xmlns:soapenv="http://schemas.xmlsoap.org/soap/envelope/" xmlns:soapenc="http://schemas.xmlsoap.org/soap/encoding/" xmlns:xsd="http://www.w3.org/2001/XMLSchema" xmlns:xsi="http://www.w3.org/2001/XMLSchema-instance"> <soapenv:Body> <updateInventory xmlns="http://inventory.ws.itso.ibm.com"> <partNo xmlns="">12345</partNo> </updateInventory> </soapenv:Body> </soapenv:Envelope>
The HTTP response for our updateInventory() method is shown in Example 8-11. There is no SOAP response envelope for the one-way invocation of updateInventory.
Example 8-11: SOAP response for updateInventory
HTTP/1.1 200 OK Server: WebSphere Application Server/5.0 Content-Type: text/html; charset=ISO-8859-1 Content-Language: en-US Content-Length: 0 Connection: close
A response appears because the HTTP protocol requires an acknowledgement to be returned to the sender. However, this acknowledgement simply confirms that the one-way call was successfully received by the HTTP transport mechanism, for "out-bound" transmission. There is no guarantee that the call was successfully delivered to the final recipient, nor can there be one, by definition.
The SOAP request for our getDeliveryDate() method is shown in Example 8-12.
Example 8-12: SOAP request for getDeliveryDate
POST /ITSOTargetApp/services/Inventory HTTP/1.0 Content-Type: text/xml; charset=utf-8 Accept: application/soap+xml, application/dime, multipart/related, text/* User-Agent: IBM WebServices/1.0 Host: localhost Cache-Control: no-cache Pragma: no-cache SOAPAction: "" Content-Length: 427 <?xml version="1.0" encoding="UTF-8"?> <soapenv:Envelope xmlns:soapenv="http://schemas.xmlsoap.org/soap/envelope/" xmlns:soapenc="http://schemas.xmlsoap.org/soap/encoding/" xmlns:xsd="http://www.w3.org/2001/XMLSchema" xmlns:xsi="http://www.w3.org/2001/XMLSchema-instance"> <soapenv:Body> <getDeliveryDate xmlns="http://inventory.ws.itso.ibm.com"> <partNo xmlns="">12345</partNo> </getDeliveryDate> </soapenv:Body> </soapenv:Envelope>
The SOAP response for the getDeliveryDate() method is shown in Example 8-13.
Example 8-13: SOAP response for getDeliveryDate
HTTP/1.1 200 OK Server: WebSphere Application Server/5.0 Content-Type: text/xml; charset=utf-8 Content-Language: en-US Connection: close <?xml version="1.0" encoding="UTF-8"?> <soapenv:Envelope xmlns:soapenv="http://schemas.xmlsoap.org/soap/envelope/" xmlns:soapenc="http://schemas.xmlsoap.org/soap/encoding/" xmlns:xsd="http://www.w3.org/2001/XMLSchema" xmlns:xsi="http://www.w3.org/2001/XMLSchema-instance"> <soapenv:Body> <getDeliveryDateResponse xmlns="http://inventory.ws.itso.ibm.com"> <getDeliveryDateReturn xmlns="">09/12/2003</getDeliveryDateReturn> </getDeliveryDateResponse> </soapenv:Body> </soapenv:Envelope>
TCP/IP Monitor Server
The TCP/IP Monitor Server provided with WebSphere Studio Application Developer (shown in Figure 8-16) also allows tracing of SOAP messages. It works in a similar way to the WebSphere TCPMon tool. To use the TCP/IP Monitor Server, create a new Server and Configuration and select Other → TCP/IP Monitor Server for the server type.
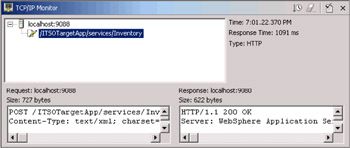
Figure 8-16: Tracing SOAP messages using WebSphere Studio TCP/IP Monitor Server
|
| < Day Day Up > |
|
EAN: N/A
Pages: 139