| Although we're going to start small, once we start designing data structures and building Java classes and database tables that represent them, along with all the configuration and control files to glue them together and make useful things happen, we're going to end up with a lot of files. So let's start out with a good organization from the beginning. As you'll see in this process, between the tools you've downloaded and their supporting libraries, there are already a significant number of files to organize. 1.4.1 Why do I care? If you end up building something cool by following the examples in this book, and want to turn it into a real application, you'll be in good shape from the beginning. More to the point, if you set things up the way we describe here, the commands and instructions we give you throughout the examples will make sense and actually work. Many examples also build on one another throughout the book, so it's important to get on the right track from the beginning. If you want to skip ahead to a later example, or just avoid typing some of the longer sample code and configuration files, you can download 'finished' versions of the chapter examples from the book's web site. These downloads will all be organized as described here. 1.4.2 How do I do that? Here's how: -
Pick a location on your hard drive where you want to play with Hibernate, and create a new folder, which we'll refer to from now on as your project directory . -
Move into that directory, and create subdirectories called src, lib , and data . The hierarchy of Java source and related resources will be in the src directory. Our build process will compile it into a classes directory it creates, as well as copy any runtime resources there. The data directory is where we'll put the HSQLDB database, and any Data Definition Language (DDL) files we generate in order to populate it. The lib directory is where we'll place third-party libraries we use in the project. For now, copy the HSQLDB and Hibernate JAR files into the lib directory. -
If you haven't already done so, expand the HSQLDB distribution file you downloaded earlier in this chapter. You'll find hsqldb.jar in its lib directory; copy this to your own project lib directory (the lib directory you just created in step 2). -
Similarly, locate the lib directory in the Hibernate directory you expanded in the previous section, and copy all of its contents into your own project lib directory (you'll notice that Hibernate relies on a lot of other libraries; conveniently, they're included in its binary distribution so you don't have to hunt them all down yourself). -
Then copy Hibernate itself, in the form of the hibernate2.jar file found at the top level of the distribution, into your project lib directory. -
Installing the Hibernate Extensions is very similar. Locate the tools/lib directory inside the Hibernate Extensions directory you expanded, and copy its contents into your own lib directory, so the extensions will be able to access the libraries they rely on. -
Finally, copy the extensions themselves , which are in the file hibernate-tools.jar (found in the tools directory), into your lib directory. -
The example classes we're going to create are all going to live in the com.oreilly.hh ( harnessing Hibernate) package, so create these directories under the src directory. On Linux and Mac OS X, you can use: mkdir -p src/com/oreilly/hh from within your project directory to accomplish this in one step. NOTE There are lots of pieces to copy into place here; attention to detail will be rewarded. Luckily, you can reuse your lib directory in other Hibernate projects. At this point your project directory should be structured as shown in Figure 1-1. Figure 1-1. Initial project directory contents 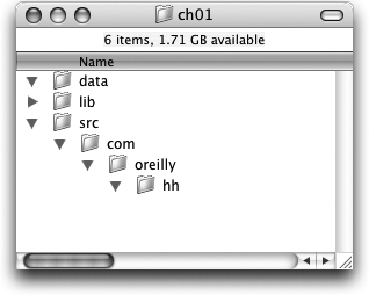
The lib directory is collapsed because it contains so much that the screen shot wouldn't fit otherwise . After following the above steps, using the release of Hibernate available at the time of this writing, it contains the following files: README.txt, ant-1.5.3.jar, ant-optional-1.5.3.jar, apache.license.txt, c3p0- 0.8.3.jar, c3p0.license.txt, cglib-2.0-rc2.jar, commons-collections-2.1.jar, commons-dbcp-1.1.jar, commons-lang-1.0.1.jar, commons-logging-1.0.3.jar, commons-pool-1.1.jar, concurrent-1.3.2.jar, connector.jar, connector. licence.txt, dom4j-1.4.jar, ehcache-0.6.jar, hibernate-tools.jar, hibernate2.jar, hsqldb.jar, jaas.jar, jaas.licence.txt, jboss-cache.jar, jboss-common.jar, jboss-jmx.jar, jboss-system.jar, jcs-1.0-dev.jar, jdbc2_0- stdext.jar, jdbc2_0-stdext.licence.txt, jdom.jar, jdom.license.txt, jgroups- 2.2.jar, jta.jar, jta.licence.txt, junit-3.8.1.jar, log4j-1.2.8.jar, odmg-3. 0.jar, oscache-2.0.jar, proxool-0.8.3.jar, swarmcache-1.0rc2.jar, xalan-2.4. 0.jar, xerces-2.4.0.jar, xml-apis.jar.
1.4.3 A quick test Before we get into actually rousing Hibernate to do some useful work, it's worth checking that the other supporting pieces are in place and ready to use. Let's start out with the Ant configuration file we'll be using throughout this project, tell Ant where we've put the files we're using, and have it fire up the HSQLDB graphical database interface. This will be useful later when we want to look at the actual data that Hibernate has been creating for us, and it's reassuring right now as a sanity check that nothing is amiss and we're ready to move forward. Fire up your favorite text editor and create a file named build.xml at the top level inside your project directory (the folder ch01 in Figure 1-1). Type the content shown in Example 1-1 into the file. Example 1-1. Ant build file 1 <?xml version="1.0"?> 2 <project name="Harnessing Hibernate: The Developer's Notebook" 3 default="db" basedir="."> 4 <!-- Set up properties containing important project directories --> 5 <property name="source.root" value="src"/> 6 <property name="class.root" value="classes"/> 7 <property name="lib.dir" value="lib"/> 8 <property name="data.dir" value="data"/> 9 10 <!-- Set up the class path for compilation and execution --> 11 <path id="project.class.path"> 12 <!-- Include our own classes, of course --> 13 <pathelement location="${class.root}"/> 14 <!-- Include jars in the project library directory --> 15 <fileset dir="${lib.dir}"> 16 <include name="**/*.jar"/> 17 </fileset> 18 </path> 19 20 <target name="db" description="Runs HSQLDB database management UI 21 against the database file--use when application is not running"> 22 <java classname="org.hsqldb.util.DatabaseManager" 23 fork="yes"> 24 <classpath refid="project.class.path"/> 25 <arg value="-driver"/> 26 <arg value="org.hsqldb.jdbcDriver"/> 27 <arg value="-url"/> 28 <arg value="jdbc:hsqldb:${data.dir}/music"/> 29 <arg value="-user"/> 30 <arg value="sa"/> 31 </java> 32 </target> 33 </project>
 | Take care with punctuation in typing this, and pay special attention to self-closing XML tags (those which end in '/>' rather than just '>'). If you get it wrong, you'll be rewarded with parse errors when you run Ant. Again, you can download these files from the book's web site if you don't need the typing practice. | |
If you haven't seen an Ant build file before, here's a whirlwind introduction to help orient you. The documentation at ant.apache.org/manual/index.html is quite good if you want a bit more detail. The first line is simply a declaration that the type of the file is XML. If you've worked with XML in other contexts, you're used to seeing this. If not, you'll see it again. (Ant doesn't currently require this, but most XML parsers do, so it's a good habit to develop.) Ant's build files always contain a single project definition, which begins in this file on line 2. The default attribute tells Ant which target (defined below) to build if you don't specify any on the command line. And the basedir attribute determines the 'directory relative to which all path calculations are done. We could have left this out since the default is to treat paths as being relative to the directory in which the build.xml is located, but it's a good habit to be explicit about fundamental settings. The next bit, starting at line 4, defines four properties that we can use by name throughout the rest of the build file. Essentially, we're defining symbolic names for the important directories used for different aspects of the project. This isn't necessary ( especially when the directories are named so simply), but it's another good practice. For one thing, it means that if you need to change where one of these directories is located, you only need to fix one place in the build file, rather than conducting an error-prone search-and-replace . The class path section starting at line 10 serves a more obviously useful purpose. This feature alone is why I almost never start Java projects without setting up at least a simple Ant build for them. When you're using a lot of third-party libraries, which you're going to be doing for any serious project, there's a whole lot that needs to go into your class path, and you have to be sure to set it equivalently at compile time and runtime. Ant makes this very easy. We define a path , which is kind of like a property, but it knows how to parse and collect files and directories. Our path contains the classes directory, in which we're going to be compiling our Java source (this directory doesn't exist yet; we'll add a step to the build process that creates it in the next chapter), and it also contains all JAR files that can be found in our library directory. This is exactly what we need for compiling and running. NOTE Ant's understanding and manipulation of Java paths and class hierarchies is a big plus. It's worth learning in some depth. The syntax on line 13 looks like punctuation soup, but it can be broken down into pieces that make sense. Ant lets you use substitution to insert variable values into your rules. Where you see something like ' ${class.root} ' this means 'look up the value of the variable named class.root and stick it here.' So, given the definition of class.root on line 6, it's as if line 12 contained ' <pathelement location="classes"/> '. So why do this? It lets you share a value throughout the file, so if you ever need to change it there's only one place to worry about. In large, complex projects this kind of organization and management is crucial. Finally, with all this preamble out of the way we can define our first target at line 20. A target is just a series of tasks that need to be executed in order to accomplish a project goal. Typical targets do things like compile code, run tests, package things up for distribution, and the like. Tasks are chosen from a rich set of capabilities built-in to Ant, and third-party tools like Hibernate can extend Ant to provide their own useful tasks, as we'll see in the next chapter. Our first target, db , is going to run HSQLDB's graphical interface so we can look at our example database. We can accomplish that using Ant's built-in java task, which runs a Java virtual machine for us, with whatever starting class, arguments, and properties we'd like. NOTE If your database GUI pops up and vanishes, doublecheck the 'fork' attribute of your 'java' task. In this case, the class we want to invoke is org.hsqldb.util.DatabaseManager , found in hsqldb.jar in our project library directory. Setting the fork attribute to 'yes' tells Ant to use a separate virtual machine, which isn't the default since it takes a little longer and isn't usually necessary. In this case it's important since we want the database manager GUI to stay around until we dismiss it, and this doesn't happen when it runs in Ant's own VM. You can see how we're telling the java task about the class path we've set up above; this will be a common feature of our targets. Then we supply a bunch of arguments to the database manager, telling it to use the normal HSQLDB JDBC driver, where to find the database, and what username to use. We've specified a database called 'music' in the data directory. That directory is currently empty, so HSQLDB will create the database the first time we use it. The user sa is the default 'system administrator' user for new databases, and it's configured not to need a password initially. Obviously, if you plan to make this database available over the network (which HSQLDB is capable of doing) you'll want to set a password. We aren't doing any such fancy things, so we can leave it out for now. Let's try it! Save the file and from a shell (command) prompt running in your top-level project directory (where you put build.xml ) type the command: ant db (or, since we've made db the default target, you can just type ant ). Once Ant starts running, if all goes well, you'll see output like this: Buildfile: build.xml db: A moment later you should see the HSQLDB graphic interface, which will look something like Figure 1-2. There's nothing in our database yet, so there's not much to see beyond whether the command worked at all. The tree view at the top left of the window is where the various tables and columns in our database can be explored. For now, just verify that the top reads ' jdbc:hsqldb:data/music. ' You can explore the menus a bit if you like, but don't make any changes to the database. Once you're done, choose File  Exit. The window will close, and Ant will report: Exit. The window will close, and Ant will report: BUILD SUCCESSFUL
Total time: 18 minutes 3 seconds Figure 1-2. The HSQLDB database manager interface 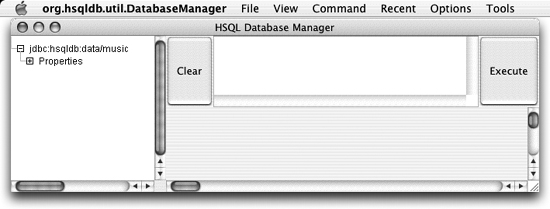
The 'Total time' reflects how long you were running the database manager, so it will vary. At this point, if you look in the data directory, you'll find that HSQLDB has created some files to hold the database: music.properties music.script You can even look at the contents of these files. Unlike most database systems, HSQLDB stores its data in a human-readable format. The properties file contains some basic settings, and the data itself goes in the script file in the form of SQL statements. Right now all you'll find is the basic definitions that get entered by default, but as later examples start populating the database, you'll be able to see DDL and SQL statements that create the tables and data. This can be a useful debugging feature for basic sanity checks, even faster than firing up the graphical interface and running queries. NOTE The fact that you can read HSQLDB's database files is weird but fun. 1.4.4 What just happened ? Well, to be honest, you jumped through a lot of hoops to find, download, expand, and organize a bunch of software. It was probably pretty tedious and exacting. But you're now in a great position to start working with Hibernate and, as you'll see in the next chapter, that means progress will start happening very quickly. You'll be able to see Java code written for you! Database schemas created out of thin air (or, at least, out of the same XML mapping table that produced the Java)! Real tables and data appearing in the HSQLDB manager interface! (Or, at least, genuine faux sample data....) Sound exciting? Well, compared to what you've done so far anyway? Then let's dig in to awakening the power of Hibernate. 1.4.5 Why didn't it work? If, on the other hand, you saw no database manager window appear, and instead were greeted by error messages, try to figure out if they're due to problems in the build file, problems in the way you've set up Ant or your project hierarchy, or something else. Double-check that all the pieces are arranged and installed as shown earlier, and consider downloading the sample code if you are having trouble with a version you typed in yourself. |